At work, many people have to deal with the need to convey information to a mass audience. Teachers, managers, marketers, scientists in the age of modern technology give their reports using multimedia materials on a large screen using a projector. And the situation is very unpleasant when the lecture is about to start, but the equipment is not connected. Usually the causes and solutions to the problem are very simple; it is enough to know what to do if your computer or laptop does not see the projector.
There are two fundamental points:
- The situation occurred for the first time when connecting a new projector.
- The problem arose suddenly, everything worked before.
In the first case, the reason is most likely due to incorrect connection of the equipment. In the second case, the situation arose due to some changes in the computer’s software environment or a problem with the projector itself.
Fixing the problem connecting the projector to the computer
If you connect a new projector and see the message “no signal,” it means you did something wrong. Please note the following points:
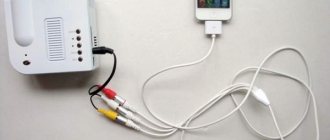
- Connection procedure. First you need to connect the device, and then turn on the computer or laptop itself. The connection itself is usually made via a VGA connector or an HDMI cable, which provides a clearer image. There are projectors that work via WI-FI and wireless ones with special sensors for the device and the computer. In all these cases, read the instructions for the equipment and make sure that you are doing everything correctly and in the right order.
If there is no signal from the projector and your computer does not see it, reboot the system; it may simply not be able to recognize the new device.
- Correct settings. If you are connecting to a system unit and the screen is the only monitor, then there may be a problem with the set screen resolution. You must set the values supported by your projector model in advance. You can find them out from the instructions or on the box.
If the laptop cannot see the projector and there is no signal from it, follow these steps:
- Go to the Control Panel and go to the Screen Settings section. Alternatively, right-click on your desktop and select Screen Resolution.
- Set the desired options. There is also a “Find” item here so that the system searches for the second monitor, in your case, the screen.
- In the “Display” section of the control panel, you can select “Connect to a projector”, then you will be offered four display options.
Check if the display mode is set correctly:
- Computer only - data is displayed only on a computer or laptop monitor.
- Duplicate - the picture is the same on both screens.
- Expand—part of the work area will be visible only to you, and part will be visible to both you and the audience.
- Projector only - the image is displayed only for viewers.
Make sure you don't have the first mode selected. Fix it and everything will work.
How to turn off the projector
After completing the presentation, the projector should be handled with the utmost care; do not mindlessly pull out all the wires and press the buttons. First, you need to close all documents and presentation tabs on your computer. Then return the screen extension to the desired position. Disable settings that display or hide images from the screen to the projector.
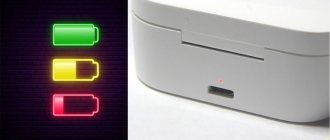
You need to turn off the projector step by step, just like you turned it on. The off button is pressed after making sure that all the lights are extinguished. Press the button once until the fan stops working . Only then can you disconnect the projector from the power supply.
After turning off, be sure to close the screen curtain to prevent dust from getting on the monitor itself. For preventative purposes, the screen itself can be wiped with a soft cloth soaked in alcohol or vodka. For these purposes, you can find special wipes or liquids for cleaning the monitor in stores.
The remote control and port can also be wiped with alcohol. Timely disinfection and cleaning of the projector will preserve its operation for a long time. We carefully wind up the wire cables, making sure that there are no kinks or creases.
After the devices are completely turned off, carefully disconnect all wires from all devices and put them in the box with the projector.
It is worth remembering that a projector is a very necessary device for modern presentations. Therefore, it needs proper care and the correct system of use. This device is very fragile and you should treat it with care and clean all its elements in a timely manner. Then it will serve you for a long time and will become an indispensable assistant during presentations.
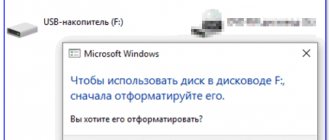
System problems
Sometimes it happens that the laptop suddenly stops seeing the projector, although there were no problems before. If this happened after reinstalling the operating system, there was probably a problem with some driver. Go to Device Manager and look for your projector in the list. Problematic equipment is highlighted with a yellow exclamation mark.
If the system has not been reinstalled, run an antivirus scan. The drivers may have crashed due to malware. After treatment, download the necessary drivers from the official website of the developer.
Downloaded drivers are usually installed automatically, but you can do this manually through Device Manager. Right-click on the unidentified hardware and select Update Driver, selecting the Manual method and specifying the location of the downloaded installation files. Sometimes you have to remove the old driver in order to successfully install the new one.
But still, most often the reason that the computer does not see the projector lies on the surface and is caused by simple inattention when connecting. Modern equipment is created with the simplest possible control and connection method. Carefully read the tips discussed above; they most often contain a solution to the problem.
Connecting the Projector to a PC
The guide presented in this article is suitable for connecting the projector to both a PC and a laptop. But keep in mind that not all devices are equipped with the necessary video inputs and outputs by default.
Step 1: Connection
The process of connecting the projector should not cause any difficulties; you just need to follow the instructions we provide. Do not forget that both devices must first be disconnected from the high-voltage network.
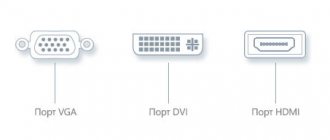
- Locate one of the following connectors on the projector and your computer:
- VGA;
- HDMI;
- DVI.
Ideally, both devices should have the same type of connector.
Note: HDMI is the most optimal, as it guarantees high quality video signals.
Some models can be used wirelessly by default, working via WiFi.
At an electronics store, purchase a cable that has identical connectors on both sides.
If there is only one type of connector on the projector and PC, you will have to get a suitable adapter.
Do the same on your computer and make sure the wires are connected tightly. In the case of a VGA cable, be sure to secure the connector using standard clamps.
After completing the wire connection, turn on the power on both devices, after which you can proceed to setting them up.
Step 2: Setup
When connecting a computer to a projector, it is necessary not only to connect the equipment correctly, but also to configure it for further use. In some cases, the configuration is carried out automatically; just turning them on is enough.
Projector
- As mentioned above, projectors usually automatically configure themselves to transmit video signals. You will be able to know that the connection has been successful if the projector begins to display an image from the computer after turning on.
Some equipment models are equipped with a control panel with a “Source” button, when pressed, the search for a video signal begins, and when it is detected, the picture from the main monitor is duplicated on the wall.
Sometimes the projector remote control may have several buttons corresponding to a particular connection interface.
There are also projectors with their own menu for settings, the parameters of which should be set based on the instructions included in the kit.
Screen resolution
- Review the specifications of the projector you are using, particularly the supported screen resolution.
On the desktop, right-click and select “Screen Resolution”.
Through the “Display” list, select the projector model.
In the graphics settings, change the value according to the requirements of the connected equipment.
On Windows 10, there are a few additional steps required.
- If you did everything correctly, the image quality from the projector will be stabilized.
Display Mode
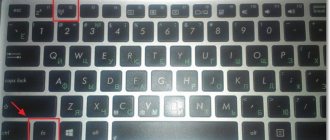
- To change the way the projector operates, press the “Win+P” key combination on your keyboard.
The keyboard shortcut is universal for versions of Windows OS higher than the seventh.
The interface with display mode settings may differ from what we presented.
Duplicate – the image from the main monitor will be copied by the projector;
In Windows 10, the names of the items are slightly different from those in previous versions.
If you are using a laptop, there will be an additional button on the keyboard (Fn) that allows you to instantly switch the display mode.
By following these steps, you can easily achieve a positive result by successfully connecting and setting up the projector.
If all else fails
Do not forget that a modern digital projector is a rather complex electronic device that can also break down. If you have tried all the above steps - checked the connection is correct, installed the drivers, and the projector is still not recognized and does not work, it is useful to check it too.
To do this, just connect the projector to another computer, of course, installing the drivers, and if it still does not work, then it is likely that the problem is in the projector itself - the firmware may crash, some circuit element may burn out, and much more . We simply throw away a flash drive that is not recognized, and the device will have to be sent in for repair.
Projector Settings
It’s easy to check if the connection between the projector and laptop (computer) is correct: immediately after connecting the devices, the image from the monitor will be projected onto the screen. If this does not happen, you need to move on to setting it up:
- Some devices have a remote control included in the list of accessories. To search for a signal, you need to find the “” button on it. Source" and click on it.
- Also, there are remote controls with a function for selecting the output through which the laptop is connected.
- The third option is to use built-in projector settings using the documentation that comes with the device.
Typically there is no need to configure anything on the projector. Yes, in the future you can change the color rendering and change other parameters, but the image should be displayed immediately in any case.
“Twisted pair” cable categories with characteristics + summary table
Features of working with PowerPoint
Often, a projector is the best option for demonstrating presentations from Microsoft PowerPoint. In this case, for the correct display configuration, you will need to perform a few more steps, namely, decide on the display to display:
- You need to change the connection settings to the projector and change its parameters.
- After preparation, go to the section “Slide show", on the menu "Show presentation on…" Select the desired display device from the list.
What are DVI and VGA - features and differences
It is worth noting that this method displays the presentation directly on the screen. If necessary, you can simply output