Necessary equipment
To watch digital broadcasting, as opposed to analogue, you will need a receiver that decodes the signal. Many modern TV models (Philips, Samsung, Sony, Toshiba, LG, Panasonic, etc.) are equipped with such a unit. To make sure of this, you should refer to the user manual, this brief instruction is included with each product. At the same time, check whether the built-in tuner supports the DVB-T2 format; if not, you will need to purchase a receiver.
Receiver Supra
Depending on the set of functionality, the cost of such a device can vary from 800 to 3000 rubles. Note that many digital cable television providers provide receivers for rent to subscribers.
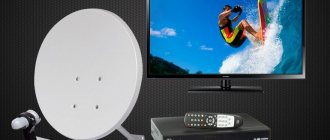
In addition, we will need to receive a digital signal. In cities and large towns this will not be a problem; just contact your local providers. Residents of rural areas will need to install a UHF antenna or satellite dish. The latter is preferable, since it is not a fact that your home is within the coverage area of the nearest digital repeater. In addition, the option with a satellite dish provides a wider selection of television channels.
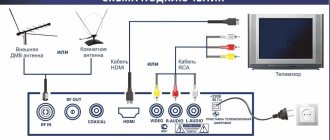
How to connect the set-top box to the TV.
To connect to a TV, the digital DVB-T2 receiver has several output connector options.
The most common is the RCA plug, the familiar “bells”, these bells can be connected to almost any TV. The signal transmitted through RCA is analog, i.e. The digital signal received from the air is converted to analog.
The HDMI connector is also available on all digital receivers, unlike RCA; a digital signal is transmitted via HDMI; this connection is preferable. Many modern TVs that do not have their own digital tuners can be connected via HDMI
Standard equipment for digital set-top box
Let's look at what is included in the standard set of the receiver; this information may be useful when connecting it to a television receiver.
Standard equipment for digital set-top box
Let's list what is shown in the figure:
- A – user manual, we recommend that you carefully read this manual to get a complete understanding of all the functionality of the device and its connection to the TV and antenna.
- B – “Tulip” cable (RCA) with characteristic connectors allows you to connect the set-top box to almost all modern models of television receivers.
- C – a device for decrypting and converting a digital signal into an analogue one (receiver).
- D – packing box.
- E – remote control for the device.
- F – batteries for the remote control.
- G – network adapter for connecting the device to a household power supply.
- H – warranty service coupon.
The basic configuration may differ slightly from what is shown in the photo (for example, the “Tulip” is replaced by an HDMI cable).
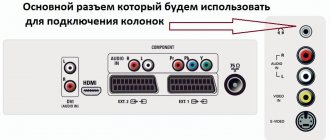
Connectors and their purpose
There are various connectors on the back of the device; we’ll briefly explain what they are for.
Figure 3. Connectors of the SDT-96 receiver from the SUPRA range
Explanation of the picture:
- Antenna output.
- Connector for connecting a satellite dish, UHF antenna or cable from a local provider.
- A socket for an HDMI cable allows you to connect a monitor or TV equipped with such an input (digital output can transmit sound and image).
- Sockets for the “Tulip” cable (transmits an analog video signal, as well as stereo sound).
Some devices may be additionally equipped with a “SCART” connector; a TV, VCR or DVD player with a video recording function can be connected to it.
Receiver with SCART connector
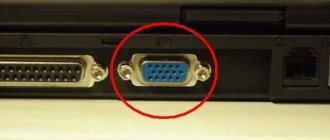
In addition, you may find devices that have D-SUB (Fig. 5) or DVI outputs instead of an HDMI jack.
Fig 5. Digital set-top box with standard VGA (D-SUB) output
Please note that such interfaces do not transmit sound, so an additional connection using “tulips” will be required to transmit it.
Connectors and their purpose
Fig 5 Connectors on new TVs
Scart
A scart, also called a Euro connector, can be used to connect devices such as home theater. It is one of the connectors with a long history. Thanks to it, it is possible to connect a digital TV set-top box to an old TV.
Tulip RCA
RCA, popularly known as tulip, is an abbreviation for the name Radio Corporation of America, which introduced this connector to the market in the forties for connecting monophonic players to amplifiers. This connection uses asymmetric signals, is vulnerable to potential differences between devices, and is susceptible to electromagnetic interference.
YPbPr and YCbCr component interfaces
YPbPr (so-called component video) is an analogue image standard that until recently was popular in professional applications. Recently it has fallen out of use for digital television. The essence of this standard is to transmit a signal using three components (components), transmitted by independent cables, to reduce the impact of external interference and signal loss.
YCbCr is a color space model used for digital transmission and storage of images and video. It uses three types of data: a luminance component, and two differential chrominance components, represented by the difference between the luminance and the two RGB primary colors.
RF interface
This is the most familiar RF connector for antenna cables. The first jack you will notice when connecting the receiver to your TV. The encoded antenna signal will enter through it.
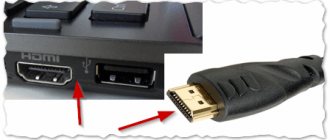
HDMI
The HDMI connector is typical for connecting a digital television receiver to a modern flat-screen TV. The most important performance characteristic of HDMI is that when transmitted by this interface, the video and audio signals are not degraded, distorted or changed. A low-quality or defective HDMI cable will not degrade the image quality: it will either transmit the signal without distortion or not transmit it at all.
You may be interested in: The correct antenna for receiving DVB T2 digital television at the dacha
The process of connecting a digital set-top box to a new TV step by step
Important! All manipulations must be done with the equipment turned off. If you connect working equipment, there is a high probability of its failure.
Let us describe the order of our actions:
- You need to select the interface for connecting the set-top box to the TV. It can be analog (tulips, D-SUB, SCART) or digital (HDMI, DVI). The choice is made depending on the specific TV model. Despite the fact that many FULL HD television receivers have an analog input, it is better to feed them “digital”, since double conversion of the signal will negatively affect the quality of the “picture”.
HDMI input on the TV
This interface allows you to transmit video and audio, so the connection can be made with one cable.
If the TV does not have a digital input, it can be connected using any analog interface; the easiest way to do this is using tulips. In the case where the device only has a bulky SCART connector, you can purchase a tulip adapter for it. In this way you can connect almost any model, except for very ancient ones.
- We check the availability of the cable necessary for connection; it may come with the receiver or television set. If you cannot find one, you will need to purchase it.
- We remove the protective film from the set-top box (if any), install it in the chosen place and connect it to the TV. The cables are made in such a way that it is physically impossible to insert them into a connector not intended for this purpose. The exception is tulips, they can be mixed up. But to prevent this, manufacturers make nests for them in the appropriate color.
Standard colors of RCA interface connectors (tulips)
As you can see, the colors of the connectors match the colors of the sockets (4 in Fig. 3).
- Connect power to the console. If the network adapter is built-in, simply plug the plug into the socket; pre-connect the remote power supply to the corresponding socket of the receiver.
- We connect the provider’s cable, a decimeter antenna or a satellite dish to the antenna input (2 Fig. 3).
- We insert the batteries into the remote control, turn on the set-top box and the TV.
This completes the connection procedure, and you can begin setting up channels. If your TV does not have the interfaces listed above, do not worry, we will tell you how to get out of this situation.
How to connect a Samsung TV to digital television without a set-top box
If you are using a Samsung TV that is not an old model, you can use digital TV without a receiver. The activation process itself does not require much experience. Any user can set up the digital number, the main thing is to follow the instructions:
- Launch the main menu and go to the “Broadcast” tab.
- Click on "Auto Configuration".
- Next you will need to indicate the source. Select the antenna or connector you are using from the list.
- Against the broadcast type, select “Digital broadcasting”.
- Next to the search mode, select “Full”.
- Start scanning.
- The system will begin detecting broadcasts, adding channel names to the list.
- There is no need to save anything manually, it happens automatically.
- Wait until the search is complete and click Next.
Why doesn’t digital TV show today and says “No signal”: what to do?
If the automatic search ended due to an error, or you noticed that it did not detect all TV channels, then you can conduct a manual search. To do this you need:
- Go to options and select the “Channel” tab.
- Enter your country by location.
- Select frequencies – 298000-362000 kHz.
- On the next line, enter “Digital.”
- In the search type, select "Network".
Connecting to an old TV
The signal converter can work even with older models of television receivers when connecting them to the antenna output (1 in Fig. 3). To do this, you will need a piece of antenna wire of the appropriate length and two antenna plugs. In order not to bother with soldering, you can take special F-connectors; the procedure for installing them on the cable is demonstrated in Figure 8.
Installation on the F-connector cable
Procedure:
- We remove the insulation from the antenna cable, carefully so as not to damage the braiding (it is enough to clean 15 mm).
- We bend the braid as shown in the picture.
- Carefully remove the insulation from the central core.
- It is necessary to expose 10 mm of the central wire.
- We screw the connector clockwise.
- We do this until the central core protrudes 2 mm from the connector.
Using a manufactured cable, we connect the antenna input of the TV to the corresponding output of the set-top box. In this way you can connect any TV, be it Horizon 101 or the legendary KVN.
Settings
The set-top box is configured in the same way as a TV, namely:
- The menu is called up using the button of the same name on the remote control.
- Select the appropriate command to start scanning channels.
- When the scanning is completed, we save the list of detected channels; if desired, they can be grouped in a certain way, given a name, etc.
Detailed instructions and descriptions of functionality can be found in the user manual. In most cases, the menu interface is intuitive, so setting up the receiver is as simple as connecting a digital set-top box to the TV.
How to connect a digital TV receiver to a Samsung TV
The procedure for connecting the set-top box depends on the available inputs on the TV and on the tuner itself. Below we will study in detail how to connect a digital television set-top box to a Samsung TV using different connectors.
Error_model_bind on Samsung Smart TV: reasons, how to fix?
Connecting a digital set-top box to a Samsung TV via tulips (RCA)
Connecting through tulips is the most affordable option. RCA outputs are available on all device models. Connect the cables by color - red to red connector, white to white, etc. If the yellow wire transmits an image, the other two are responsible for transmitting sound.
SCART
SCART has not been used in new TVs for a long time. This connector is found only in older models. To use this output you will need an RCA adapter.
HDMI
The presented output is available on all new TVs. HDMI has better transmission quality, providing good picture and sound. Connect the cable to the receiver and to the connector on the TV.
RF
RF is only used in older devices. The tuner has two such inputs – IN and OUT. The first is necessary for the encoded signal, and the second connects to the TV itself.