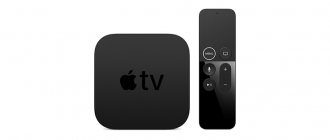
Surely you, like most other people, have a TV at home. It is possible that this is a TV from the rather popular Samsung company. We have long been accustomed to such a device and simply watching programs is boring, especially when a friendly company gathers and the soul demands to sing. Then karaoke comes to the rescue.
To enjoy singing, you first need to understand whether your “TV”, as you call it, even has a karaoke function. If it supports Smart TV, then there is media content and, accordingly, a microphone input.
Possible problems
Before connecting the microphone to your Samsung TV and setting it up, carefully read the instructions, as there may be problems related to its compatibility. As a rule, the instructions, or as it is commonly called the “manual,” contain a list of devices that are suitable for your TV. If you doubt your choice, or cannot find the list, take the instructions from the TV and visit the store where the TV was purchased. The consultant will help you choose the model that is suitable for your TV.
But a situation may arise that:
- Your plug-in microphone has a 6.3mm TS/TRS jack and a 3.5 MiniJack input. This problem is solved by purchasing a jack-mini-jack adapter, which costs around one dollar;
- The TV doesn't have a jack at all to connect it to.
Can it be connected to a Samsung Smart TV, or is the problem insoluble? In fact, there are several options for solving this problem.
How to connect a microphone
Now let's look at how to connect a karaoke microphone to a Samsung Smart TV. There are four ways in which you can make the connection. They are not complicated and do not require much experience. The main thing is to follow the instructions.
Wink Rostelecom does not work on TV and computer: reasons, what to do?
Method 1
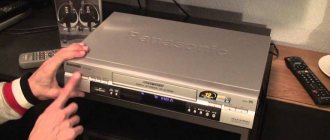
The first option involves using a simple microphone connected to a DVD player that has a 3.5 mm Mini Jack plug. The next step is to take care of amplifying the microphone, because the TV does not have a microphone amplifier. To do this you will have to turn to the Internet.
Depending on your microphone model, select an amplification scheme and follow the instructions. When you finish the procedure, connect the micro to the DVI AUDIO IN connector, which is located on the back side. After this, you can launch the program and start singing.
Method 2
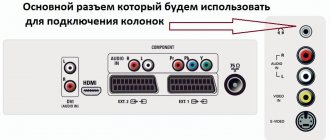
It is worth resorting to the second method in a situation where the first did not bring results. There should be a SCART input on the back of the TV. Use an RCA adapter to connect a microphone. Then, using the remote control, go to settings and go to the “Search” section, select the detected device.
Method 3
This method requires additional equipment.
If you have connected a DVD player, connect the speaker device directly to it.
Method 4
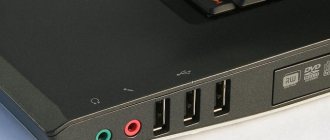
A simple solution is to buy a micro with USB and insert it into the corresponding connector on the TV. This input is built into all TVs. There shouldn't be any problems.
The first way to connect a microphone
You can solve this problem by purchasing a microphone with a USB connector. This type of connector is available on any Samsung TV that supports Smart TV technology.
You can also use a Web camera, like the STC 2000 HD. It is designed to work with Samsung LED and plasma TVs, and more precisely for video calls via Skype. Such cameras are connected using a USB connector. However, a significant drawback of this method is the fact that the camera microphone has a narrow polar pattern, which forces the performer to stand directly in front of the Web camera. And the price of the device at $75 does not make this option the most profitable. Although, if you use Skype installed on your TV for communication, then this is a fairly reasonable way out of the situation.
Connection options
The type of microphone connection to the TV depends on the device. Classic wired ones require a contact connection. Wireless models connect via bluetooth.
Using adapters
For the contact method of connecting to a TV, the inputs HDMI, SCART, RCA, USB, etc. are suitable. If you bought wired equipment for which there is no suitable socket on the back panel of the TV, adapters will come to the rescue:
- The Jack - Mini-Jack adapter is suitable if the microphone plug is equipped with a 6.3 mm TS/TRS connector, and the input on the TV receiver panel is MiniJack 3.5.
- Scart to RCA jack adapter. It is connected to it using a special “tulip” adapter. Sometimes it is additionally required to connect a mini-jack - tulips adapter. Set the switch to the “input” position, connect the plug and insert the structure into the SCART socket.
- USB adapter - MiniJack 3.5. Suitable for connection via USB port.
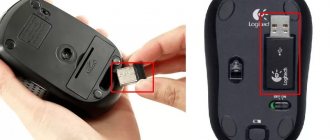
Standard USB connection
The second type of wired microphones is with a USB input. Such a device can be connected to a Samsung smart TV or other smart TV receiver. The smart system is able to quickly recognize the type of equipment being connected and prepare for operation.
Using 3.5 and 6.3 mm connectors
All multimedia gadgets are equipped with audio outputs - “jacks”. 3 types are used:
- Jack - 6.3 mm in diameter.
- Mini-Jack - 3.5 mm in diameter.
- Micro-Jack - 2.5 mm in diameter.
The last type of socket (jack - “socket” is translated from English) is used in the smallest devices, but manufacturers are abandoning it in favor of mini-jack. The most popular is with a diameter of 3.5 mm.
The 6.3mm connector is used less frequently. Historically, they were equipped with professional audio equipment - synthesizers and electric guitars. It is now found in professional vocal instruments.
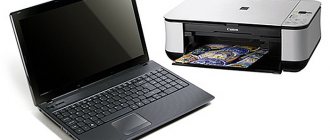
You can connect the gadget using DVD. Additional software is required to connect to the player. You can connect via a computer or laptop.
For bluetooth microphone
Wireless connection is carried out via bluetooth communication channel. Modern smart TVs are equipped with many of the functions of smartphones and computers and can be connected to them wirelessly.
The most expensive karaoke microphones for TV are wireless. They have high-quality sound and are equipped with a set of additional functions. Expensive models have noise reduction and power adjustment, and are able to change the singer’s voice, giving it strength or changing the timbre. The absence of wires allows you to move freely around the room and dance while performing a hit.
To connect, you must follow the instructions. If you have ever connected a headset to a mobile phone, you will not have any difficulties. Activate the bluetooth icon on the screen, turn on the microphone and wait for synchronization. Sometimes you need to install a special application.
Second way
You can connect a microphone to a Samsung TV through the “SCART” socket, which is located on the back wall of the TV, using a SCART-tulip adapter. To do this you will need:
- Using the switch, switch the adapter to the “INPURT” mode;
- Connect a regular plug and a tulip adapter;
- Connect this structure to the TV;
- On the control panel, press the “SOURCE” key and select an external connection.
After this, you should run the program and check if the microphone works. And if everything is good, then let your soul unfold, as long as the neighbors don’t complain too much.
Connection features
As a rule, microphones are equipped with a 3.5 mm Mini Jack connector. Most TVs also have a corresponding input: it's usually pink and labeled Audio IN. However, most users note problems with this connection:
- the TV does not see the microphone;
- The TV recognizes the device, but there is no sound coming from it.
There are several ways to solve this problem.
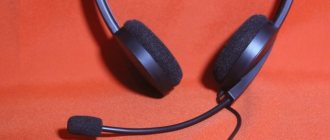
The microphone not only allows you to sing your favorite songs, but using it you can easily perform voice control of the device
. Modern devices with built-in Smart TV provide great scope for realizing their capabilities. Find out more about the nuances - this will make it easier for you to use the device in the future. The most popular “smart” TV devices are Samsung, and they, and in general, are distinguished by their intuitive simplicity.
Basic ways to connect a microphone to TVs with Smart TV function. Equipment necessary for setting up home karaoke. Features of configuration and connection of elements.
Devices called karaoke have become widespread as a means of leisure. Many people want to try their untapped abilities on an improvised stage, where their best friends act as critics. To do this, you need to know how to connect a microphone to a Samsung, LG or other brand Smart TV.
Third option
It involves the use of additional devices. For example, you can use special adapters to connect a wireless microphone. This greatly increases the singer's freedom of action, but has a significant drawback. Such microphones run out of battery life, and you should always have spare batteries on hand.
Alternatively, you can connect any DVD player that supports karaoke mode to your TV. The disadvantage of this method is the need to purchase the above-mentioned player. However, if you already have one, then this is not a problem at all. In addition, a big plus is that you can record onto discs not only your favorite backing tracks, but also your own versions of songs.
You can also connect a computer or laptop using an HDMI cable. In this case, you need to connect your device to the Internet, because... Connecting your TV to a smart TV will not be enough. The disadvantages and advantages of this method are identical to connecting a DVD player, except that you can save your creations on your hard drive, although the microphone will have to be configured.
Third Party Applications
If the required microphone jack is missing, then do not rush to get upset. Use your computer by connecting it via an HDMI cable. The second step is to install the application if you do not have the appropriate hardware. At this stage we determine where to install the program. There are two options:
- To a computer or laptop when connecting a microphone.
- To TV with support function.
Error_model_bind error on Samsung Smart TVs: reasons, what to do?
There are two options to download and install the software on your TV:
- The first involves using the Internet.
- The second is using a flash drive.
If you downloaded the program via the Internet, then before installing it on your TV, be sure to make sure there is no virus software. Otherwise, the device's firmware may crash or serious errors will occur, which will require reinstalling the software.
If you have any questions or complaints, please let us know
Ask a Question
Fourth
This is the most difficult microphone connection option. For this you will need a signal amplifier. However, the problem is that they are not available ready-made, and you will need to make the amplifier yourself. If you do not know how to handle a soldering iron and do not know the basics of circuit design, you will have to turn to specialists. You can find the amplifier circuit on the Internet.
And now, when the soldering iron is turned off, there is a smell of rosin in the room, and you have done everything correctly and were able to integrate this device into your TV, you can connect the microphone to the DVI AUDIO IN jack located on the back wall of the device!
Now you can deservedly enjoy singing! But, one moment... Don't forget to turn on the karaoke app.
Connecting a microphone to your TV
To organize home singing, you must have:
- a special program suitable for the TV model;
- microphone;
- playlist with your favorite tunes.
The universal Smart TV system allows you to connect various acoustic devices (speakers) to get high-quality sound. Of course, you can only check the sound quality through a microphone. On the global network you can find many different useful applications that describe how to quickly connect a microphone and configure vocal playback.
Applications, which include the necessary drivers, as well as various codecs, are freely available, but downloading is possible only after payment. These programs have a limited period of use (trial); in order for it to continue to operate, you must subscribe to a paid subscription.
It is possible to organize a free connection if you use special instructions that describe the procedure in detail. To connect a microphone, you can use additional devices:
- DVD player;
- special digital signal cable - HDMI.
To check whether a connection via HDMI is possible, you will need a microphone that has this function.
Connecting a microphone will be successful if you adhere to several important rules:
- The device must match the TV. Otherwise, it is impossible to achieve high-quality sound. The equipment will work, but the sound quality will not exceed 80%. That is why, before making a purchase, you need to inform the seller of the TV model, its series and brand number.
- If the microphone is selected correctly, connecting to Smart will not take much time. This system on the TV automatically finds a new device and configures it.
- The microphone inserted into the TV is immediately ready for use. The system will take care of its correct operation. All that remains is to launch karaoke on the screen and you can start singing.