One of the common problems that owners of Samsung Smart TVs face is problems with the Internet connection. And if when you connect the TV to the Internet via cable, everything works more or less stably, then there are problems with connecting via Wi-Fi. For example, it’s not uncommon for users to write that there is no Wi-Fi in the Samsung TV settings, it doesn’t see wireless networks, or it doesn’t connect to Wi-Fi. In some cases, after connecting to the router in the Smart TV menu of a Samsung TV, there is no access to the Internet in applications and the browser. Error connecting to the Internet or to the server (“network not connected”, “no network connection”) in different applications. There are situations when, for example, the Internet does not work only in YouTube, or sites do not open in the TV browser.
If we are talking about connecting via a wireless network, then we need to understand that the cause of some problems may be not only the TV, but also the router. The process of connecting a Samsung TV to Wi-Fi is not at all complicated. I recommend following the link and trying to connect following the instructions. Perhaps everything will work out, and you will not have to understand the solutions that I will talk about in this article.
To begin with, I recommend making sure whether there is Wi-Fi on your TV at all. If you are sure that there is, skip a few paragraphs. Many Samsung TV models (mostly older ones) with the Smart TV function do not have a built-in Wi-Fi module. These TVs can be connected to the Internet either through an external USB receiver (branded, only from Samsung) or via a network cable.
You can check in three ways:
- If you have a Samsung TV without Wi-Fi support, then most likely there will be no wireless connection options in the settings, or these settings will be gray (inactive). Or the TV will ask you to connect a USB adapter (in the form of a flash drive).
- You can go to the TV settings, to the “Support” section – “Contact Samsung” (or “About this TV”) and scrolling down the page, we will see information about the MAC address. The MAC address of the wired and wireless connection will be indicated there.
If in the line “MAC address of wireless int.” the address is not specified, this line is not there, or there are all zeros (or other identical characters), which means there is no Wi-Fi on the TV. On older models this menu looks a little different, but it doesn't matter. - Find out the model of your TV and use a search (you can search on the Samsung website) to find and view its characteristics. The specifications will indicate whether there is built-in wireless network support. If the specifications say optional (or something like that), then this means that the TV does not have built-in Wi-Fi. But wireless connection support will appear after connecting a proprietary USB adapter. I wrote in more detail about this check in the article linked above.
If your TV does not support a wireless network (but does have a Smart TV), then you can connect it to the Internet using a cable. Or use a regular router or repeater as a receiver. I talked about this here.
No matter what problem (error) you have, before jumping into any complex solutions, I highly recommend doing this:
- Turn off the TV completely for 10-15 minutes. Don't just turn it off with the remote control, but turn off the power (pull the plug out of the socket). There are many cases when such a reboot of a Samsung TV solves problems with connecting to the Internet.
- Turn off the router for 30 seconds and turn it back on.
- Try connecting the TV to a different Wi-Fi network. This is very important to check, because this way we can find out what is the reason that the Samsung TV does not connect to Wi-Fi, or the Internet does not work after connecting. You can distribute Wi-Fi from your Android phone, or share the Internet from your iPhone. Just note that some operators are now blocking distribution. A network is created, but without access to the Internet. So before connecting the TV to this network, it is advisable to connect another device to check.
- Make sure that other devices connect to your home Wi-Fi network without problems and have Internet access.
Next we will look at solutions depending on the problem that arises:
- The TV does not see the Wi-Fi network
- Samsung TV does not see Wi-Fi networks in the 5 GHz range
- TV won't connect to Wi-Fi
- Internet does not work after connecting to a wireless network
- All-in-one solutions: network reset, TV reset and Smart Hub reset
- Setting up Wi-Fi (changing region) through the TV service menu
You can jump straight to solutions to a specific problem (using the article navigation above).
Samsung Smart TV does not find Wi-Fi network
There may be two options: the TV does not see only our Wi-Fi network (but sees others), or it does not find a single wireless network. At the same time, other devices in the same location find home and neighboring Wi-Fi networks.
Most often, of course, the list of available networks on a Samsung TV does not include our wireless network, to which other devices are connected and work perfectly. If the TV does not find any networks (but they are displayed on other devices), then most likely there is a hardware problem with the TV, or it does not have a wireless module at all. Let's return to the problem when the list does not contain one network we need.
You can click on the “Update” button. If it does not appear in the list, then first make sure that the router distributes Wi-Fi (other devices see the network). Perhaps the TV is installed far from the router and our wireless network simply does not pick up near it. Or the signal is very bad. If possible, install the TV closer to the router. Reboot your router.
If this does not help, then change the channel of your Wi-Fi network in the router settings. I wrote how to do this in the article on how to find a free Wi-Fi channel and change the channel on the router. Just go to the router settings and set the static channel. For example, the 6th. You can also experiment with the channel width and operating mode settings. Either "mixed" or "n only". No “g only”, “b/g”.
After changing the settings, you need to save the changes and reboot the router.
Samsung TV does not see Wi-Fi networks in the 5 GHz range
New Samsung TV models may have built-in wireless modules that support the new Wi-Fi 802.11ac standard. These TVs can be connected to a wireless network in the 5 GHz range. The speed at this frequency is higher, and this is important for watching online videos in good quality. There are two nuances here:
- The TV must support the 802.11ac wireless standard. You can look at the specifications, or find out the model, call Samsung support and ask.
- You must have a dual-band router and it must distribute the network at a frequency of 5 GHz.
If both points are fulfilled, but the TV does not find a network that operates at a frequency of 5 GHz, then most likely the problem is in the channel on which your network operates in this range. In the router settings, for a network in the 5 GHz range you need to set one of four channels: 36, 40, 44, or 48.
There is more information on this topic in the article why Smart TV does not see Wi-Fi in the 5 GHz range.
If all else fails, try resetting the network, or completely resetting the TV (instructions at the end of the article).
Update: there is support for Wi-Fi 5 GHz, but does not find networks
Thanks to information from the comments, we were able to find out that there are situations when a specific Samsung TV model supports Wi-Fi 5 GHz (Wi-Fi 5, 802.11ac), this is written in the specifications on the official website, but the TV still does not see Wi-Fi networks in the 5 GHz band and changing the channel in the router settings does not help.
As it turned out, the reason is that support for this range may be blocked in the TV itself. Due to the fact that this particular TV was supplied to countries where it is prohibited to use the 5 GHz band.
There is a solution. You can try to unlock support for this band in the TV service menu. In the comments, Valeriy shared his experience and photographs, for which many thanks to him.
You do all actions at your own peril and risk. Be careful!
To enter the service menu of your TV, use one of three options:
- Press the Mute button, then press “1” - “1” - “9” - “OK” - “1” - “2” - “3” - “4” - “OK” in sequence.
- Quickly and sequentially press the buttons “Info” - “Menu” - “Mute” - “Power”.
- Quickly and sequentially press the “Menu” - “1” - “8” - “2” - “Power” buttons.
In the service menu we do this:
- In the Option , in the Local Set , set the CIS_RUSSIA .
- Go to the MRT Option . And change the following parameters: Lenguage Set - CIS , Region - PANEURO , PnP Lenguge - ENG (RU is possible).
After this, you need to turn off the TV, turn it on, go to settings (General - Network) and see if our network in the 5 GHz band is in the list of available networks. If there is one, select it and connect.
Options for solving the problem
There is a solution to any problem, you just need to figure out what the problem is. If the TV does not receive Wi-Fi, then you need to carry out diagnostics. You should always start with the simplest. For example, check the presence of electricity and the router signal, and the integrity of the cable during a wired connection.
Network reboot
If Wi-Fi does not work, then experts recommend rebooting the router. In 99% of cases, this action will help restore communication. To do this, you need to find the Power button on the back panel and press it. All flashing symbols should go out. There is no need to turn on the device right away; wait 5 minutes and press the same button again. Wait until the device is fully turned on and check the Internet connection on the TV. If it still does not connect, then make sure that other gadgets can connect to your home network and have Internet access.
Setting up a data connection manually
If the TV loses connection with the router, then after rebooting it you need to reset all settings. This is done if rebooting does not help. After all settings have been reset to factory settings, you need to restore them manually.
The following three types of network settings are used:
- Dynamic IP – dynamic settings that are set automatically via DHCP.
- Static IP – settings that must be entered manually.
- PPPoE – access is assumed after entering your login and password.
To connect your TV to the Internet manually, you need to:
- Go to the “Network Settings” menu, then “Wireless”.
- From the networks that appear, select yours and press Enter.
- Select IP Settings on the network test screen, and then set IP Mode to Manual.
- Enter the values for the parameters “IP address”, “Subnet mask”, “Gateway”, “DNS server”. Complete the setup by clicking the “OK” button.
- Set up WPS(PBC). To do this, go to “Network Settings” and then WPS (PBC).
- Press the WPS(PBC) button on the router and hold it there for 2 minutes. At this time, the TV panel will receive the settings automatically.
DNS server errors
If the DNS server gives an error, you need to connect the TV manually. Try manually setting up the server settings from Google 8.8.8.8 or 8.8.4.4. Before this, disable the DHCP function on the router and if the address is, for example, 192.168.1.1, then enter the following data:
IP address: 192.168.1.103;
Subnet mask: 255.255.255.0;
Gateway: 192.168.1.1;
DNS server: 8.8.8.8 (or 192.168.1.1).
If the N standard is used, then set the authentication to WPA2-PSK and the security type to AES and reconnect the device. “Access Control” may be activated on the network device. This means that the IP address of the TV panel is blocked. Disable it and set it to ignore the TV panel's MAC address check.
Resetting network settings on the TV and changing standards
One of the reasons why the Wi-Fi connection on the TV is lost may be a reset. To configure the router, you need to do the following:
- Open a browser on your computer.
- In the address bar enter 192.168.0.1 or 192.168.1.1. These are the most common addresses, but if they do not fit, then look in the instructions for the transmitting device or on its back panel.
- Open the “Login and Password” window and enter the required values, if required.
- For TP-link in the interface, go to the “Wireless Mode” and “Settings” tab.
- Come up with a name for the network and go to the “Wireless Protection” tab.
- Set the encryption type to WPA/WPA2 and create a password.
- In the “System Tools” tab, open the “Password” item.
- Enter the old login and password and then enter the new values. Write down or remember the new values.
Here are the most common reasons and methods for eliminating them, due to which the connection between the television receiver and the network device is lost. But you may have to face other problems that will require the intervention of specialists.
Samsung TV does not connect to the Internet via Wi-Fi
The next problem is an error in the connection process. There are different types of mistakes. Most often they are associated with a password or Wi-Fi network security settings.
If, after selecting a Wi-Fi network and entering a password, you see an error “password is not valid”, “invalid password”, etc., then be sure to make sure that you are entering the password correctly. You can remember the password for your network by following the instructions on how to find out your Wi-Fi password, or what to do if you forgot your password. The password must be at least 8 characters long. The capital letter "A" in the password and the small letter "a" are different characters.
When entering your password, check the Show Password checkbox to see what characters you are entering.
Other reasons and solutions:
- Security Settings. The router settings must be set to a modern type of wireless security and encryption. Install WPA2-PSK.
- The current operating mode of the wireless network should also be set there. Either mixed mode (b/g/n) or “n only” (if we are talking about a network in the 2.4 GHz range). If anything, here are the instructions: https://help-wifi.com/nastrojka-wi-fi-setej/rezhim-raboty-wi-fi-seti-bgn-ac-chto-eto-i-kak-smenit-v- nastrojkax-routera/
- The DHCP server must be enabled on the router. It is enabled by default, but if it is disabled for some reason, the TV will not be able to connect to the router. At least until you register static IP addresses on it.
- Perhaps the router is configured to filter devices by MAC addresses, or some other security functions. If you have configured something similar, then you need to check and disable/change the settings of these functions.
- If a Wi-Fi signal amplifier is installed, then the TV may be trying to connect to it. This may be the reason why your Samsung TV is not connecting to the internet.
Try connecting your Smart TV to a different network. If it connects, then for some reason the TV doesn’t like your Wi-Fi network, and the solution needs to be looked for on the router’s side.
What do you need to know?
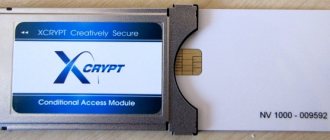
The network adapter allows SONY BRAVIA HDTVs to access the Internet wirelessly. It can be integrated or connected to the TV via USB input. Using the WPS (Wi-Fi Protected Setup) option, the receiver is connected to the home network.
The built-in adapter helps you connect your Sony TV to Wi-Fi without installing additional equipment. Using this option, you can easily access the Internet and use all the features and services of Smart TV.
Reference! The availability of an adapter in the package depends on the TV model. Either it is available or purchased separately. For Sony, only the UWA BR100 model is suitable.
All about the Smart TV function here:
Internet does not work on Samsung Smart TV
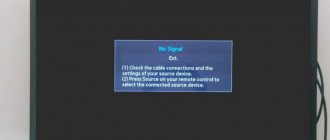
It happens that the TV connects to a wireless or cable network without problems. But there is no Internet access. The Internet does not work in the browser, applications, or some Smart TV functions. If you open “Network Status”, you can see something like this:
Message: "Unable to connect to the wired (wireless) network." “The TV is connected to the local network, but the Internet connection could not be established.” And in the picture we see that there is a connection between the TV and the router, but not between the router and the Internet.
Of course, the first thing we do is check whether the Internet works through the router on other devices. If it works, turn off the power to the TV for 15 minutes. Reboot the router and try to reconnect.
If the problem is not resolved, you need to try setting a static DNS server in the network settings on your Samsung TV.
Open “Network Status”.
Go to “IP Settings”.
Set “DNS Settings” to “Enter manually” mode. Below we enter the address 8.8.8.8 (this is public DNS from Google) and click Ok.
You can click on the “Repeat” button. If the Internet connection does not appear, restart the TV (by turning off the power for a few minutes). Try resetting the network according to the instructions below. Check if the Internet will work when connected to another network.
On older Samsung TVs, Smart TV may not work (report that there is no network connection) due to problems with access to the company’s servers. There was information that Russian providers are blocking access to these servers. You can check this information with the support of your Internet provider or Samsung.
Connection errors
Network problems can be frustrating as they can result in apps not loading, movies being buffered, music not playing properly, or other errors.
Sony TV won't connect to WiFi
The device in question depends on the device's router IP address to stream audio or video. If a device is assigned an incorrect IP address, it causes network problems such as inability to connect, errors when attempting to connect, or service unavailability.
If your Sony TV does not connect to the wifi network, you need to check the network status of the device to ensure that the IP address is correct.
- On the supplied remote control, you need to press the HOME or MENU button.
- Select Settings.
- In the “Settings” category, select “Network”.
- Under Network Settings, select View Network Status.
The network settings of the device in question will vary depending on the model. You must read the manual to find specific model information.
Sony TV does not see wifi
If the TV no longer sees only a specific access point, but sees others, then most likely the wireless router has switched to a radio channel that is not supported by the TV.
Sony Android TVs operate on Wi-Fi channels 1 to 11.
You should go to the settings of the router (access point) and manually set the Wi-Fi channel from 1 to 11.
Network error
The following factors may cause network problems:
- Incorrect password entered on the device when using a secure network
- Slow internet speed
- Distance from router to device
- Software updates performed on the device
- Interference from other wireless devices, etc.
If a configuration failure occurs when receiving Sony Internet content when trying to access content, e.g. Netflix or YouTube video services, you need to follow these steps to fix the problem:
- Check if the problem is resolved after completing each step.
- Check to see if you receive an error message when accessing another online video service or content.
Note! If the error occurs only when trying to access one specific service, that service may be temporarily unavailable. In these rare cases, you should try again later. If a network error occurs, writes Sony Bravia “the Internet is not available,” you must adhere to the following algorithm.
- Test your Internet connection using another device, such as a smartphone or computer, to see if the Internet is available.
- Make sure your router or cable modem has an active wired or wireless Internet connection.
Some routers have a Wi-Fi Multi Media (WMM) setting that helps control video streaming. If you are using a wireless connection, you will need to change this setting to control latency and jitter when transmitting content.
- If you are using a wireless gaming adapter for connection, you should make sure that it is configured correctly.
- Reboot your router or cable modem.
- Unplug the power cord from the outlet for a minute.
- Plug the power cord back into the outlet and wait until the blinking lights indicate that the modem or router has completely restarted.
- Update Internet content.
- For TVs, run network diagnostics.
Users of SONY equipment often encounter the Sony Bravia 2200 error. It manifests itself in the form of a disconnected network connection when trying to access the World Wide Web. The TV refuses to load content. Error: 2200 appears regardless of the TV model: “Configuration failed when connecting. An error has occurred. Please try again later. Error 2200."
Configuring DNS servers with error 2200
The TV may display a 2200 message when attempting to access a network connection under the following circumstances:
- Internet signal lost
- unstable internet speed
- Internet videos are not displaying
- Apps suddenly disappear when watching internet videos.
To fix this problem (Sony Bravia connected without internet), you need to do the following:
- Turn off the TV.
- Unplug the TV's power cord.
- Unplug the router and modem power cords.
- Connect the router and modem power cords after two minutes.
- Connect the TV's power cord.
- Turn on the TV.
- After five minutes, update the TV's Internet content several times.
When using a wireless router, the connection between the TV and the router may be unstable due to radio waves. If wireless Internet does not work on your Sony Bravia TV, then to eliminate any possible radio wave interference, you must:
- Turn off the power to other wireless devices.
- Connect the TV to the router using a wired LAN connection.
Universal solutions
Below I will show you how to reset your network settings and hard reset your TV. Perhaps this will help solve the problem with your Internet connection.
Resetting the network in the Samsung Smart TV settings
If I understand correctly, the “Reset network settings” function is not available on all Samsung TVs. In my case, one of the new TVs (M, Q, LS series).
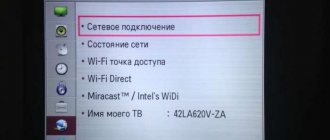
Open the settings and go to the “General” – “Network” section.
Select “Reset network settings” and confirm the reset to factory settings.
After restoring the factory network settings on the Samsung TV, we try to connect it to the Internet again.
Full reset, or reset Smart Hub
If you believe the information on the Samung website, then when you perform a factory reset, all settings and channels will be deleted, but the network settings will remain. So in our case, this solution is unlikely to give any result.
You can perform a reset in the “Support” – “Self-diagnosis” section. Menu item – “Reset”. You may need to enter a password. Standard: 0000.
If you have a different menu and cannot find these settings, then see the instructions (for all series) on the Samsung website: https://www.samsung.com/ru/support/tv-audio-video/how-do-i- reset-settings-on-my-samsung-tv/
There you can also perform “Reset Smart Hub”.
On some TVs, Smart Hub settings can be reset in the “Smart Hub” settings section - “Reset Smart Hub”.
Samung has a lot of TV models, series, and versions of the Smart TV system. They are all a little different. It is almost impossible to make detailed instructions for all models.
Changing WIFI REGION through the service menu of a Samsung TV
There is information that changing the letter in the “WIFI REGION” settings in the TV service menu allows you to restore Wi-Fi operation.
Important! You do all the actions described below at your own peril and risk. Don't change everything. Remember what parameters you change.
To open the service menu of a Samsung TV, you need to turn off the TV and use one of these combinations:
- Quickly and sequentially press the buttons “Info” - “Menu” - “Mute” - “Power”.
- Quickly and sequentially press the “Menu” - “1” - “8” - “2” - “Power” buttons.
In the service menu we need to open the “Control” section.
We are interested in the “WIFI REGION” item. You need to put the letter “A” in it. If it doesn’t help, set “B”.
Perhaps this solution will be useful to someone.
Reset
If rebooting and reconnecting does not help, you can try resetting the settings. This is one of the easiest and fastest ways to solve the problem of connecting the receiver to the network. The method for returning to factory settings depends on the device model.
To reset an LG TV that refuses to connect to WI-FI, do this
- go to the settings menu;
- from there to the “Additional” sub-item;
- click on the inscription “General”;
- Click “Reset to factory settings”.
If your Sony TV does not connect to WI-FI, then it is also recommended to solve the problem by resetting the settings. To return to factory settings on a Sony device, you need to:
- go to the TV menu;
- go to the “Settings” subsection;
- click on “Storage & reset”;
- click on the “Factory data reset” column;
- reset the settings and confirm the action.
To reset your Samsung receiver to factory settings:
- go to the “Support” menu;
- select the sub-item “Self-diagnosis”;
- Click on the inscription “Reset settings”.
Samsung has found video instructions for your TV: