Connection via HDMI cable
The HDMI interface allows you to transmit digital video data with HD resolution and higher, and multi-stream audio audio signals with copy protection.
Now developers equip almost all stationary screens with an HDMI connector: from 15-inch monitors to 100-inch TVs. The connection to the laptop is made using an HDMI cable equipped with identical connectors on both sides.
The maximum permitted cable size at which the signal will be transmitted without interference is 10 meters. There are also “laces” long: less than a meter, 1, 1.5, 2, 2.5, 3, 5 and 10 meters, respectively.
How to connect a laptop to a TV via HDMI:
- Using a cable, connect the turned off TV and the disconnected laptop (connecting equipment disconnected from power will save the HDMI ports from premature burning).
- Turn on the TV and switch the playback channel to HDMI on the remote control. Check that you have selected the correct channel as your TV may have more than one socket.
- Turn on the laptop. After loading the operating system (especially if you have Windows 10), the TV will begin to duplicate information from the laptop screen.
- On the desktop, right-click and select Display Settings.
- In the “Multiple Displays” section, you can choose in which mode the two displays will operate. You can duplicate, expand (one is a continuation of the second) or turn off one of the screens.
- From the same menu, you can view information about connected displays and make personalized graphics settings.
If the displayed information is beyond the scope of the TV, you can correct it:
- selecting the appropriate resolution in the video adapter properties;
- by setting a personal scale for one screen (to scale only the TV display, select the “extended” display mode);
- In the TV settings, select the appropriate picture size via scaling.
How to connect your phone to TV via wifi
Modern smartphones that support the Android or iOS operating system provide users with all the functions that are present on every PC. Smartphones have advanced cameras that allow users to capture interesting moments in their lives. In order to present beautiful pictures/videos to your family and friends, you need to connect your smartphone to the TV.
When purchasing a new TV, people often wonder how to connect via their smartphone on their own without the help of a professional. Sometimes even a modern TV with the Smart version needs to be configured. Only after this can you transfer content from your mobile phone or tablet to the big screen. The article discusses several methods:
- 2 devices are connected to the same wifi network, you need to install a special program on your home TV. Mostly they recommend allshare for Samsung TV or smartshare for LG;
- when connecting the TV to the network via cable, wifi support is not required;
- Smartphones that have the Android operating system also support the Wifi Direct program. This serves to connect to the TV signal receiver;
- In order to connect your TV to your smartphone, you need to purchase a router. The connection is made via a local network;
- You can use a regular player to play the video. This function is presented only for TVs that support the Smart TV function and must be connected to the same network as the iPhone or Android itself;
- Using the Youtube mobile application, you can watch videos on remote devices.
Note! When choosing a specific method, you need to know about the functions of your TV. In almost all cases, a prerequisite is connection to a single network.
Equally important is connecting your smartphone via a router. If there is a home network in the house, then you will have to use a router. All modern mobile phones are equipped with a communication option to gain access to a wireless network. You can easily connect to the router via the Internet using your mobile device.
DVI cable
DVI is an interface for connecting and transmitting video data to digital devices: LCD monitors, TVs and projectors. It was developed to replace the VGA standard in order to transmit high-quality images.
There are no restrictions on cable length, but there are warnings:
- A DVI cable up to 10.5 meters is capable of transmitting digital video data in a resolution of 1920x1200.
- With a cable length of 15 meters, normal transmission is only possible for images in the 1280x1024 format.
Over the course of its existence, the interface has acquired several specifications: DVI-A (analog transmission only), DVI-I (analog and digital), DVI-D (digital only).
Block title
- DVI-D to DVI-D will work.
- DVI-I to DVI-D – will work via a cable connection with DVI-D connectors;
- DVI-D to DVI-I – works via DVI-D cable connections;
- DVI-A to DVI-D will not work. It is possible to work with large losses through an expensive converter.
The process of connecting a laptop to a TV is as follows:
- Connect the switched off equipment together.
- Select the appropriate connection channel (possibly displayed as VGA-PC) on TV and turn on the laptop.
- If the picture does not appear on your TV, open Display Settings and click Detect Display.
Scart
The Scart interface is a universal standard for connecting multimedia devices. This plug is also often called: ratchet and comb. Almost all produced TV models are equipped with this interface due to its features. Scart can both playback and record a signal.
TVs usually have at least one female connector. The versatility of the cable is that the standard allows it to work as an adapter. If there is a Scart male at one end, there may be an output at the other:
- scart;
- VGA;
- DVI;
- RCA (tulips composite/component).
There is a whole variety of converters on the market, so you can connect even the oldest display to absolutely any computerized equipment.
The process of connecting a laptop to TV via a Scart adapter is as follows:
- Turn off the equipment. Insert the plug into the Scart connector on the TV, and connect the other output (DVI, HDMI) to the laptop.
- Turn on your laptop and TV. On TV, select the Scart signal playback channel.
- If the screen does not duplicate the signal when you turn on Windows, go to the screen settings (RMB on the desktop) and select display search.
If you have previously connected your laptop to another screen, make sure that the “show only the first screen” option is not set.
Via Miracast
This function is based on Wi-Fi Direct, but the creators have made several improvements and additions. As a result, users can transfer 3D files, and the problem with transferring large-sized information has been removed. This is the function that is considered a modern approach to synchronizing a smartphone and TV.
To connect, you need to go to the settings of the gadget and TV, and launch the function on two devices at once. The main problem is that not all TVs support this function, unlike Android smartphones. To solve the problem, buy a separate adapter with technology support. It plugs into an HDMI or USB port. The rest of the actions are no different. The video shows instructions on how to connect a phone or tablet to a Samsung TV
VGA output
VGA is a video interface for connecting electro-ray tube monitors, developed by IBM in 1987. The interface is still mounted on plasma, LCD and some LED-TV boards. The image is transmitted in a maximum resolution of 640 by 480 pixels and with support for 16 colors.
Connecting devices:
- Using a male-to-male VGA adapter, connect the switched off TV and laptop.
- Turn on the two devices, and on the TV remote, select the VGA playback channel.
- If the image is not transmitted, in the PC video card settings, select a resolution of 640x480 with color rendering 16.
- Restart your computer to apply the new settings.
- You may need to do similar actions on the connected display.
RCA and S-Video
S-Video is an analog video interface for separate transmission of brightness and color. This ensures high image quality when transmitting a standard definition television signal. The standard is not suitable for HDTV. Audio transmission is carried out via a different RCA cable.
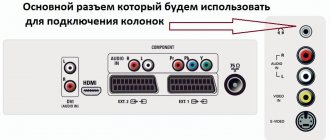
Tulips (RCA) - a standard for outputting video and stereo audio. Consists of three connectors:
- yellow – for video signal;
- white – for the left channel of two-channel stereo;
- red – for the right channel of two-channel stereo.
Typically, VGA to RCA/S-Video adapters are used to connect devices.
Such outputs are often found on TVs with CRT screens. How to connect a laptop to a TV with a wire:
- Connect the switched off devices with a VGA adapter to the corresponding input of the computer and an RCA/S-Video adapter to the TV.
- Turn on the devices and set the TV to play from the channel, through composite “tulips” and component S-Video.
- In the screen settings, select a screen resolution of no more than 640x480.
- Reboot your device.
Connection via Wi-Fi or Ethernet
If the TV does not have a Wi-Fi adapter, but it has an Ethernet connector, it can be connected to a home network that includes a laptop.
To connect two devices via a LAN cable, you need:
- The TV has an Ethernet connector;
- A long network cable so as not to place devices closer to each other.
- A router that distributes the network to both devices.
- A special program that allows you to broadcast movies on a large display.
You can install and use programs:
- Home Media Server – for Samsung and other TV manufacturers.
- VAIO Media Server - for
- Smart Share – for LG.
There are many analogues of the program. Each such software uses DLNA media content sharing technology. How to connect a laptop to a TV via cable:
- Using an Ethernet cable, connect the TV to the router.
- Connect your laptop via wire or Wi-Fi.
- Install a program to run media on the display.
- Start the broadcast by clicking "Start".
It’s easy to work with the program, for example, in Home Media Server you can:
Find movies and other video files on your computer and drag them into the playback window on the display.
View photos and listen to audio.
Watch IP-TV using an Internet TV stream from a connected VLC media player.
You can work with the program interface both from a PC and from a TV.
The implementation of setting up IP-TV via Home Media Server is well described in this video.
Broadcast from laptop to TV via Wi-Fi Direct
If a user needs to connect a laptop to a TV via Wi-Fi, he must follow simple rules so that it does not lead to an error. The function is active for TVs of the 5th generation or newer. They have drivers for moving files.
Here the TV acts as an external device, broadcasting what is contained on a mobile phone or laptop monitor. The operating system on your computer must be Windows 7, 8 or 10. If it is old, playback will not work.
Connection setup
Next, use the following sequential manipulations:
- turning on both devices;
- activation of Wi-Fi adapters;
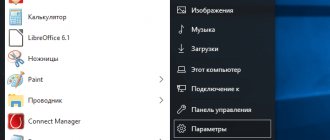
- On the laptop, go to the Start menu, Settings, System, Display (opening occurs sequentially);
- the right side will contain several options at once, there you need to click Connect to a wireless display;
- connect to a detected device by clicking on it;
- Select the confirmation button on the device.
Interesting! This option may not turn on the first time. But when the devices are combined, the broadcast can be performed from any room in the house where a Wi-Fi network is available.
If the user needs to disable this connection, press the wireless connection again. In the menu, select the function to disconnect.
Using a wireless monitor
This function uses Miracast technology, a standard for wireless multimedia signal transmission. The technology allows you to transmit video signal packets in the ITU-T H.264 format. This provides:
- Playing file contents;
- Complete duplication of what is happening on the second device.
The technology works in two directions - from laptop to TV and back. The main condition is that the receiver and transmitter are equipped with Wi-Fi modules, and that the software and hardware have adequate support for the Miracast wireless display.
Note! The laptop must be no older than 2013, its video card must support DirectX 12, and the system must have a virtual Wi-Fi Direct adapter. Connecting to a display wirelessly is best implemented in Windows 10.
If the TV is not equipped with a Wi-Fi adapter, no problem. You can use special devices such as TV-Box, which allow a regular TV to acquire smart functions. These devices run on the Android operating system and support wireless display mirroring technology.
There are also models for Windows, but their price tag is already higher than that of Android TV-Box.
Or use an Apple TV set-top box. Only it does not support Miracast, but works through its own AirPlay. Therefore, connection is only possible with Apple products: MacBook, iMac, iPhone, iPad.
The wireless display function on TV or set-top boxes is called differently:
- Screen Mirroring;
- Screen Beam;
- Mirascreen;
- MirrorShare and more.
How to connect a laptop to a TV via WiFi:
- On Windows 10, in the lower right corner, click on the notification icon to open the notification panel.
- Click Cast to Screen. Also, this menu is called up with the Win+P keys.
- In the next item, select the line “Connect to a wireless display”.
- At the same moment, in the settings of the TV or set-top box, find the “Wireless connection” item.
- Open it and run Search.
- Activate the found devices with each other by pairing.
After this, the display will broadcast everything that happens on the laptop screen.
The peculiarity of the technology is that a router or Internet is not required for the connection.
Why connect your phone to your TV?
Users will be able to:
- look at photos;
- play video;
- listen to audio;
- launch games and applications;
- use websites;
- make presentations.
To make the work process more convenient, you should connect a joystick, mouse, and keyboard. To transfer any data from a smartphone to a TV with a Wi-Fi adapter, you do not need to perform complex actions. There are step-by-step guides for any method. Immediately after the settings, you can turn the gadget into a control panel, which is convenient in different situations.
Setting up a TV and laptop
To simply connect devices via cable, no setup is required. The main thing is that the TV and computer have the appropriate “female” connectors, and have a working cable ready to connect the devices through these connectors.
Configuration may be required if the connection uses a local network or wireless connection technology via Wi-Fi.
TV software setup
Depending on the system used by the TV (Android, Tizen and others launchers), the interface and name of the parameters may differ. But the setup algorithm is as follows:
- Turn on and go to the smart functions menu or TV-Box screen.
- In the settings, open “access points”, enter the login and password for the Wi-Fi network.
- If you are using an Ethernet cable, make sure it is connected to the TV and has Internet access.
- In the settings, find the Screen Mirroring wireless screen feature. If possible, put it on the main screen.
- If you work through Home Media Server or analogues, install VLC player from the application store.
In general, there is no need to make any further settings on the TV. Developers of large displays make equipment in such a way that all functions “work out of the box” and settings take place automatically.
Laptop setup
Before using a wireless connection using Miracast technology, on a laptop:
- Install Windows 7, 8 or 10 and update your network drivers. It is advisable to use drivers specifically tailored for your network card, and not randomly taken by the system from its database.
- Right click on Start and go to Device Manager. Open Network Settings and make sure the Wireless adapter is visible and configured to work correctly.
- Now make sure that the laptop supports the technology
- Press Win+R and enter dxdiag.
- On the first System tab, click the Save All Information button and convert the information into a text document.
- Open it and look for the Miracast line.
- If it says: Available, with HDCP, then the laptop supports the technology and is ready for wireless connection to the display.
When connecting a computer or laptop via DLNA technology:
- Make sure that the router is operating normally and that the laptop and TV have access to the Internet.
- Then you need to create a DLNA server. Home Media Server performs this role perfectly, but Windows 10 tools can also be used.
- Through Windows Search, open “Media Streaming Options.”
- Click "Enable Media Streaming" and then give the "media library" a name and click "OK."
- Ready. Now you can find network server folders from the TV through the file manager.
- And to start playback on TV, right-click on the file, and through the context menu, select “Bring to device.”
Methods for connecting a laptop to a TV via Wi-Fi to transfer images
To connect to your TV via Wi-Fi, you will need to check whether there is a module for receiving the signal. If you bought a TV panel with a Smart function, then, of course, there is one. For the rest, you need to check whether you can connect to WI-FI. You can transfer an image in several ways:
- using DLNA;
- using Intel's WiDi software.
Using DLNA
A home DLNA server provides the ability to access movies, clips and other content from various devices, in our case a TV. To do this, you will need to connect all the devices that you plan to use to your home network, and it doesn’t matter whether it is done wired or wireless. But now we will look at connecting a laptop to a TV via Wi-Fi. Then you need to open access to the folders where the files are located. To do this, follow these steps:
- in the directory properties there is an “Access” tab, go to it;
- click “Advanced settings”;
- o and click “Ok”.
You can also synchronize your laptop and TV panel using Explorer:
- Click on the “Network” menu item.
- A window with the message “Network discovery” will appear, you need to click on it.
- To make the settings correctly, follow the assistant's recommendations.
- On the TV panel you need to check the availability of external connections. To do this, turn on the TV device and select a laptop from the proposed signal sources.
- After you have managed to activate DLNA and synchronize the two devices, right-click on the file and select “Play to” from the menu and then select the TV model.
Remember that modern TV panels do not support the .mkv format, so the broadcast will not start.
Intel's WiDi program
To create synchronization via DLNA between your computer and TV, you will need to allow access to the folders in which the content is stored. But the WiDi function works much simpler - it provides the ability to duplicate the laptop screen onto a TV panel using a local network connection.
However, for synchronization to be successful, the laptop must be equipped with an Intel processor, a discrete graphics card and an adapter for connecting to a Wi-Fi network. It should be noted that most modern laptop models from Samsung connect to TV devices precisely through this function. Before you start setting up, you will need to download and install the driver for wireless broadcasting. You can find them on free resources or on the official Intel website. The only thing that can become an obstacle is that not all modern TV panel models support the WIDI function, so you will have to buy an adapter.
To configure correctly, you must:
- Press the main menu button of the TV device.
- Go to the “Network” section.
- Select the “Miracast/Intel`s WiDi” function from the list.
- On your laptop, go to the Intel Wireless Display program, which is designed to synchronize with TV.
- Select the TV model from the devices that appear on the screen.
- If it requires you to enter a password, then it is mainly the numbers 1111 or 0000.
- To complete the setup, go to the Gharms section on your laptop and select “Devices” and then “Projector”, where you indicate that the broadcast should be carried out to your TV model. If your model is not highlighted in the list, then you need to update the Wi-Fi driver.