Hi all! While sorting through another letter, I came across the question: “How to connect a wireless mouse to a laptop?” I use mice like this all the time, as they are quite convenient to use, but we won’t go into details about the convenience. In this article I will tell you in detail about how to connect a mouse to a computer. We will also consider some problems that each user may encounter.
First let's look at connection types. The most popular is connection using a special external adapter. It operates using radio waves at a frequency of 2.4 GHz. The second type usually uses Bluetooth transmission and does not have an additional module. Fortunately, almost all laptops have a “Blue Tooth”. Well, the third type is a combination of these two connections.
In the article I will consider both options: when connecting using an adapter and using Bluetooth. If you have any questions, write in the comments.
NOTE! The instructions are suitable for all models: SD Connexion, A4Tech, Abkoncore, ASUS, Aceline, Acer, Apple, Canyon, CoolerMaster, Corsair, Cougar, DEXP, Dark Project, Defender, Fellowes, GAMDIAS, GIGABYTE, Gembird, Genesis, Genius, Glorious, HP, Harper, Huawei, HyperX, Jet.A, Kensington, Lenovo, Logitech, MSI, Mad Catz, Marvo, Microsoft, Oklick, Petriot Memory, QUMO, Qcyber, RITMIX, Razer, Redragon, SPEED-LINK, SVEN, Satechi, Sharkoon, Smartbuy, SteelSeries, ThunderX3, Trust, Tt eSPORTS, Xiaomi, ZET, Zowie.
With adapter
This type of mouse is the most popular, so most likely this is the mouse you have. It also connects quite simply to both a laptop and a regular desktop computer without Bluetooth. And connecting a wireless mouse to a laptop occurs in one step.
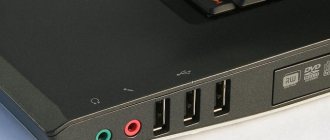
Find the wireless module under the case and connect it to one of the USB connectors on your laptop or computer. The PC must be turned on.
At the bottom of the mouse, find the switch and move it to the “ON” state. To turn it off, you probably already understood, you need to move it to the “OFF” state. But usually the mouse turns off automatically and there is no need to do this all the time.
The drivers should install automatically, and you will see a connection notification in the lower right corner of the screen in the tray. If the cursor does not move after this, then do the following:
- You can remove and insert the battery that powers the mouse. Perhaps she moved away. They can also be changed - perhaps she just sat down.
- Restart your PC.
- Reconnect the adapter - simply pull it out and plug it back in. If nothing happens, then simply insert it into a nearby USB port - perhaps this input is not working.
You can also go to Device Manager:
- Press the "Win" and "R" keys on your keyboard.
- We write the command: “devmgmt.msc”.
- You may have disabled the automatic driver search feature. Click on the “Computer with Magnifying Glass” icon at the very top. If this does not help, then find your mouse in the “HID (Human Interface Devices)” section. The device must have exactly the same name. Right-click and then select Update Drivers. It is advisable to be connected to the Internet.
Usually there are no connection problems, and the drivers are automatically available on all versions of Windows: 7, 8, 8.1 and 10. If you have any difficulties, try connecting it to another computer or laptop. Otherwise, you need to take it back to the store.
Instructions for connecting via adapter
The vast majority of wireless computer mice are connected to a laptop or computer via an adapter. The signal is transmitted via the Wi-Fi protocol from the device to the adapter and then processed by the computer. The maximum operating range is usually 15 meters. Next, we will describe in detail how to connect a wireless computer mouse to a laptop. The instructions provided will also be relevant for those who are interested in how to connect a wireless mouse to a personal computer.
Manipulating the mouse and adapter
If you have a wireless mouse, the first thing you need to do is find and connect the adapter. Typically, it comes in a box with the product itself or is hidden inside the mouse body. It is usually located in a special recess or compartment on the back of the mouse.
Make sure your device has fully charged batteries. After that, plug the adapter into the USB port on your laptop/computer and turn on the mouse. Move the switch to the On position. If the wireless mouse is a laser mouse (not to be confused with an optical one, in which the beam is not visible), then when it is activated, you will see a red light under it. Place it on a glossy surface and check its functionality.
Driver installation
Many mice are detected by most versions of operating systems and without specially installed drivers. At the same time, there are a number of models for which a driver must be installed to be fully functional. You can find it:
- on the disk that comes with the device;
- on the global Internet on the manufacturer’s website.
Enter the full name of your mouse in the search engine and go to the manufacturer’s official website. You can usually download drivers in the “Support”, “Downloads” or “Software” sections. You can find the necessary drivers for your model on the websites of Asus, A4tech, Corsair. These are the most popular and well-known brands among computer mouse manufacturers. If you don't know how to install a wireless mouse on a laptop, you can also look for information in the instructions for the mouse.
You can see if the driver is installed correctly and even update it in the task manager. If the driver is not installed correctly, there will be a yellow triangle with an exclamation mark next to the device. Right-click on the device (for example, via a touchpad) and select “Update Drivers” to update through the OS.
Settings in the operating system
As a rule, with a correctly installed driver, there is no need to perform any settings in the OS. But through the interface, the user can configure various parameters of the mouse’s functioning: its sensitivity, pointer type and much more. To go to the desired section, follow the following instructions:
- Go to your control panel. On Windows 10, right-click on the Start icon.
- In Control Panel, select Mouse. A window will appear with several tabs where you can fully configure the device.
- In the “Hardware” tab, make sure that the system recognizes your device. The “Status” field should read “The device is working normally.”
Bluetooth connection (mouse without adapter)
To connect an optical Bluetooth mouse to a laptop, first make sure that your mouse supports this connection. There should usually be a Blue Tooth logo on the bottom or side. This information is also on the mouse box.
ATTENTION! If you are going to connect this mouse to a computer, make sure that the motherboard has Bluetooth support. Otherwise, you will need to buy an additional adapter - look at the models here.
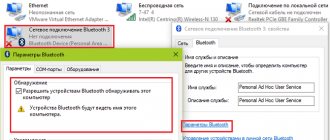
In the tray, find the “Bluetooth” icon and right-click on it. Next, select the button to add a device.
NOTE! If you don’t see this icon for yourself, then click on the arrow that points up - perhaps it’s just hidden. If it's still not there, check its presence in Device Manager. If it is missing, then most likely it is not turned on and drivers are not installed for it - there is a separate detailed article on installing Bluetooth from my colleague here.
Windows 7
Find “Bluetooth” in the tray and turn it on, if it is not already active - right-click and select “Enable adapter”.
Right-click again and select “Add device.”
Select your mouse from the list. If you don’t see it, then once again follow the steps that I wrote about just above - perhaps you didn’t turn it on, or didn’t activate the connection mode.
Since we are using a mouse, we select “Linking without code.”
After this, the connection should be established.
Windows 10
The mouse should have a button at the bottom that turns on “Bluetooth” - you should notice it by the corresponding icon. After turning on this button, the mouse will start looking for someone to connect to. To activate pairing, you need to press another button - most often it is called “Connect”. Click on it several times.
The connection should already be established, now it needs to be configured on the PC. Select “Add Bluetooth or other device”. Next, select the Bluetooth connection.
Now, among all the proposed devices, you should see your mouse - click on it.
After this, the laptop and mouse should connect to each other and you will see a success message. Try moving your mouse.
I also recommend installing additional software specifically for your mouse. This is especially true for cool gaming devices, where you can adjust the sensitivity in more detail or program some keys. You can download this software from the manufacturer’s official website. You can either go to the office. website and search for your mouse there, or simply enter the full name of the model into a search engine. The exact model name can be found on the box, in the instructions or under the case.
Connecting a wireless mouse to a laptop using Bluetooth
- You need to insert the batteries into the mouse by removing the battery compartment cover. Typically AAA or AA batteries are used, depending on the model. After installing the batteries (with obligatory observance of polarity), all that remains is to turn on the device using the switch at the bottom.
- Turn on Bluetooth on your laptop or other computer device, and use the connection search system to find the mouse.
Actions in operating systems:
Windows 7 : You need to open the control panel on the screen and select the devices and printers section, then click on add a new device. All that remains is to indicate the new mouse in the list that appears. Now you need to click “ Next ”.
Windows 8 : You need to press the Win + S combination to open the search for Bluetooth connections. In the window that appears, you need to select adding a new device, after which the computer will find the wireless mouse. Now the user only needs to add a device.
Mac OS X : the mouse is connected through the system settings; you must first enable Bluetooth on the laptop. You can find your wireless mouse in the Devices . You need to click on it to pair.
- Mouse settings. You can use either the basic settings of the operating system, or special software, if it comes with the mouse.
With these simple steps, you can easily connect your wireless mouse to your laptop.
How to disable the touchpad on a laptop?
The touchpad causes a lot of trouble when working, because when typing text, you inadvertently constantly come into contact with it. But you can disable it if you have an official utility from the manufacturer installed on your laptop.
Click on the “Start” menu and enter “Mouse” in the search - then click on “Mouse Options”.
In the device section, click on “Advanced settings...”.
There should be a checkbox on one of the tabs that will disable the touchpad when such a device is connected. It doesn’t matter which device is wired or wireless. At the very end, click “Apply”. I showed you the example of a Lenovo beech, but this function is available on all laptops.
How to connect a wireless mouse to a tablet
Sometimes there is a need to connect a wireless mouse and keyboard to a tablet or phone, for example, for typing text in large volumes, for processing it when there is no access to a desktop computer. Some tablets have a standard USB port. In this case, connecting a wireless mouse will not cause difficulties. Proceed in the same way as when connecting a mouse to a laptop. If there is no such port, then the tablet always has a micro-USB connector and you can simply use a USB - micro-USB adapter. It is usually included in the kit or purchased additionally. It looks like this:
Insert the mouse adapter into the USB connector and turn on the mouse. Through such an adapter it is possible to connect a regular, wired mouse to the tablet. A signal that the pointing device is connected to the tablet is the appearance of a standard cursor icon in the form of an arrow on the screen.