Operating principle of the refrigerator start relay
The control type mechanism, which controls the operation of the cooling equipment, is small in size and located in close proximity to the compressor. There are two types of relays:
- launchers;
- Start-protective.
The latter variety comes in two types:
- Current . It turns on when the electric current reaches a certain value. The motor consumes this electricity, and if it overheats, the relay cuts off the power. When the motor cools down to a certain temperature, the trigger turns it on again.
- Current-thermal . The starting relay is triggered by thermal indicators and electric current values. A running motor consumes electricity passing through the coil, which heats up slightly without affecting the biometric plate.
Starting relays come in several types, but there are two main functions:
- starting the starting winding;
- stopping the supply of electric current at increased engine speed.
Based on the principle of operation, devices are distinguished:
- tablet (posistor);
- induction
A posistor, a type of thermal resistor, together with a capacitor located between the buses of the working and starting windings, are the main parts of the tablet. The last part of the design provides a phase shift that turns on the refrigerator compressor motor.
The maximum electric current flows through the winding, heating the posistor and increasing its resistance. Electricity keeps a type of thermal resistor warm while the compressor is running.
The tablets include:
- RT;
- RCT;
- P3R;
- RP3P2;
- 6SP;
- A.E.G.
The main working part of the induction relay is a solenoid, the coil of which is connected to the working winding of the compressor motor. Electric current at its maximum value passes through the coil, creating a strong magnetic field. The attractive force of the latter attracts the current-conducting contact, completing the circuit.
A set of required rotor speeds becomes a signal to reduce the current strength, which reduces the impact of the magnetic field. This allows the core to restore its original position by opening the contacts. A prerequisite for the operation of the induction relay is a strictly horizontal location of the part inside the refrigerator.
Operating principle of the start relay
A three-phase motor does not need a starter. Alternating currents pass through three stator coils, the phase of each of which is shifted relative to the other by 120°. This creates a “rotating” magnetic field around the rotor.
In a stationary rotor, which is made in the form of a hollow cylinder of conductive materials or contains a short-circuited winding (according to the “squirrel cage” principle), eddy currents are generated. And they, in turn, interact with the electromagnetic field of the stator, are carried away by it, trying to “catch up” with it. This generates an electromotive force that spins the rotor.
As soon as the frequency (speed) of rotation of the rotor approaches the speed of rotation of the stator field, electromagnetic processes begin to “decay” in the current-carrying part of the rotor, it begins to slow down, gets excited again and accelerates. That is, the rotor rotates asynchronously relative to the magnetic field of the stator.
In domestic conditions, a single-phase network is used. But one working winding cannot “unwind” a stationary rotor - to create a starting torque on the stator, a second winding with a phase shift is needed.
Important! The second prerequisite for the starting winding is the offset relative to the working one. It is either located at an angle of 90°, or made with the opposite direction of winding (bifilar).
The phase shift for the starting winding current is created using an inductor or capacitor. But the operation of the second winding is needed only when starting the engine - the moving rotor will accelerate (or slow down) the rotation of the stator magnetic field, so for operation it will be enough if alternating current flows through the main winding.
To summarize what has been said, to start the compressor motor you need a device that performs the following functions:
- shifts the phase of the current for the starting winding;
- turns on the starting winding when the engine starts;
- turns off the starting winding when the rotor “accelerates”.
Hence the name of this part of the refrigerator - the start relay.
How to check the functionality of the start relay?
You can suspect a malfunction of an important part of the refrigeration equipment if the following non-standard reactions occur:
- the temperature inside the chambers is higher than normal;
- the equipment does not turn on;
- quick shutdown of the electric motor in working condition.
Before you start checking the start relay, you should make sure that it is the problem. To do this, disconnect the contacts from it and connect the compressor directly. The stable operation of this part of the refrigerator confirms the suspicions. If the compressor does not turn on when the electricity is turned on, then the problem is there.
Check the functionality of the relay according to the following scheme:
- Visual inspection of the location . The part is in the correct, strictly vertical position, there is no inclination or displacement.
- Using the tester . All contacts are probed with a measuring device. The absence of indicators is the result of oxidation and contamination of contacting units. Sandpaper all wires.
- Internal inspection . This procedure involves removing the device and opening it.
- The absence of the above violations requires checking the voltage supply. This is done with an ohmmeter or multimeter.
Troubleshooting and Troubleshooting
There are two ways to determine that the relay is broken:
- Remove the terminals from the trigger mechanism and connect them directly to the electric motor. If the engine runs stably, it turns off stably after 10-20 minutes.
- Connecting the operating relay. If with it the refrigerator starts and stops the engine reliably, then the problem is in the starter mechanism.
Mechanisms with moving parts, contact groups, heating elements are characterized by a standard set of breakdowns:
Contact group jamming
Typical fault signals of this type:
- the electric motor does not turn on at all when the current is connected;
- the engine runs for 10 minutes and turns off;
- non-stop operation of the motor.
A few seconds after the electricity is supplied, the thermal protection is triggered, and the starting relay turns off the current supply. The damage is corrected by restoring the mobility of the rod. The causes of failure are also wear of the part, mechanical damage to the mechanism as a whole or its parts.
Burning, oxidation of contacts
This type of malfunction is detected by disconnecting the relay contacts and connecting the electric motor directly. The stable operation of the latter indicates its serviceability.
You can check the condition of the starting relay with a tester - between the contacts the indicator is zero, indicating the absence of breakdowns. Exceeding the value indicates the need to replace the device. First, you can try to clean the contacts with sandpaper and smooth out the spots.
Heating element burnout
If the compressor does not turn on, the cause may be an open circuit. Attempts to independently correct the breakdown will lead to failure; a complete replacement of the trigger mechanism is required.
Failure of the biometric plate, loss of its main properties
The malfunction is accompanied by the opening of the contact group when the spiral reaches a certain temperature. Short-term switching on and off of the compressor indicates a breakdown of the biometric plate. The only way to fix this is by replacing the relay.
Calling contacts
Malfunctions of the trigger mechanism are detected with a multimeter by ringing three sections:
- Using a measuring device, check the input and output to the working winding for the presence of a break, oxidation of the open contacts, return of the protective mechanism to its original position;
- break of the zero section due to mechanical impact on the circuit;
- Use a multimeter to check the input and output to the starting winding for a break in the current-carrying wire, lack of contact, or open circuit.
Checking the posistor on and off
The part should be checked in a hot and cold state. 2-3 minutes is enough for the posistor to completely cool down. In this state, it must be probed with a millimeter. Absence of indicators or a high value indicates a malfunction of the element. When hot, the posistor displays certain data, which depends on the type of part.
Where is the relay located in the refrigerator? The refrigerator start relay is an important element
The longest-running device in our apartments is not a computer or TV, but an ordinary refrigerator. The refrigerator operates around the clock, and we evaluate its operation 2-3 times a day. If the refrigerator is made with high quality, then we don’t have any problems with cooling food for at least 20 years. Many people still have old Soviet-made refrigeration units. And like everything in this life, the refrigerator suddenly breaks down, but instead of throwing away the device that has served faithfully for so many years, you can make an attempt to restore it. Due to the repair, the fact that the new thing will be good on the outside, but the reliability is unlikely to compete with the Soviet apparatus.The principle of operation of a refrigerator can be considered using the example of a filled gas cylinder. The cylinder is filled with gas under high pressure and the temperature of the gas and the cylinder are the same and correspond to the street temperature. If you open the valve, the gas will begin to escape and at the same time the valve will begin to cool sharply. This is due to the fact that gas in a cylinder under pressure has a very high boiling point, and outdoors at low pressure this point is very low. As if you boil a kettle of water and start climbing a mountain, the water in the kettle would continue to boil, because as the pressure drops, the boiling point decreases. So it turns out that the gas in the cylinder is a liquid, and as soon as it leaves the cylinder, the gas immediately boils. When boiling, the gas evaporates, and the surface from which it evaporates freezes, because the gas takes heat from this surface. So, back to the balloon. If we now connect the cylinder to a cooler, where the products we need will be cooled, and a pump that will drive gas from the cylinder through the cooler into the cylinder, then nothing will work. You need to somehow create a pressure difference. The pressure difference can be achieved using a throttle - a thin tube. The tube will not allow a large amount of liquid gas to pass through, it will become a narrowing, and after passing through the tube, the gas enters the evaporator, where there is a lot of space and where the gas will boil.
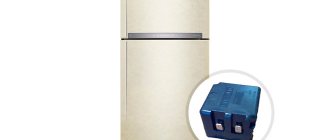
So, this refrigerator worked for me until it suddenly stopped and started leaking. By the way, if water flows from under the refrigerator, this is not a breakdown, it’s just that the condensate drain hose from the chamber has shifted. The hose connects the chute for draining condensate from the refrigerator chamber and the container on the compressor.
The rear panel does not provide any particularly interesting data. The refrigerator cost a huge amount for that money - 355 rubles, which was 3 monthly salaries of an engineer. The refrigerator is powered by an AC mains frequency of 50 Hz with a phase voltage of 220 V and consumes 155 W.
The general electrical circuit is shown in the figure. The circuit contains two temperature relays with temperature sensors (RTS). One sensor monitors the temperature of the refrigerator compartment and turns the refrigerator compressor on and off. The second sensor contains a button called “defrost”. If you press this button, the relay will turn off the compressor, but it will turn back on only after the temperature in the refrigerator reaches approximately +10 C.
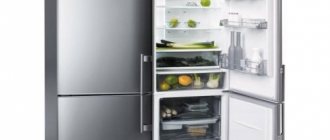
Freon-12 is used as a substance that takes heat from products. Freon is a gas, but if you compress it, the gas will transform into its other state - liquid. The essence of the refrigerator is very simple: warm food is placed in a heat-insulated cabinet, the walls of which are equipped with tubes through which cold liquid flows. As a result of the fact that there is no heat exchange with the outside room, the heat from the products heats the liquid inside the cold tubes and the products are cooled. As a result of the circulation of liquid in the refrigerator, the substance heats up and turns into a gas. To maintain the desired temperature, the compressor must operate periodically. Periodic operation is influenced by the temperature sensor with which we increase or decrease the temperature in the refrigerator.
First, the superheated refrigerant compressed by the compressor in a vapor state enters the condenser - a long zigzag tube. Here it gives off its heat to the surrounding air and, upon cooling, turns into liquid. Then the liquid refrigerant enters the evaporator, which is located inside the freezer. There, at low pressure, it begins to boil and evaporate. And since it evaporates, it means it takes away heat from the chamber and creates cold. The evaporated refrigerant is again sucked into the compressor, and the cycle repeats.
The main consumer of electrical energy in the refrigerator is the light bulb and the compressor. A light bulb in the refrigerator is needed to illuminate food for those categories of citizens who eat at night. The light comes on when the refrigerator door is opened. It has no effect on the operation of the compressor.
The compressor is used to transfer the refrigerant from a gaseous state to a liquid state. The compressor is a sealed tank in which an electric single-phase motor and a gas liquefaction mechanism are located.
The compressor is a sealed and non-separable device. Freon is a gas circulating in a closed ring inside the entire hydraulic system of the refrigerator. Usually, when freon leaks on the evaporator - a plate inside the refrigerator - a fur coat grows - a large block of ice, and the compressor switches to almost round-the-clock operation. Local shabashniks treat this syndrome by pumping in freon and thereby eliminating the consequences of the breakdown for some time. After a little time, the freon comes out again and the fur coat grows again. In a good way, in case of such a breakdown, you need to look for the cause - bad soldering or a cracked tube.
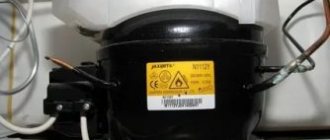
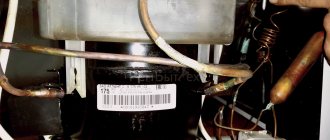
Compressors are available in many modifications. Remove the presented compressor from the Minsk-15 refrigerator.
You can disassemble the compressor using a grinder. If you cut off the top of the cap, you can see a vertically located engine and a block with one cylinder. The freon tube is bent into a spiral so that there is play in the tubes during vibration. If the tubes are tightly secured, vibration will cause them to break.
Cutting the top will do nothing to remove the engine, so you can cut off the bottom of the compressor. The bottom view gives an idea of the cooling of the entire compressor during operation. At the bottom there is a tube through which freon is circulated, cooling the engine itself. In addition to the tube, shock-absorbing fasteners on which the engine is mounted are visible on the sides. As a result of the fact that the engine converts the rotating movement of the shaft into the translational movement of the compressor piston due to the eccentric on the engine shaft, vibrations occur in the entire mechanism. To compensate for vibration on the shaft next to the eccentric, metal was selected in such a way as to level the masses during rotation, balancing the entire system. The engine is also placed on springs placed on pins. Nuts are not used. The engine is limited at the top by a cap. The motor connection connector is also located here.
The first cut went through the bottom of the cap and was useless for disassembly, just like the second cut. To remove the engine from the housing, you need to make a cut under the head or in the middle of the tank. The removed engine is covered in oil. The windings are clearly visible on it - working and starting. The starting winding is made of thick wire and has low resistance. The working winding is the exact opposite of the starting winding: small diameter and high resistance.
After removing the casing, the engine and compressor present a deplorable sight.
By removing the four screws holding the compressor housing in place, the compressor and motor can be separated. The eccentric and balance plate are visible on the engine. On the compressor you can see the piston itself with a hole for the eccentric, which pumps freon into the system.
There are only 4 chambers on the compressor. Through some, freon is taken from the system, through others, with the help of a piston, freon is compressed and pushed back into the system.
This is roughly how a refrigerator compressor works.
A single-phase electric motor has two windings connected in series with an output from a midpoint.
To start such an engine, you need to apply either phase or zero to 0 common, and either zero or phase to 1 start and 2 working, respectively. In other words, the voltage between pins 1 and 0 should be 220 V, between pins 0 and 2 - 220 V, and between pins 1 and 2 the voltage should be zero. If the voltage is applied correctly, the engine will jerk and the rotor (the part of the engine that rotates) will begin to rotate. The direction of rotation depends on which end of the working winding is connected to the common terminal. In a refrigerator, it is impossible to start the engine in the other direction, because the common terminal is located inside the hermetically sealed compressor.
After the rotor begins to rotate, you must immediately turn off the starting coil. Otherwise, the motor will overheat and the winding insulation will burn out, which will cause an interturn short circuit and damage the motor. To disconnect the starting coil, it is enough to disconnect pin 1, then the voltage between pins 0 and 2 is 220 V and the engine will not stop.
The starting coil is only needed to start the engine and is not needed at all while it is running. To accurately determine the health of the engine, use an ohmmeter; the resistance values are visible on the device.
The starting current of the refrigerator compressor motor is 4.8 A, and the operating current is 1.02 A. At the same time, the resistance of the starting winding is 13.1 Ohms and the operating winding is 47.5 Ohms. Small fluctuations of 0.5 ohms are acceptable. It should be taken into account that the more powerful the refrigerator, the higher the resistance and current values will be.
All manufacturers see their compressors differently and the starting winding is not always higher in resistance than the working winding. Many foreign manufacturers have a working winding larger than the starting winding. This difference is only a few ohms. It all depends on the manufacturer and the specific compressor. On the compressor label you can see three connection points similar to the compressor connector.
C - COM, means the point of connection of two windings, i.e. center point;
S - START, starting starter winding;
R - RUN or M - MAIN, working winding.
For comparison, I present the resistance of the compressor windings of refrigerators from different manufacturers.
The engine is controlled by a starting relay. The relay is located in a plastic box to the right of the installation junction box.
When a single-phase electric motor is turned on, a large starting current flows through the working winding. The starting current is 3-7 times the rated current of the motor, it lasts only for a while until the motor rotor begins to rotate and reaches the rated speed. The relay coil is connected in series with the working winding of the motor, so when the current is high, a magnetic flux will appear in the coil, which will push the coil core up. At the end of the core there is a contact plate that connects the starting winding of the motor to the network. As soon as the rotor rotation speed reaches the planned value, the starting current in the working winding will drop, the magnetic flux in the starting relay coil will drop and the plate will lower, disconnecting the starting winding of the engine from the network.
If the engine overheats, that is, if the engine rotor does not have time to pick up rotation speed, or if the engine itself is faulty, an emergency shutdown of the electric motor from the network is provided. The protection is made in the form of turns of nichrome wire. Nichrome is an alloy of the metals nickel and chromium. When current is passed through it, the nichrome heats up and releases heat, but does not burn. That is why most electric heating devices contain this metal.
When large starting currents flow, nichrome heats the bimetallic plate located underneath it, the plate heats up and bends, disconnecting both motor windings from the network. After some time, the nichrome will cool down, the bimetallic plate will return to its normal position and the relay will restart the refrigerator again. If you have a refrigerator at your dacha and during a thunderstorm, or when a welding machine is working nearby, the refrigerator growls and does not turn on, then know that there is not enough voltage for the rotor to gain the required speed and the protection is triggered.
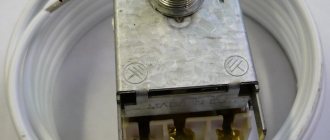
The start and shutdown of the refrigerator is controlled by a temperature sensor, which gives the start command by applying a potential to the common terminal of the motor. The temperature sensor is a sealed tube filled with gas, a housing with a rod for regulating the temperature at which it operates and leads for connecting wires.
Sometimes two sensors are installed - one on one camera, and the second on the second camera. Or the second sensor is used for the defrosting function, which means that the refrigerator will not turn on until it is completely defrosted.
When assembling and connecting all wires, you must observe the correct electrical diagram. For clarity, all wires are marked. 220 V (brown and blue) comes from the network. The compressor motor is also powered by 220 V. Power is supplied to the motor from the brown power wire through the blue wire (3). The second wire to the engine is taken from the brown network wire through the gray wire to the temperature sensor, the output from the sensor is a white wire connected to the black wire (0). To check whether the compressor is working without a temperature sensor, you need to apply a voltage of 220 V to the blue (3) and black (0) wires suitable for the start relay.
For those who are especially meticulous and don’t have a start relay, you can take three pieces of wire. Connect one to terminal (0) on the compressor plug, the second to the end of the working winding (2) and the third to the end of the starting winding (1). The free ends of the wires (1) and (2) must be connected together. It is advisable to equip the wire to terminal (1) of the compressor with a toggle switch, but it is possible without it. Now you need to apply power. Insert the wire to terminal (0) into one contact of the socket, and the wires connected together to terminals (1) and (2) into the other. Almost immediately you need to disconnect the wire to terminal (1) from the network. The relay response time is approximately 0.5 s. It’s better to disconnect it with a toggle switch, but you can also use side cutters with insulated handles. The compressor will start working. To start it again you will need to cut the wire again. There are never too many wires, so if there is no relay, assemble a switching circuit through a toggle switch or circuit breaker. The engine runs on 220 V, which is supplied to contacts (0) and (2). Just to start, you should connect to contact (1) the same wire that goes to contact (2).
Almost all single-phase motors can be started from a capacitor. The fact is that single-phase motors operate from brushes (one stator winding and one armature), starting relays (two unequal stator windings) and a capacitor (two stator windings). The capacitor is connected between the ends of both windings according to the diagram below.
On average, the capacitor capacity is taken at the rate of 22 μF per 1 kW of engine power. It turns out that a 155 W refrigerator motor needs a 3 µF capacitor. You need a paper capacitor. The supplied 160 V capacitor did not heat up or explode, but it did crack, so we are looking for a capacitor of at least 250 V. The heating of the windings will serve as an indicator of operation. The reason why a relay is used to start the refrigerator compressor is higher starting reliability. And indeed, during tests, the engine started when the power cables were switched sharply, but when started using a switch, sometimes the engine did not rotate, but hummed. This is due to the fact that a starting capacitor was not used. The starting capacitor is connected in parallel with the working capacitor and only when the engine starts. The capacity of the starting capacitor is 3 times higher than the capacity of the working capacitor.
Have a nice renovation. Be careful with electricity.
Malfunction
| Cause | Elimination | |
| The refrigerator is not freezing | Compressor burned out | Replace compressor |
| Start relay burnt out | Replace start relay | |
| The power cable is faulty | Fuse the breakdown site and isolate it | |
| Works and doesn't turn off | Temperature sensor faulty | Disassemble and replace the sensor |
| It buzzes and turns off immediately | The motor starting winding does not start | Clean the contact plate of the start relay |
DIY relay replacement
Symbolic identifiers of the feed-through contacts will help you correctly connect the new starting device. If there are none, then when unscrewing the wires, it is recommended to mark them, otherwise it is easy to mix up the contacts, which will lead to breakdown of a working mechanism.
Refrigerators Nord, Stinol, Ariston, Indesit have similar designs, so replacement is carried out according to the same scheme:
- disconnect the device from the power supply, after which it is recommended to wait until the device is completely de-energized;
- unscrew the fasteners securing the water supply hose and move it to the side to avoid damage;
- Unscrew the fasteners of the rear panel, remove the protective plate of the rear panel of the refrigerator;
- press out the latches, rivets or unscrew the screws holding the trigger mechanism to the compressor;
- carefully pull out the part, maintaining spatial orientation;
- disconnect the wiring from the start relay, mark each contact to avoid confusion when installing a new device;
- loosen the clamp by lightly pressing, disconnect the connector;
- clean the contacts of the wires and connector with a soft cloth moistened with alcohol;
- move the starting capacitor from the old to the new relay;
- connect the cleaned connector to the space provided for it;
- fix the relay on the capacitor in a strictly vertical position;
- Tighten the wiring using pliers and check the reliability of the connection;
- secure the relay with screws, latches, rivets;
- put the back panel in place, screw it on;
- put the water supply hose in place and secure it;
- Connect the refrigerator to the electrical network and check operation.
Replacing the starting relay of Atlant, Minsk refrigerators is carried out according to a different scheme, since they have similar designs:
- disconnect the refrigeration device from the electrical network, wait a while for complete de-energization;
- remove the back panel of the refrigerator;
- remove the wire clamp that secures the trigger mechanism;
- disconnect the contacts, inspect them and, if necessary, sand them with sandpaper;
- mark the wires to avoid mixing them up when connecting a new device;
- Unscrew the fasteners, if they are rusty, pry them off with a screwdriver or lubricate them with oil;
- slightly press the wire clamp to remove the device;
- move the starting capacitor from the old to the new relay by simple rearrangement;
- install the mechanism in place, monitor strict horizontality and verticality;
- connect the wires according to the markings, securely screwing each patch;
- Throw on a wire clamp and secure;
- put the back panel in place, tighten the screws;
- Connect the refrigerator to the electrical network and check operation.
Modern types of cooling equipment have similar designs, but there are still differences that must be taken into account before starting independent repairs. Experts recommend reading the manufacturer's instructions before opening the equipment in an attempt to fix the problem.
Replacing the start relay of a Liebherr refrigerator:
- disconnect the refrigeration device from the electrical network, wait until the power is completely off;
- Unscrew the fasteners, move the rear protective panel;
- remove the plastic cover and inspect the mechanism;
- Clean the contacts with sandpaper;
- check the serviceability of the return spring;
- unscrew the fasteners securing the start relay;
- replace the device with a working one, having first checked it;
- put the device in place of the old one;
- secure with fasteners;
- return the back wall to its place, tighten the screws.
Operating principle of the starting protection relay
The starting coil must be turned off when the speed is up. At the moment of start, the windings consume a large current, the effect allows you to track the moment of recommutation. The refrigerator start relay performs protective functions (not always). The option is implemented by heating the sensitive element with electric current. The threshold is exceeded - the circuit breaks, regardless of whether the desired refrigerator mode has been reached according to the thermostat readings or not. Two schemes for the operation of the starting relay have been invented (at the same time it can be protective):
- "Tablets" work on the basis of a material that expands by heat. Initially, the working element is cold, the starting winding consumes current, ensuring a smooth start of the asynchronous motor. Gradually, the temperature of the tablet rises, causing the contact to open, and the working coil remains switched on. We believe that to maintain the mode, a mechanism is installed inside the relay to prevent the tablet from cooling. Operating winding choke, heating element. If a button relay breaks, you can often hear the rustle of scattered powder inside, changing the position of the device body.
- Induction relays are based on the action of electromagnets. When starting, the current is high and due to this the core presses the contacts of the starting coil. Over time, engine consumption drops. As a result, the current will no longer balance the spring, and the contacts of the starting coil open. Please note: it is important to orient the relay in space correctly. Often the core falls, carried away by the force of gravity. But testing such elements is much simpler: turn from side to side so that the contacts of the starting relay change the resistance from zero to infinity.
The tablets often come with thermal relays on a bimetallic plate in the same housing. The current of the working coil passes through it. As soon as the value exceeds the response threshold, the contacts open, stopping the compressor. The bimetallic type refrigerator relay circuit is based on heating the sensitive element.
There is nothing complicated about it! The two plates are welded tightly to each other. The coefficient of expansion of metals in them is different. When heating occurs, the double plate bends towards the material that elongates less. It becomes possible for the relay to operate. This scheme is often used in household appliances.
Induction relays often use a heating coil. There is already one material here. But it heats (!) the bimetallic plate. The current of the working coil passes through the spiral. If the amperage is too high, the bimetallic strip breaks the contacts. The inductive start-up relay has the following types of faults:
- the spiral has burned out, in this case the contacts will not ring in any position;
- the core is jammed, the engine does not start, or the engine stalls after 5 - 10 seconds;
- The operating mode of the plate is disrupted, the refrigerator turns off even in normal mode.
We would like to draw your attention: thermal protection is completely emergency. In normal operation, the relay should not operate. At the same time, the starting function accompanies the refrigerator during the operating period. The switching process is accompanied by a slight click. We often hear the start-up relay in the refrigerator when the appliance is running.
The start-up relay resembles a tablet or an indeterminate shape in appearance. This is such a small element located directly next to the black barrel-shaped compressor housing. Have you ever wondered why this soot color was chosen to paint the heart of the refrigerator?
The answer is simple: black absorbs heat, but also radiates well. In which direction the process moves determines the direction of the temperature difference between the compressor and the environment. When the motor is hot, the black housing gives off heat to the air. In addition, there is a fan nearby that creates forced cooling of the compressor.
Read more: Repair of Stinol refrigerators, typical breakdowns, how to fix it yourself
Switching diagram of the refrigerator start-up relay:
- Phase 220 V.
- Earth.
- Starting winding of an asynchronous compressor motor.
- Working winding of an asynchronous compressor motor.
- Earth.
You can usually find out what is connected where and by the color of the wires. In any case, repairs should be carried out carefully. It’s easier to find out the compressor ground if you scrape a little paint off the housing and ring the three contacts. But this method is left for last when the others have not helped.
DXR induction start-up protection relays are mounted on a fixed frame and work in tandem with DXM compressors. The designation may be followed by a number that is the same for both devices. The difference in designs is in the operating voltage and operating and releasing currents. To speed up the breaking of the circuit when overheated, a magnet is located behind the bimetallic plate.
The induction relay for the RTP refrigerator compressor differs in that it can also be located on a wire. Doesn't have to be attached to the frame. The work is carried out with compressors DXM 3 and 5. The difference from DXR is a slightly lower operating current. This will better protect the compressor. The release current is the same. Craftsmen use refrigeration compressors to manufacture high-pressure apparatuses and receivers. Tires are inflated and pneumatic equipment is used.
Before you buy a relay for your refrigerator, make sure that the product matches the type of compressor. The element must then be installed correctly. It is better to take exactly the brand that was available before the repair. If the relay of the Biryusa refrigerator is equipped with the RTK type, it is better to take this, despite the fact that both RTP and DXR are also suitable for the DXM engine. Lookup tables can help determine device compatibility. Indicate the necessary technical information.
How to remove the start relay
An important part of the refrigerator does not break often, but replacing or repairing it requires certain knowledge, a set of tools, and protective equipment. The design of the starting relay is simple, so a couple of assemblies and disassemblies of the mechanism will allow you to acquire sufficient skill, understanding of what is happening, and experience.
To remove the start relay, you must follow the diagram:
- disconnect the refrigerator from the electrical network, wait until the power is turned off;
- unscrew the fasteners securing the protective cover and move it to the side;
- disconnect the contacts by unscrewing, when soldering with metal parts, pry them up with a flat screwdriver;
- remove the latch screws holding the relay;
- remove the trigger mechanism.
How to connect the start relay
Self-installation of a new mechanism must be combined with a certain level of knowledge, otherwise you should call a specialist. If the refrigerator arrived without a start relay and there was no visual inspection of its correct location, it is recommended that you read the manufacturer’s instructions.
The starting relay connection diagram is standard:
- disconnect the electrical appliance from the network;
- wait a few minutes for the equipment to completely de-energize;
- unfasten the water supply hose from the back wall and move it away so as not to accidentally damage it;
- Unscrew the fasteners securing the protective panel and put them aside;
- remove the old start relay; if it is not there, find the location on the compressor;
- connect the connector to the new device;
- insert into place;
- connect the wires according to the markings;
- secure the trigger mechanism with screws and latches;
- put the back panel in place, screw it on;
- attach the water supply hose, secure;
- plug into the electrical network for testing.
Professionals recommend using protective gloves to prevent hand injuries. Independently connecting modern types of starting relays can cause a number of difficulties that are not always possible to correct on your own.
The start relay is an important part of the refrigerator that starts the electric motor and protects the equipment from breakdowns. Failure of an element leads to the appearance of uncharacteristic noise and equipment not turning on. You can identify the malfunction, carry out repairs, and replace it yourself, but in the absence of certain knowledge, it is better to turn to specialists.
How to test the refrigerator start relay
It is not uncommon for a refrigerator to suddenly break down. The cause of the breakdown can be many factors. This includes a power surge, physical damage, and manufacturing defects. You need to know how you can diagnose a refrigerator relay for stability. You can do a short test yourself at home. Electrical measuring instruments must be available.
View » Why the red “attention” light is on in the Atlant refrigerator: reasons for the signal, what to do to fix the problem
First you need to find out whether the spare part is located correctly. The norm is strictly vertical. Then you need to remove the part, check its integrity and contacts. They may become acidic or dirty, then they should be carefully treated with fine sandpaper. Contact between terminals can be checked using a tester. It is better to remove noticed rust with a special solution. The presence of traces of burning means only one option - the part is faulty and must be replaced.
Using the “diagnosis” procedure, it is worth testing whether the voltage is correct for the compressor (you should use an ohmmeter or multimeter).
The parameters obtained as a result of the measurement are compared with those declared for this refrigerator model. If the actions do not lead to a positive result, you can call a specialist to your home. On site, a specialist with special knowledge and skills will be able to determine how much repairs cost, how to check the refrigerator start relay for functionality most effectively, and where else the breakdown may be located.
Where is the relay located
The initial installation location is determined by the manufacturer based on their size, type and model. You can see where it is and check the relay by removing the back panel of the refrigerator. In this case, be sure to follow electrical safety precautions.