Home / Gas boilers
Back
Published: 02/29/2020
Reading time: 5 min
0
1516
Thermocouple for a gas stove, integrated into the safety system to control the burner flame. If it suddenly comes off and the combustion process stops, it sends a signal to shut off the gas to the burner.
A thermocouple is a simple heat sensor that does not have any electronic devices inside that could fail. It can only burn out as a result of prolonged use.
In this case, the gas stove does not work normally and becomes an emergency, interruptions in the gas supply will begin, the flame does not burn evenly or goes out.
- 1 Why do we need a thermocouple?
- 2 What is a thermocouple
- 3 Operating principle
- 4 Types of temperature sensors
- 5 Cleaning
- 6 Functionality check
- 7 Replacing the thermocouple yourself
Why do you need a thermocouple?
To create safe operating conditions for gas stoves with an open flame, protective systems are used today in which the primary temperature sensor is a thermocouple.
During gas combustion, with the gas supply to the burner open, the high temperature between the contacts of the primary sensor causes a thermal electric force. When the torch from the burner breaks, the gas flame goes out, the thermocouple cools down, the thermoelectric force disappears, the gas valve closes under the action of a spring, thereby cutting off the fuel supply.
Many modern Western gas stoves are equipped with a gas control system, which also includes a thermocouple. At the same time, users note that the system often triggers falsely and cuts off the gas supply when it is absolutely not necessary.
In particular, if liquid gets on the gas stove or there is a draft in the kitchen, the thermocouple is activated and shuts off the gas. Therefore, owners of modern gas stoves need to understand the principle of operation of the protective system and figure out how to replace the thermocouple in a gas stove if it malfunctions.
Differences from temperature sensor
In addition to the thermocouple, a thermal cylinder is connected to the automatic fuel valve of the boiler, which is responsible for turning off the main burner when the set coolant temperature is reached. Externally, the element flasks and copper connecting tubes are somewhat similar. An uninformed homeowner can easily confuse these sensors.
Let us list the main differences between a temperature meter and a thermocouple:
- sensor design - a cylindrical bellows made in the form of a copper flask with a sealed end;
- the thermal cylinder is connected to the gas automatics with a thinner capillary tube than the electricity-generating sensor;
- the heat-sensitive flask itself is installed inside the immersion sleeve or hidden under the casing near the water jacket, and is not attached near the igniter;
- The temperature meter does not detach from the automation at all or the size of the fastening nut differs.
We recommend: How to choose the right heating radiator
Note. The thermal balloon operates on a different principle: when heated, a special liquid expands inside the flask. The pressure through the capillary is transferred to the automatic valve, which turns off the main burner. The igniter flame does not go out.
What is a thermocouple
The thermocouple terminology is defined by the international standard, which considers this device in the form of 2 welded conductors of a variety of alloys with the opposite sign of the thermopower, and therefore the greatest potential difference is created.
Gas stove thermocouple device:
- a thermoelectrode having a “hot” junction made of 2 different metal alloys, attached with a nut to the mounting plate next to the stove burner;
- extension cord - a wire laid inside a copper tube, in parallel acting as a negative contact;
- a positive terminal protected by a washer made of dielectric material, installed in the body of the gas shut-off valve and secured with a nut.
Characteristics of thermocouples for popular gas stoves:
- Thermocouple for Hansa gas stove, country Poland, length - 45 cm, price - 950 rubles.
- Thermocouple for Indesit gas stove, country Italy, length - 45 cm, price - 800 rubles.
- Thermocouple for gas stove Hephaestus, country Russia, length - 45 cm, price - 700 rubles.
- Thermocouple for Bosch gas stove, country Germany, length - 55 cm, price - 902 rubles.
Thermocouples for gas boilers: classification, installation features and operating principle
- Type K made of nickel-chrome (TCA thermocouple) or nickel-alumel (XA), which has the following properties: low price, durability, error of no more than 0.4%, measurement range from -270 to 1269 degrees. Designed to work in oxidizing and inert environments.
- L - chromel-copel (TCC), an inexpensive thermocouple with an upper limit of 600 degrees.
- J—iron constantan. The sensor ranks second in popularity, the range is from -210 to +760 degrees, less durable, resistant to oxidation.
- E - nickel-chromium or nickel-constantan with higher accuracy and signal magnitude, the upper measurement limit does not exceed 870 degrees.
- Sensors made of noble metals operate at higher temperatures, but have a high cost, and therefore are most often used in industry.
Thermal sensors are made mostly from base metals. They are protected from the influence of the external environment by a pipe with a flange that serves to mount the device. Protective fittings protect conductors from the influence of aggressive environments and are made without seams. The material is ordinary (up to 600ºС) or stainless steel (up to 1100ºС). Thermoelectrodes are insulated from each other with asbestos, porcelain tubes or ceramic beads.
If the terminal is located close, then the thermocouple wires are connected to it directly, without additional connectors. When the measuring device is located at a distance, when it is connected to the circuit, the free ends of the thermocouple are placed in a cast head attached to a protective tube.
Inside there are brass terminal blocks on a porcelain base for connecting compensation wires, made of the same materials as thermoelectrodes, but not having precise and strictly controlled characteristics. They are less expensive and thicker. They are inserted into the head through a fitting with an asbestos gasket.
Ceramics serves to equalize the temperature at all joints. There is a threaded protective cap with an airtight seal on top.
Crimp terminals should not be installed on wires as they may impair the accuracy of the readings. A ring is made from wire and clamped under a screw.
Correction of temperature changes at the terminals can be done electronically, which increases the accuracy of measurements.
Disadvantages of Thermocouple
The thermocouple does not have many disadvantages, especially when compared with its closest competitors (temperature sensors of other types), but they still exist, and it would be unfair to keep silent about them.
So, the potential difference is measured in millivolts. Therefore, it is necessary to use very sensitive potentiometers. And if we take into account that it is not always possible to place metering devices in close proximity to the place where experimental data is collected, then it is necessary to use some kind of amplifiers. This causes a number of inconveniences and leads to unnecessary costs when organizing and preparing production.
Working principle of thermocouple
A thermocouple consists of two wires made of different metals. These two wires are bonded or welded together to form a junction. When this junction is exposed to temperature changes, the thermocouple reacts to them by generating a voltage proportional in magnitude to the temperature changes.
If a thermocouple is connected to an electrical circuit, the amount of voltage generated will be displayed on the scale of the measuring device. The meter readings can then be converted into temperature readings using a table. On some instruments the scale is calibrated directly in degrees.
Thermocouple in an electrical circuit
Measurement error
The correctness of temperature readings obtained using a thermocouple depends on the material of the contact group, as well as external factors. The latter include pressure, background radiation or other reasons that can affect the physical and chemical properties of the metals from which the contacts are made.
consists of the following components:
- random error caused by the manufacturing features of the thermocouple;
- error caused by a violation of the temperature regime of the “cold” contact;
- error caused by external interference;
- error of control equipment.
Replacement if you can’t repair it yourself
The device crashes for various reasons. You can replace a broken device with a new one yourself . To do this, you need to follow the step-by-step instructions:
- First, use a wrench to unscrew the special nut with which the thermocouple is attached to the pipe.
- Unscrew the compensation screw that fixes the device in place (it is located directly under the mounting bracket).
- Carefully remove the old device.
- is inserted into the vacated hole .
- Everything is fixed with a compensation screw and then with a nut .
- A leak test is performed If necessary, a sealant is used - polymer or ceramic.
When carrying out the procedure, it should be remembered that an undertightened or overtightened threaded connection will be dangerous for the serviceability of the system.
Bibliography
- https://ru.wikipedia.org/wiki/Thermocouple - Thermocouple
- Garcia V. – Temperature measurement: theory and practice
- https://slovari.yandex.ru/~books/TSB/Thermometry/ - Thermometry
- Preobrazhensky V.P. – Thermal measurements and instruments...
- Zimin G.F. – Verification and calibration of thermoelectric converters...
- https://ru.wikipedia.org/wiki/Getter_(getter) - Getter (getter)
- https://metallurgicheskiy.academic.ru/2094/Gas density – Gas density
- Nikonov N.V. - Tungsten. Properties, application, production, products (https://www.metotech.ru/articles/art_volfram_1.pdf)
- Nikonov N.V. – Thermocouples. Types, characteristics, designs, production (https://www.metotech.ru/articles/art_molibden_1_web.pdf)
- https://ru.wikipedia.org/wiki/Graduation - Graduation
- https://temperatures.ru/pages/graduirovochnye_tablicy - Calibration tables for thermocouples (NSH)
- GOST R 8.585-2001 “Thermocouples. Nominal static conversion characteristics"
Source: https://www.tproekt.com/termopara-cto-takoe-prostymi-slovami/
Principle of operation
The thermoelectric effect in a thermocouple occurs at the junction of two conductors made of different metals and alloys combined into a current-receiving ring. When the liquidus of the adhesion zones is equal, the potential difference is zero.
As soon as one of the ends is in an area with a higher or lower temperature, a voltage will begin to appear, which will be proportional to the temperature delta. The coefficient of this relationship differs for various alloys.
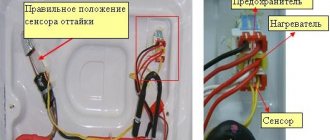
The operating principle of the gas control system is based on the interconnected functioning of the basic protection elements:
- The user, by pressing, rotating and holding the knob on the working panel of the gas stove, which has a built-in gas control system, opens the gas, which is ignited by the igniter.
- In the burner area, the temperature begins to rise from the combustion products, as a result of which the end of the sensor heats up.
- The thermocouple in the gas stove supplies an electrical signal to the solenoid shut-off valve.
- In stable mode, the valve is in the open position.
- When the flame on the burner goes out unexpectedly, for example, due to spilled liquid, the temperature sensor cools down, the shut-off valve does not receive a signal from it, so the emergency protection is triggered and it closes, cutting off the gas supply to the burner.
After the protection is triggered to turn on the gas stove, it takes a certain amount of time because the sensor does not heat up immediately. In various modifications, the process takes approximately 5 or 20 seconds; before this time, turning on the stove is impossible.
The temperature sensor, as a rule, has a single hot tip located near the fire divider. There are options with 2 or 3 temperature control points. They are used in ovens of various modifications.
Such multi-point sensors have a peculiarity: even if only one of them fails, the shut-off valve will be triggered to close.
How to check and replace a thermocouple
The main sign of a malfunctioning flame sensor is that the wick goes out simultaneously with the release of the button. Sometimes the problem manifests itself differently - the light on the igniter remains, but after igniting the main burner, the fuel supply is shut off again and the boiler goes out completely. Reasons for such problems:
- the thermal electrode is covered with soot and does not warm up well, causing the voltage in the circuit to drop below the minimum;
- burnout of the meter body;
- contact failure at the hot junction point;
- the fastening nut has been unscrewed, the working rod is skewed and is poorly heated by the igniter;
- the traction sensor has become unusable or its electrical circuit has broken.
The electrode heated by the igniter must be periodically cleaned of carbon deposits. The problem is that the contamination of the part is hard to see from the outside; you have to remove the bar or the entire panel with the burner
Clarification. A malfunction of the draft sensor causes similar symptoms, since this “limit switch” is connected in series with the thermocouple (in an open circuit). To eliminate the influence of the sensor, temporarily short-circuit its wires.
For diagnostics, you will need a multimeter or other device capable of measuring low voltage (up to 100 mV). How the check is performed:
- Close the gas supply to the heat generator or instantaneous water heater using the tap located on the supply pipe. Remove the casing or front panel of the unit.
- Using open-end wrenches, unscrew the nuts securing the thermoelectrode and connecting tube. Remove the flame sensor.
- Carefully inspect the working electrode, clean it of soot with a brush and rag. If burnouts are detected during a visual inspection, the thermocouple must unconditionally be replaced.
- Moving to the kitchen, light the gas stove burner. Connect the multimeter clamps to the center terminal and the copper tube. Set the lowest measurement limit – 0.1 or 1 V.
- Heat the thermoelement with a gas stove burner while observing the voltmeter readings.
The main condition: a working thermocouple for the boiler must produce a voltage of at least 0.02 volts. If the device shows zeros, the voltage fluctuates or does not exceed 20 mV, the element needs to be changed. Modern sensors cannot be repaired by re-soldering.
Watch this video on YouTube
Advice. When buying a new thermocouple, always be guided by the brand and specific model of the boiler, so as not to get confused in the markings and designations.
If you don’t want to remove the element ahead of time, diagnostics can be performed directly on the boiler. After unscrewing the nut, disconnect the thermocouple tube from the automation and connect the multimeter as described above. While holding the key, light the igniter and take readings from the device. Disadvantage of the method: the impossibility of visual inspection and cleaning of the electrode from soot.
We recommend: Drip furnace: do-it-yourself testing, drawings, options
When installing a new thermocouple in a gas boiler, adjust the position of the heated rod. Ideally, the electrode is horizontal, does not deviate up or down, and is well washed by the flame of the wick.
Types of temperature sensors
In the production of thermoelectric sensors, various alloys of noble and ordinary metals are used. For certain temperature ranges, specific categories of metal are used.
Based on the metal vapors used in production, thermocouples are divided into a number of types. The following types of pairs are most commonly used to operate gas stoves:
- Type E, production mark THKn, made of chromel and constantan, for operating temperatures from 0 to 600 C.
- Type J - an alloy of iron and constantan, grade TZhK, for operating temperatures from -100 to 1200 C.
- Type K, brand TXA, is produced on the basis of chromel and alumel plates, for operating temperatures from -200 to 1350 C.
- Type L, THK grade, is produced on the basis of chromel and copel plates, for operating temperatures from -200 to 850 C.
In the protective systems of columns, stoves and boilers operating on gas fuel, TXA temperature sensors of types K/L/J are usually used. Thermocouples made of precious metal alloys are produced for significant temperature conditions that are achievable in metallurgical production and energy.
Conclusions and useful video on the topic
How to replace a thermocouple with your own hands:
The operating principle of gas control in the hob and oven:
Thermocouple device for gas stoves:
A gas stove without a properly working thermocouple is a source of danger. If the gas control has stopped functioning, it is quite possible to replace the sensor yourself. There is nothing difficult about dismantling the old and installing a new control device. You just need to purchase a device that matches the existing tile model and work a little with a gas wrench and a screwdriver.
If you have comments on the topic or your own observations on the above information, write them in the block below. We, as well as other readers, will be interested in your stories about the nuances of replacing a thermocouple that you made yourself. Write, don't be shy.
Gas stoves from imported manufacturers have an imperfect “gas control” device, the function of which is to turn off the gas supply in case of accidental loss of flame (flooding, draft, etc.). The device is very capricious and often fails to function.
There are many speculations and “legends” on the Internet. The same fate befell my stove - the oven failed. It will go out, then it will go out. ) I decided to carry out research work on this topic. As the saying goes . a well-studied device is a device broken by your own hands. which is what I did.
I outlined the background to these “research” in this post. Read, try to revive your gas control or “kill” it completely by turning the stove into USSR devices that work just fine without gas control. As a last resort, familiarize yourself with the device.
- User Blog – Stayer
- Login to reply
Cleaning
If the sensor stops sending a signal to the shut-off valve, you should not change it immediately; you need to check the thermocouple and may have to clean it.
The specific symptom of such a failure can be determined by the following actions:
- press the igniter button;
- the burner lights;
- the torch burns until the finger rests on the button;
- As soon as the hand is removed from the button, the flame disappears.
This is a sign of a dirty thermocouple. The end of the temperature sensor is placed right next to the burner and flame. In the oven it is also close to the flame divider at the top of the chamber. This part of the thermocouple must be free of carbon deposits, deposits and any defects.
When the working area of the temperature sensor is covered with carbon deposits, it is cleaned with sandpaper. The larger the carbon layer, the less thermal energy is supplied to the sensor and the less emf is created.
The millivolts generated are probably not enough to operate the shut-off valve. If this action does not help, you need to check the functionality of the thermocouple.
Functionality check
It is necessary to carry out inspections, carry out repair work and replace the temperature sensor in the gas stove with your own hands when the fuel supply to the device is blocked.
Only after this can measures be taken to repair the temperature sensor. Likewise, the user needs to remember to turn off the power supply if the stove is volatile.
A working thermocouple for a gas stove, when heated over a paraffin candle, should generate an EMF of 20 mV within 30 seconds. When this value is lower, the thermocouple must be replaced.
Replacing the thermocouple yourself
In order to replace the thermocouple, you must carefully remove the front working panel from the gas stove and lift the panel with the installed burners.
The tip of the temperature sensor is rigidly fixed near the burner or burner device using a nut. It is possible that it boiled during operation and does not immediately unscrew.
In this case, it is not recommended to press the wrench hard, as it is possible to break the fastener and damage the plate. You will first need to treat the connection with a special aerosol to dissolve scale. Algorithm for replacing a thermocouple on a gas stove:
- Using a wrench, unscrew the nuts that secure the temperature sensor to the solenoid valve.
- Carefully remove one of the working areas of the temperature sensor.
- Inspect the work area. If it is covered with various contaminants or the surface is damaged by oxidation processes, it will need to be cleaned with fine sandpaper.
- The second tip of the sensor is mounted to the e-valve using a threaded connection or 2 crimp connections. It's not difficult to remove them.
- Check the sensor using a multimeter.
- One of the tips is connected to a multimeter, and the second is heated using a regular lighter.
- The device should show a value of at least 20 mV.
- A working primary sensor is installed in reverse order. It is attached with one tip near the burner, and with the other to the electromagnet.
A user of a gas stove who has independently decided to replace a faulty thermocouple needs to pay attention to its design when choosing. It is better to use a native thermocouple according to the modification of the gas stove.
All thermocouples are produced in different lengths from 45 to 120 cm, which is due to the design of the plates. During installation, it is important to pay attention to the fact that the sensor conductors in the area up to the valve should not be overtightened or loose. Their connection to the valve must be rigid; a loose connector in this connection is unacceptable.
Changing the thermocouple in the oven for a Hansa gas stove is done in a slightly different way. First you need to remove the gas stove cover, which is located on the back side of the structure.
Next, find the thermocouple and disconnect it from the flame divider in the oven. The functionality test is carried out similarly to the above algorithm.
Before removing the thermocouple from the gas column, you will need two open-end wrenches 14 or 15, depending on the specific modification of the column. On many of them, the temperature sensor is secured with screws. Further steps are the same as for a gas stove.
Thermocouple in the gas control system (gas control)
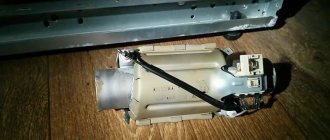
If you decide to install a solid fuel boiler in your country house, you do not need to worry about what will happen if the fire suddenly goes out. However, when you use gas equipment, you need non-volatile automation that can shut off the gas supply as quickly as possible if the burner suddenly goes out. For these purposes, modern gas boilers are equipped with a gas control system. How does it work?
The system consists of two main parts: a solenoid valve and a thermocouple. One end of the sensor is placed directly in the burner flame, and the second is connected to an electric valve, which consists of a core with a winding, a cap, a return spring, an armature and a rubber band that shuts off the gas supply.
Photo 4: Non-volatile gas control system for stoves and boilers
The gas control works quite simply. By pressing the gas button, you push the rod inside the coil, charging the spring. According to the instructions for igniting a gas boiler, the supply valve must be held pressed for about several tens of seconds. This time is necessary for the thermocouple to warm up and sufficient voltage to appear at its ends to hold the valve inside the coil.
We recommend: Installation of shut-off valves: detailed instructions
At the moment when the burner goes out, the thermocouple begins to cool, the voltage at the ends of the thermocouple decreases and at some point, the return force of the spring outweighs the electromagnetic force holding the rod inside and returns the valve to its original position, cutting off the gas supply. This process usually takes several tens of seconds.
One of the features of gas control is that it is completely electrically independent. In large heating complexes, like the domestic Svetlobor pellet boiler, when the power supply is turned off, the entire control system stops functioning. The thermocouple gas control system is completely electrically independent and can operate reliably without the need to connect to an electrical outlet.
Connection, testing and troubleshooting
One of the common malfunctions of gas boilers is as follows: you press the gas supply button, light the igniter, hold it for the required 30 seconds, release it and the burner immediately goes out. One of the reasons that can lead to this result is a faulty thermocouple or its poor contact with the solenoid valve.
Photo 5: Connecting and checking the thermocouple on the measuring device
You can fix this problem yourself without resorting to the services of a specialist. To do this you need to follow these steps:
- Using a wrench, unscrew the clamping nut that holds the thermocouple in contact with the solenoid valve and remove its end.
- We inspect the connector for the presence of various oxides and contaminants. If necessary, use fine sandpaper to carefully clean the contact area.
- Next, you should check the thermocouple with a multimeter. To do this, we connect one end to the measuring device, and heat the other with a manual gas burner. The voltage at the ends of a working thermocouple should be about 50 mV.
- If all indicators are normal, you should put everything back together and try to start the boiler.
If the problem remains, most likely the solenoid valve itself is faulty or the contact between it and the thermocouple is still poor. If the valve is in good condition, you should re-clean the connection and try to find a position of the clamping nut at which good contact is achieved.
Useful:
A compensation wire is usually used to connect thermocouples to measuring instruments. In this cable, the cores are made of the same material as the sensor itself. This can significantly reduce measurement error.
If the thermocouple fails, you need to buy a new one. There are many different manufacturers producing these sensors on the Russian market: Arbat, AKGV, AOGV (Zhukovsky plant), Honeywell. Prices for different types range from 600 to 2000 rubles.
For more information on how to repair a thermocouple in a gas boiler yourself at home, see the following video:
Return to contents Conclusion
Thermocouples are actively used not only in the automation of gas stoves, boilers and water heaters. Based on them, many different thermostats and thermometers have been produced, both for household and industrial purposes. Many craftsmen, based on a thermoelectric converter, make their own chargers and mini power stations that can charge phones and other low-power devices directly from a fire or other open flame. We hope you liked our story, and you learned a little more about the nuances of the operation of such familiar household appliances.
Thermocouple for a gas boiler: operating principle, characteristics, troubleshooting An article about the design of a thermocouple, operating principle, main types and characteristics, do-it-yourself fault detection and repair, as well as its role in the gas control system of a gas boiler.