There are several electrical tools that are constantly needed around the house. One of these can be called a sharpening machine or emery machine. The unit is useful not only for purely male needs, such as sharpening a drill, removing burrs or chamfering, but in many ways it performs everyday tasks. This includes sharpening knives and tidying up garden tools. The simplest, but not the cheapest, is to buy a ready-made machine. There is another option - to make emery with your own hands. To do this, you don’t need to buy expensive parts or have engineering skills.
The advantages of making a homemade emery with your own hands are obvious: the design will be designed to suit you, the materials here can be steel scraps that always get in the way underfoot, the engine can be taken from an old washing machine - in general, with minimal financial and physical costs you can really get an excellent thing.
Emery from a washing machine motor
What's good about Soviet washing machines is that they were equipped with reliable electric motors. Another advantage of using such motors for a sharpener is the low power and shaft speed, and this is important for an emery grinding wheel, which at high speeds can simply crack upon contact with the tool being processed. Good weight and power supply from a 220 V network are also convenient: in the first case, the emery will be stable without the use of additional attachments, the second indicator saves the master from the need to assemble the starting unit for the emery: it can simply be taken from the washing machine.
Sandpaper from a washing machine engine is in no way inferior to factory models. And if in the case of Chinese technology one can still doubt the longevity of the product, then a homemade design, where every detail has passed through its own hands, will indeed be an indispensable assistant for many years.
What you need
To make emery with your own hands, you will need certain tools and materials. The simplest design eliminates the need for welding and turning, which allows it to be manufactured by almost anyone. Set of necessary tools:
- a jigsaw or a regular wood hacksaw (it’s better if the hacksaw is a packaging one);
- electric drill with a set of drills;
- screwdriver or shaped screwdriver;
- Angle Grinder;
- soldering iron 100 W;
- small chisel;
- a square with one of the angles at 90 degrees;
- calipers;
- drawing compass;
- drawing pencil and tape measure;
- metal scissors;
- bench vise;
- a piece of 150 grit sandpaper.
Set of necessary materials and equipment:
- model of a Soviet electric motor from a washing machine with capacitors;
- toggle switch for loads up to 1.0 kW;
- cord with socket 2 meters long;
- small sharpening stone with a mounting hole diameter of 32 mm;
- chipboard slab measuring 0.5x0.5 meters and thickness 0.02 meters;
- multilayer plywood measuring 0.15x0.15 meters and thickness 0.01 meters;
- timber measuring 60x60 mm and height 0.2 meters;
- wood screws 50 and 20 mm with a press washer;
- galvanized sheet 0.5x0.5 meters in size and 1 mm thick;
- rubber stoppers for antibiotics in the amount of 4 pcs.
You should not take an electric motor from an automatic washing machine if it is high-speed. The revolutions of the emery should not exceed 1500 per minute, otherwise it will be dangerous to work on such a machine.
Which engine to choose
As mentioned above, the parameters of the washing machine motor must meet certain criteria. Taking the first engine you come across and building an emery structure around it is not very practical if in the end it turns out that it will be impossible to work on such a machine. Therefore, craftsmen with practical experience recommend proceeding from the following points when choosing an engine for making emery with your own hands:
- the most common models among Soviet engines that are used to make emery are the motors of such washing machines as “Malyutka”, “Sibir”, “Volga” or “Vyatka”;
- the recommended engine shaft rotation limit is 1500 rpm;
- It is advisable to take the power no lower than 100 Watts and no higher than 1000 Watts, the most famous motors have a power within 400 Watts;
- if the engine has support legs with holes for fasteners, this is welcome;
- The engine of the future emery must be designed for a voltage of 220 Volts.
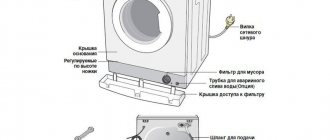
When removing the engine from the washing machine, it is important to remove the entire starting circuit along with it, so as not to separately select and buy capacitors for the emery. If the engine does not have support legs, this will not prevent it from being installed in the structure. It is important here that it has studs, by means of which the body of the unit is tightened: by attaching it to these studs, the motor will be installed on the emery.
How and from what to make security elements
The protective casing in the emery is an extremely important design element.
It serves as a protection against possible injuries when the grindstone breaks, and also prevents sparks from getting into the eyes and onto nearby objects. Also, if you take motors from washing machines, then in some of them the stator winding may be open and it must be protected from abrasive and other foreign particles. It is impossible to seal the engine housing, as this disrupts the cooling mode of the unit and it may fail. In this case, the protective casing also plays an important role, simultaneously protecting the emery motor. The most convenient way to make a protective casing with your own hands is to make it from galvanized steel. It is not necessary to make it round, following the contours of the working grinding wheel; it is easier to make it in the form of a truncated cone, where the upper part is slightly larger in size than the diameter of the stone. The easiest way to attach such a casing is not to the engine, but directly to the emery support on which the motor is mounted.
According to the rules, the casing must cover the working tool on all sides, leaving open only a small window in the working area, namely part of the end and side planes of the emery circle.
Steps for creating emery from a washing machine engine with your own hands
For a homemade device, a belt-driven motor is useful.
All that remains is to assemble the device correctly. After installing the flange, put the nut and washer on the shaft, then a large emery wheel, and then the nut and washer again.
Motor connection
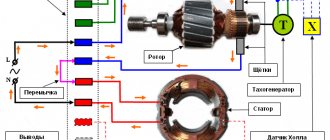
How to connect the motor from an automatic washing machine:
- Using a multimeter tester, look for the tachogenerator wires that show a resistance of 70 ohms (usually they are white). We will not use them.
- There are four wires left. Using a multimeter, you need to identify paired wires.
- Connect the wires leading to the stator and to the electric brushes. The remaining wires need to be connected to a wire and a plug at the end, and then connected to the network.
- Connections must be insulated.
Immediately after connection, the motor for home emery will start working, and you will be able to evaluate the functionality of the device.
Connecting the electric motor of Soviet-made washing machines differs from the previous version.
- Here you will find only 4 wires. We need to find pairs.
- Take a multimeter and measure the readings of each wire. You need paired wires with lower resistance that go to the working winding.
- Connect these wires to a plug and connect to the network.
- Now we need to make a trigger element. You can use any button, for example, a door lock. Connect one wire coming from the button to the starting wire (PO), and the other to the working wire (OB).
The motor is now connected. But before starting work, you need to thoroughly secure the machine to avoid an emergency.
DIY emery assembly steps
Step-by-step assembly of electric emery with your own hands. Attaching the motor to the base of the machine:
- The base of the machine is a 50x50 cm chipboard board. The engine is placed in its middle part and the dimensions of the engine are outlined with a pencil in order to know approximately where it will be installed.
- The engine typically has four studs or long screws that hold the engine housing together. Two adjacent studs will be the points where the support brackets will be screwed.
- Emery support brackets in the shape of the letter “P” are made from two pieces of galvanized steel 5 cm wide and such a length that the distance between the legs is equal to the distance between the head and the screw nut, and the height of the legs is approximately 6 cm. Holes are drilled in the legs of each bracket for a screw, in the long part of the bracket there are two holes for self-tapping screws.
- Unscrew the two adjacent screws, put the brackets on the petals of the body covers and put the screws back in place.
- The staples are turned so that their long sides lie with each other in the same plane, and the screws are tightened.
- The engine is installed in the previously outlined location on the brackets and screwed with self-tapping screws to the emery plate.
Attaching the trigger circuit and toggle switch to the base:
- Take a liter plastic container with an acrylic paint lid (or similar) and screw the lid next to the engine so that the container can be inserted into it, turning the latter upside down.
- A cut is made on the side of the bucket for the wires, and a toggle switch is installed at the bottom of the bucket with the switch lever facing outward.
- All capacitors are glued to the lid with hot glue and connected by soldering to the toggle switch and power cord.
- The bucket is put on and snapped onto the lid, after inserting the wires into a pre-made slot.
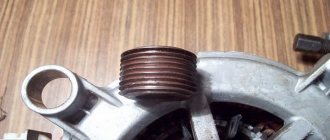
Making a flange for attaching a sharpening stone:
- Two circles with a diameter of 60 mm and one circle with a diameter of 32 mm are cut out of plywood with a jigsaw.
- In the middle of each circle, a hole is drilled with a diameter equal to the diameter of the engine working shaft.
- Two circles of different diameters are combined with holes and connected to each other using glue and two self-tapping screws.
- In the resulting part, at the end of the larger circle, a through hole with a diameter of 3 mm is drilled to the center and a self-tapping screw (locking screw) is screwed into this hole so that it is visible in the central hole.
- 2 mm of steel is removed along the motor shaft on one side so that the locking screw resting in this place does not allow the flange to rotate.
- The flange is placed on the motor shaft and secured with a self-tapping screw.
- A stone is placed on the flange and tightened with self-tapping screws through a wooden circle.
Making a protective casing:
- The protective casing consists of two parts, both of which are truncated cones. The distance between them should be 2.5 cm wider than the thickness of the grinding wheel.
- The side parts and the end of the casing are made of galvanized steel and connected to each other by soldering with a powerful soldering iron.
- In one place of the end, a grinder is used to cut out a window for the working area; on the side, a vertical slot is made with a width equal to the diameter of the engine shaft so that the casing can be put on top.
- The casing is attached to the chipboard using emery using self-tapping screws.
Do-it-yourself sharpening machine with a washing machine motor
Hello to all DIY lovers.
It's no secret that all cutting tools sooner or later become dull and have to be sharpened; a sharpening machine is perfect for these purposes. Buying a ready-made option is too easy and also a little expensive, so in this article I will tell you how to save your money and make a sharpening machine with your own hands. This machine will allow you to sharpen lathe equipment, drills, taps and other cutting tools, as well as level and grind metal workpieces. Parts for assembling this homemade machine can be purchased at a flea market for pennies, this will allow you to save on purchasing a ready-made version, as well as gain experience in assembling a homemade machine.
Before reading the article, I suggest watching a video that shows in detail the entire process of assembling the sharpening machine.
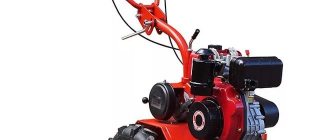
In order to make a sharpening machine with a washing machine motor with your own hands, you will need:
* Motor from a washing machine * Electric drill, metal drill with a diameter of 7 mm * Angle grinder * Semi-automatic core * Metal sheet * Channel width 270 mm * Metal corner with a shelf width of 63 mm * Stamped disk from VAZ * Welding machine, electrodes * Welding mask, leggings, safety glasses, gloves * Wire brush * Side cutters * A pair of M12 bolts and four M6 bolts * A file * A can of blue paint * An M16 hairpin * A sheet bending machine * A metal pipe with a diameter of 89 mm * A shock absorber rod * A soldering iron * A diamond cup * A caliper
Step one.
The first step is to figure out how to connect the power to the motor from the washing machine.
Such motors have two windings, one starting and the other working. Using a multimeter, we check the resistance at the motor terminals; the resistance of the working winding should be about 10 Ohms.
The starting winding on this engine, unfortunately, does not connect, which means there is a break, but without it the engine can be started, but only with a “pusher”, helping to start the engine with your hand. Since the motor from the washing machine was exposed to the rain for a long time, its insides need to be checked, as well as the condition of the bearings. We disassemble the engine housing, unscrew the four nuts from the studs, and remove one of the covers.
The bearings have traces of rust, which is not surprising.
This type of bearings is quite common, so we buy a couple of them in the store and install them in their places. At the same time, we lightly clean the covers themselves with a wire brush so that the engine looks as beautiful as possible.
We cut off the leads from the starting winding with side cutters and insulate them, since they will not be useful.
We install the cover in its place and tighten the studs back.
Step two.
Now you need to make a base for installing the engine on it. From a channel 270 mm wide, measure a length of 200 mm using a tape measure and draw a straight line.
Next, we saw off the channel according to the markings using an angle grinder with a cutting disc installed in it.
When working with an angle grinder, be careful and use safety glasses and gloves.
This way the engine will be located on the channel.
For fastening, you need to make two small sections of 130 mm each from a metal corner with a shelf width of 63 mm. We also saw them off using an angle grinder.
Having measured the distance between the studs on the engine using a caliper, we transfer them to pieces of metal corner. In the place of the marks we perform core punching with a semi-automatic core.
Next, we drill holes with a 7 mm drill installed in the chuck of an electric drill.
During the drilling process, add a little technical oil to the cutting edge, so the tool will last longer.
The result is two such blanks with holes with a diameter of 7 mm for mounting pins.
Step three.
We try the engine on the corners, screw on the nuts and install it on the base.
We make several tacks on the corners with a welding machine, after which we fully weld the fasteners by removing the engine.
When working with a welding machine, be careful and wear a welding mask and gloves.
After welding, remove the slag by lightly tapping it with a hammer.
We install the engine on the mount, and then the diamond cup on its shaft for fitting.
From the same corner from which the mount was made, we make a support for the table, and weld a piece of the shock absorber rod to it, sawn off to fit the width of the corner.
We make the table itself from the remaining part of the channel, we make cuts in it for a diamond cup using an angle grinder.
Next, we saw off a couple more pieces from the shock absorber rod and welded them to the table in the lower part in the center. The M16 pin will serve as a clamp for the table in the required position, since sometimes you have to sharpen or grind it at a certain angle.
The table will be attached to the base with two bolts, the table width is 200 mm and the length is 140.
To move the table, we make two holes in the base and bore them with a file. In the corner we make matching holes of the same diameter for M12 bolts.
Step four.
We paint all the components blue using a spray can.
Then we assemble the structure into a single whole and check it in operation.
To start the engine, we lightly rotate the disk by hand, after which it begins to rotate. With this machine you can sharpen almost any cutting tool, but there is not enough power for large parts.
For this reason, it was decided to make a small modification to the machine.
I suggest watching a video about modifications to this machine.
Step five.
It was customary to begin the modification of the machine by replacing the engine with a more powerful one; it was removed from the centrifuge, and besides, both windings of the engine turned out to be working. And the first thing I had to change was the distance between the holes in the mount on the frame.
We disassemble the entire machine into its component parts.
We also measure the distance between the studs on the engine and transfer them to the mount, after which we make a core and drill holes with a diameter of 7 mm.
From a metal pipe with a diameter of 89 mm we measure 800 mm.
Apply a sheet of paper according to the mark and wrap the pipe, guided by the sheet, saw off the workpiece using an angle grinder.
In order for the machine to be at a level convenient for work, we will make a stand base. Using a metal brush, remove traces of rust from the stamped VAZ wheel.
Next, we install the pipe strictly in the middle of the disk and weld them to each other with a welding machine in a circle.
We try on how best the base of the machine will stand on the pipe, taking into account the center of gravity, and then weld the parts together.
Step seven.
Although the engine has a closed housing, but with some holes, we make a protective casing for it, it will be mostly decorative. From the metal body of the washing machine, we cut out a rectangular sheet measuring 500*130 mm using an angle grinder.
From the edges of the sheet we make two holes for M6 bolts for fastening to the base. On a sheet bending machine we make the edges at 90 degrees.
At the base of the machine we make holes for fastening the casing with a diameter of 7 mm.
Step eight.
We paint the base and stand with the same blue spray paint.
For convenience, two handles were welded to the pipe in case it becomes necessary to move the machine to another location.
After the paint has dried, install the motor and solder the power wires to it. In this embodiment, the engine will operate in reverse.
Finally, we attach the protective casing to the base using four M6 bolts and install the table.
At this stage, the sharpening machine is completely ready, the engine power now allows you to process large parts, as well as sharpen any equipment for a lathe, drills, taps and other cutting tools can also be sharpened by a homemade machine.
Thank you all for your attention and creative success.
Become the author of the site, publish your own articles, descriptions of homemade products and pay for the text. Read more here.
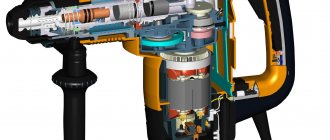
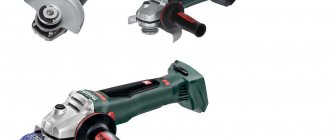
Electro-emery from an angle grinder
An angle grinder is not very suitable as a base engine for creating sandpaper with your own hands.
This is due to the high speed of its working shaft. Such a tool will be dangerous to use and will be suitable mainly for simple sharpening operations, for example, to sharpen the blade of a kitchen knife. It is advisable to use light stones with a small diameter as working stones for these purposes. It is better to order a flange for attaching such a stone to an angle grinder from a turner: it is very important here that it is perfectly balanced on the engine shaft.
Before working on such a machine, it should be well secured with clamps to the work table. During the sharpening operation, it is important to use thick clothing that will reliably cover all parts of the body from possible injury.
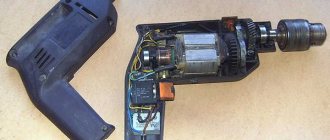
Homemade sandpaper from a drill
You can also make a sharpening machine from a regular electric drill. In this case, it is better to use a drill that has a speed controller for the motor shaft, then you can set the rotation to a safe speed. It is advisable to order a flange for fastening the stone from a turner and have it made with a shank so that you can attach the flange directly to the chuck of an electric drill.
It is convenient to use such a machine if you have a vice - you just need to carefully clamp the drill in it. Another option is to mount the drill on a workbench so that the chuck protrudes over the edge of the table. This homemade emery is much safer than emery from an angle grinder, and it is very easy to make with your own hands.
Dear site visitors, share in the comments what you think about creating emery with your own hands and what good designs there are for such a homemade machine.