A screwdriver is a versatile tool that can drill, cut, clean, grind and perform other tasks, depending on the attachment installed in the chuck. Like all tools, the device in question (regardless of its quality) breaks. In this case, only repairing the screwdriver or buying a new device will help. Repairing it yourself is a simple task that even a beginner can handle. If difficulties arise, the instructions on the website will always help you quickly fix the problem.
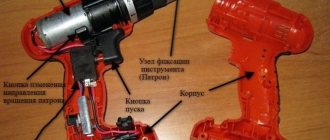
What does a screwdriver or tool design consist of?
When working with a screwdriver (popularly called a “shurik”), malfunctions arise that can be divided into repairable and non-repairable (requiring replacement). Non-repairable breakdowns, when a part cannot be repaired, include failure of the motor, button, gearbox, cartridge, etc., when they cannot be repaired, but can be replaced. Before repairing a screwdriver with your own hands, which any tool owner can handle, you need to understand its design features.
The main components of any cordless screwdriver include:
- Electric motor - driven by an autonomous battery (9V, 12V, 15V and 24V). Network devices operate from a 220V network, so they have a large power reserve and cost 2 times less than portable models
- A gearbox is a device that converts high engine speeds into lower speeds. Consists of a set of gears (usually made of plastic, but steel models are also available)
- Start button - the part responsible for supplying voltage to the motor shaft and moving the armature
- Battery or power cord. There are two types of batteries used in portable devices: nickel-cadmium and lithium-ion. If the device is networked, then its weight is much less, but at the same time, to use it, you need to connect the plug to the socket
- Force regulator - a device responsible for the amount of force applied to screws, holes made or polished surfaces
- Chucks are a mechanism in which attachments are secured to perform the corresponding actions. Screwdrivers usually use quick-release (keyless) chucks
- Reverse is another useful option that allows you to change the direction of rotation of the cartridge. This is convenient when installing and removing attachments into the device socket.
- The case is made of impact-resistant plastic, which is done not only to reduce the cost of the device, but also to increase safety when working with the tool.
This is interesting! Each unit has a corresponding purpose, however, the failure of these parts is affected not only by the frequency of use of the tool, but also by the correct use of the device. For example, a screwdriver cannot be used for drilling concrete, since it does not have an impact function. If you drill holes in the wall with the device, then such a device will not last long.
P O P U L A R N O E:
Solar battery for charging your phone
Of course, it would be nice if the phone was charged or at least partially recharged from a solar energy source. For some reason, phone manufacturers don't produce self-charging phones. But there is still a phone (Samsung E1107) that, under ideal conditions, can be fully charged from the sun in 55 hours. It’s a pity that so-called ideal conditions do not exist everywhere.
Read also: Li ion batteries for hitachi screwdriver
How to save energy consumption on lighting and electric heating? How to save heat? Methods for real energy savings. Ways to reduce electricity consumption and energy costs. Application of energy-saving technologies. Read more…
The home craftsman and the owner of the house have many useful and convenient tools. One of them is undoubtedly a screwdriver. It is often used for assembling furniture, for various work in the home and on construction sites.
This is a very reliable technique, but like any tool it sometimes breaks. In some cases, it can be temporarily replaced with a low-speed electric drill, and the faulty product itself can be taken to a service center. This can not only take a lot of time, but also extra money.
There is always the option to repair a Bosch screwdriver yourself.
The purpose of all parts and components of the tool - what they are called
If a screwdriver breaks down, then before you repair it, you need to figure out which specific part has failed. To find out the malfunction yourself, you need to understand the purpose of each unit and its design parameters.
- The start button is where the tool starts working. This mechanism performs two options - it turns on the power circuit, that is, it supplies voltage to the electric motor, and also regulates the number of engine revolutions. The harder you press the button, the faster the chuck will rotate. An electronic PWM generator, which is installed on the board, is used as a speed controller. When you press the button, the contact moves along the board. A field-effect transistor is used as a contact, which plays the role of a rotation speed regulator
- Electric Motor - Portable tools use single-phase brushed-type DC motors. The advantages of these units include high reliability and ease of maintenance. An electric motor consists of magnets (playing the role of a stator), an armature and brushes. The use of magnets significantly reduces the cost of the unit
- Reverse - this option is implemented by changing the polarity at the terminals. To prevent the user from manually changing the polarity, the design of the tool uses changeover contacts in the form of a switch. This switch is located near the Start button.
- A gearbox is a set of gears that increase the torque of the cartridge or reduce the speed. Shuriks use two types of gearboxes - planetary and classic. Classic ones are similar to those installed on drills, only they are very rarely found in screwdrivers. More popular are planetary gearboxes, consisting of a ring (intermediate) and sun gear, as well as satellites. The sun gear is driven by the motor shaft. Its rotation sets the satellites in motion, transmitting torque to the ring gear. Depending on the number of speeds, planetary gearboxes can be two-stage or three-stage. The more speeds, the more expensive the tool will cost
- Force regulator - usually 16 force positions are used, but there are also models that have a larger number. The ability to screw a screw into wood depends on the amount of force. If you need to screw a screw into drywall or other soft materials, then a lot of force will not be required, so the regulator can be set to positions from 1 to 7
- The cartridge mechanism has a simple operating principle. The device consists of three cams that securely fix the installed attachments. The advantage of quick-clamping devices is the high speed of changing attachments
- The case is a plastic impact-resistant structure, inside of which all the components are located. To repair the device, you need to disassemble the housing. For this purpose, manufacturers produce housings made of two parts, connected with screws
- Battery - Manufacturers make two types of portable batteries, nickel-cadmium and lithium-ion (like those found in cell phones). Lithium-ion batteries are longer lasting and more reliable, but they cost 3-4 times more than nickel-cadmium batteries. Typically, a screwdriver comes with two nickel-cadmium batteries, which is due to their short service life
This is interesting! If you come across batteries that have a one-piece body design, this means that they are not intended for self-repair.
If a screwdriver breaks down, it is not difficult to repair it at home, if only you can find the breakdown. Frequent problems with screwdrivers include battery failure, replacing which can cause some difficulties. Let's look at mechanical and electrical faults, as well as the features of eliminating them on your own.
How to properly disassemble a screwdriver - instructions for beginners
Before repairing the device in question, it must be properly and carefully disassembled. Beginners do not always cope with this task, so it will be interesting to know how to disassemble correctly. The instructions for disassembling the screwdriver are as follows:
- Disassembly should be carried out on a table so as not to lose the component parts. Initially, you need to unscrew all the screws that secure the device body.
- Open the housing carefully so as not to damage it. To prevent damage to the plastic structure of the case, you can use a plastic spatula
- If the housing cannot be disassembled after unscrewing the fasteners, you need to carefully inspect its internal structure. There may be staples in the structure that need to be removed
- After disassembly, you need to arrange the parts in the order they were removed, so as not to get confused and put the device back together
If there are signs of oxides inside, this means that water has entered the device. There is a high probability that the cause of the device’s inoperability is high humidity, which resulted in failure of the screwdriver parts. After disassembling the instrument, you can proceed to its repair. A video description of the disassembly process is below.
How to repair a cartridge
The chuck for each specific screwdriver model differs from similar elements of other models. The main distinguishing feature is the method of mounting the cartridge:
- Morse cone.
- Threaded connection.
- Threaded connection with fixing screws.
To determine the mounting method, it is best to use the markings that are applied to the cartridge case:
- The marking value “1–6 B10” indicates the method of fastening using a Morse taper.
- an inscription like “1.0–11 M12x1.2” or “2–13 mm ½-20 UNF” indicates a metric or inch thread.
If the cartridge is attached by means of a thread, then it is necessary to perform the following steps:
- Unclench each jaw of the chuck.
- If there is a screw, remove it.
- Clamp the L-shaped hex key (10 mm) with the short side into the chuck.
- Start and immediately turn off the screwdriver at low speeds, so that the long edge of the hex key hits the table. In order not to turn on the device, you just need to hit the hexagon with a hammer several times. This will cause the thread to shift and the cartridge to unscrew.
If there is no result, you can disassemble the screwdriver and remove the assembled gearbox from it. To do this, it is enough to use an L-shaped tubular wrench (often “19”) to unscrew the cartridge, clamping the gearbox mounting bolt with the socket heads of the keys on the other side. They provide the necessary support, making the cartridges easy to unscrew by hand.
When disassembling the cartridge, the plug at the base is removed. The plastic plugs must be carefully pryed off with a knife. Metal ones should be knocked out with a hammer, striking the base of the cartridge:
- It is necessary to provide in advance the presence of a large bolt, which should be secured in the chuck and pressed with light effort to perform alignment. The protrusion of the bolt head should be more than 2-3 cm above the chuck.
- Next, hit the surface of the bolt head with a hammer. The cartridge should pop out of the holder.
The most common cartridge malfunction:
- bits are not clamped evenly;
- backlash occurs between the bit and the cam;
- The cam extends unevenly.
To find out the causes and eliminate them, you need to perform the following steps:
- Disassemble the cartridge.
- Remove the cone nut, which consists of two elements.
- Unscrew the clamping jaw.
- Check the threads on the nut and cam and replace any defective parts.
- Completely assemble the cartridge.
It is worth considering that it is quite difficult to purchase a cam or a cone nut, since they are supplied to the market as a complete set. But they can be removed from other similar cartridges. In this regard, it is best to replace faulty cartridges with new ones. When purchasing a new element, it is recommended to go to the store with a screwdriver and a dismantled old chuck.
Mechanical breakdowns - how to fix them
Faults in the mechanical part of the tool are easier to detect than in the electrical component. This is due to the fact that any mechanical defects are audible. The main signs of mechanical malfunctions of the devices in question include:
- The occurrence of extraneous sounds
- Vibration and chatter of the chuck
- The tool motor can be heard running, but the chuck does not rotate
To repair the device and eliminate mechanical faults, you will first need to disassemble the housing. Knowing the design of a screwdriver, it will not be difficult to eliminate any breakdowns that occur in the mechanical part. If extraneous sounds occur, which indicates the cause of wear on the bushings and bearings of the motor armature, then these elements need to be replaced. When the bearings and bushings wear out, they need to be replaced, but first you need to buy these parts. Difficulties may arise when purchasing, since it is almost impossible to find spare parts for outdated models of tools.
This is interesting! Before installing a new bearing, it should be well treated with lubricants, for example, Litol-24 or Solidol, or even better with special lubricants.
In addition to bearing failure, the gearbox on the screwdriver may break. A number of malfunctions of this device include:
- The gearbox shaft bends due to heavy loads
- The working surfaces of the gears wear out
- The pin on which the satellites are attached breaks
- The bearing or support sleeve of the gearbox is worn out
Most often, it is the gearbox that fails, or more precisely, its component parts—gears. The causes of gearbox failure are:
- Incorrect use of the tool
- Heavy loads for which the device is not designed
- Lack of lubrication
- Material from which the devices are made
If the screwdriver is “old school”, that is, its gearbox consists of steel gears (instead of plastic), then it is advisable to repair it rather than buy a new one. To do this, you need to disassemble the device, inspect it and find the cause of the malfunction. When repairing a gearbox, it is necessary to clean the mechanism and parts from obsolete lubricant and apply new lubricants. If there are damaged gears, they need to be replaced. Do not rush to dispose of faulty gears, as you will need to buy the exact same parts (use them as a template).
This is interesting! If the tool has plastic gears, it is not recommended to replace them with steel ones. The reason is that plastic gears break under heavy loads, which protects the engine from combustion. If the device has metal gears installed from the factory, this indicates that the engine has a large power reserve.
To avoid unnecessary questions when independently repairing the mechanical part of screwdrivers, there is a table below that shows the main signs of mechanical faults, as well as ways to eliminate them.
| Symptoms of tool malfunction | Troubleshooting methods |
| The occurrence of extraneous sounds and hum | If extraneous sounds begin to appear when using the tool, this indicates wear of the bearings. To eliminate the breakdown, you need to check the integrity of the motor armature bearing and gearbox. If the bearings are in good condition, you should also check the integrity of the bushings, as they also wear out. Most often, the bearing shaft support sleeve wears out. |
| Vibration | Curvature of the reduction shaft, which contributes to the occurrence of strong beating and vibration. To solve the problem, you need to disassemble the case, assess the damage and make the appropriate decision to replace the part. |
| Clamp chuck failure occurs | If runout of the cartridge is detected, then you need to check the quality of its fixation. The part is fastened with a bolt, which is located inside the part (to see the bolt, you should separate the jaws). To screw the cartridge, the bolt must be rotated not to the right, but to the left, since it has a reverse thread |
| Jamming | If the tool is jammed, as indicated by the operation of the motor, but the chuck does not rotate, then you need to disassemble the housing and check the integrity of the gearbox. Jamming of the tool indicates displacement of the satellites, a violation of the integrity of the gears, or a violation of the integrity of the bearing. To fix the breakdown, you need to disassemble the screwdriver and find the cause of the jamming |
| Cracking and spinning at switch position | Gearbox malfunction. To eliminate it, you need to disassemble the tool and inspect the integrity of the mechanism. |
Electrical faults - how to identify and fix them
A drill and a screwdriver have many similarities, but the difference lies in the torque. If a drill is intended for drilling holes in different materials, then the main purpose of a screwdriver is to screw in self-tapping screws. With a speed controller, this tool can be used for drilling and polishing surfaces. It can also be used for mixing solutions (only in small volumes). Cases of electrical malfunction, which are manifested by the following factors, are not uncommon:
- When you press the start button, the tool shows no signs of life
- When switching reverse - this option does not work
- Speed is not adjustable
To deal with such breakdowns, you first need to find out what reasons contribute to the occurrence of such malfunctions.
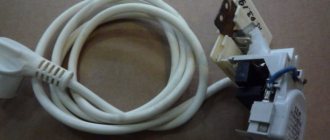
If the screwdriver does not want to turn on, check the charging unit
It doesn’t matter what brand of screwdriver fails - Bosch, Makita, Interskol, Metabo, Zubr, DeWalt and others. If the tool does not start, then first you need to check the battery charge and its serviceability. To do this, charge the battery (for 1-2 hours), and then install the battery back and check its performance. If there are no signs of life, then you need to arm yourself with a measuring device called a multimeter or tester, with which diagnostics will be performed.
This is interesting! If you pick up a multimeter, you probably know how to use it. If not, then you should read the instructions.
Using a multimeter, we will find out what is causing the breakdown - the battery or the charger. First, let's find out if the charger is working properly. To do this we do the following:
- Set the multimeter to DC voltage measurement mode at a nominal value of 20V. If the battery on the tool has a 24V rating, then the device needs to be set to 200V.
- Insert the charger plug into the socket
- Measure the output voltage at the charging block terminals
Its readings should be 2V greater than the rating of the battery being tested, for example, for a 12V battery, the charger readings should correspond to a value of 13.5-14V. If the rating is lower or there are no readings at all, it means the charging unit is faulty. It can be repaired if you have knowledge of electrical engineering. If you can’t fix the charger, you need to buy a new unit of the same brand.
How to connect the drill button yourself?
Although the process is quite complex, you can do all the work yourself by following some important rules. For example, remember that opening the cover may cause all parts and loose parts to simply fall out of the case. Of course, this should be avoided because then it will be quite difficult to assemble the device. To do this, you can gradually lift the lid, marking the exact location of the parts on the paper.
The button is restored as follows:
- First select the latches for the shroud and then carefully tighten it;
- All rusty and darkened terminals are cleaned of soot, for which you can use alcohol or sandpaper;
- We reassemble the tool, make sure all parts of the device are in place, and check the performance of the drill. If nothing has changed, we change the part;
- We fill the speed controller with the compound, and so when a part fails, we simply replace it;
- Frequent breakdowns. Abrasion of the working layer under the rheostat. It’s better not to repair it, just waste time, it’s better to buy a new one and replace it.
Many people wonder where to get such a scheme? First of all, he must buy it using the tool, but if the diagram does not exist or you have lost it, you will have to search on the Internet. After all, only with its help you can correct it without errors. By the way, the speed control button and the reverse button are located in different places, so they will have to be checked separately.
READ How to Discharge a Screwdriver Battery at Home
Malfunction of the screwdriver battery and its correct repair
If the charging unit is working properly, then the fault lies in the battery itself. However, do not rush to disassemble the battery, since first you need to make sure that it is the reason for the tool’s inoperability. How can I check if it works? There are two ways to do this:
- Connect a tester to the battery terminals and measure the output voltage. When implementing this method, you must initially charge the battery by leaving it to charge for 2-4 hours. If the readings on the multimeter are below the device’s rating, then the reason for the screwdriver’s inoperability is hidden in a battery failure
- Place a second battery in the screwdriver and make sure that the tool starts from it (usually screwdrivers come with two nickel-cadmium batteries)
This is interesting! Based on the multimeter readings, it can be assumed that one or more battery banks have failed.
Manufacturers do not recommend repairing batteries yourself, much less disassembling these devices. That is why, if you are disassembling the device, then all actions are unsafe. Reviews and practice prove that it is not only possible to repair a screwdriver battery, but it is also very easy to do. The process of repairing screwdrivers with your own hands is as follows:
- Let's disassemble the battery. Many manufacturers make batteries from two plastic bases that are connected with screws. However, some manufacturers make the devices one-piece or non-separable. Video on disassembling the screwdriver battery below
- After removing the top cover we will see the corresponding number of barrels (cans). Their number depends on the battery voltage rating. Each barrel produces 1 Volt of voltage. To obtain a nominal value of 12V, 15V or other values, all barrels are connected in series
- We check the quality of connections (contacts). If there is a break between the barrels, we can assume that a fault has been found, but such breakdowns are rare. Most often one or more cans fail
- The presence of voltage on each bank is checked, which should not be lower than 0.9V-1V. If all the banks have a voltage of 1V, and one is 0.8V or lower, then the reason for the instrument’s inoperability is precisely in this barrel. Banks cannot be repaired, but they can be replaced to repair the battery
To replace cans, perform the following steps:
- Using a soldering iron, unsolder the barrel that has a low voltage rating
- Instead, solder a jar of similar size and parameters. When purchasing a new can, you need to take into account the denomination and filling material (nickel-cadmium or lithium-ion)
- Assemble the battery, charge it and check for proper operation
This is interesting! If you have difficulty finding one or more cans to repair the battery, you can take them from the second battery (if the tool is equipped with two batteries), which is already outdated and also does not work. Before you unsolder a jar with an obsolete battery, you need to initially charge it. After this, you should disassemble the battery and find a working barrel (which produces a voltage of at least 0.9V).
The process of repairing a screwdriver battery is not complicated, but when implementing it, do not forget that you are working with electric current, so you should follow safety precautions and carry out work only in protective equipment.
Electrical circuit repair
Problems with electronics are expressed in the inability to turn on the tool, failure to switch the reverse mode, problems when adjusting the number of revolutions.
When diagnosing an electronic part, you must have certain skills in working with electrical networks and circuits. And then it will be possible to repair the hitacha instrument, bison or any other.
If the tool does not respond to the “Start” button, then begin troubleshooting with the battery.
First you need to try to charge the battery in a charger. Then measure the battery voltage using a multimeter. The voltage value must exactly match the declared battery rating. If the indicator is much lower, then you need to determine which element is faulty: the charger or the battery.
The charger is also checked by the tester . A multimeter is connected to the terminals of the charger and the voltage is measured at idle. The voltage value should be several values higher (up to two volts) than the rated voltage written on the device body. If there is no voltage, the charger is definitely faulty.
It makes sense to change battery cells if you have an extra non-functional battery. Then the missing elements can be pulled out of it. Purchasing new cells is unjustified, because their price is comparable to the cost of a new battery.
Read also: How to quickly polish wood
Repairing the charger requires more advanced knowledge of electronics.
If the batteries and charger are normal, the tool should be carefully disassembled.
When disassembling, you need to remember how the parts were assembled so that you can reassemble them correctly later.
It is best to sketch out a diagram of the location of components, contacts, screws, and springs before starting repairs and diagnostics.
Visually inspect the contacts. Are any of them darkened? If you find dark or dirty contacts, you need to clean them with sandpaper. Special attention should be paid to the quality of soldering.
There are two wires running from the start button to the battery terminals. With the battery inserted, the voltage at the button inputs is measured. If there is voltage, the power supply is removed and the inputs to the battery are short-circuited. The resistance at the push-button input is measured. The option when the resistance indicator is close to zero means that the button is ok.
If the button works, then the problem is in other components of the circuit or in the brushes. If the multimeter shows a break, then the button needs to be repaired or replaced. Most often, the button turns out to be damaged, since it is the most actively used.
When the reverse is not working, the procedure follows a similar pattern. The tester probes touch the button input and the motor contact. After which the switch handle is brought into active action. If there is no resistance, then the problem is in the reverse contacts. If the arrow of the device deviates, then the reverse is working.
There is no speed control, but the electric motor still shows maximum speed? This means that either the button or the regulating transistor is not working.
If, after checking the entire electrical circuit, no problems are found, but the screwdriver does not work, then there is a possibility that the malfunction is related to the brushes . The brushes wear out during intensive use of the tool. When the length is reduced by forty percent, the brushes require replacement. It is possible to solder them, but the solder should only be refractory.
After eliminating the above problems, the operation of the device is checked. If performance is not restored, then the electric motor needs to be checked.
Electric motor diagnostics
To do this, the motor is disconnected from the button and the resistance value of the motor is measured. When the device is “silent”, it means that the winding has broken. It is necessary to change the motor or rewind the winding.
To make sure the armature is working, measure the resistance on two adjacent collector plates. It is necessary to ring all the plates sequentially, around the entire circumference. If there are two plates whose resistance is significantly higher than zero, the armature is faulty. Needs replacement or repair.
If the battery and charging unit are working, but the screwdriver does not work
If it turns out that the charging unit and battery of the tool are working, then you should look a little deeper for the cause of the electrical malfunction. To do this, you need to disassemble the screwdriver. Further steps to identify breakdowns and eliminate them are as follows:
- Measure the presence of voltage coming from the battery to the terminals of the “Start” button. If there is voltage, then power is supplied to the button. If there is no voltage, it means the wire is damaged or the contact is broken. We follow the chain further to find the fault
- Check the start button. First, you need to remove the battery from the tool - this is necessary to check the serviceability of the button. After removing the battery, you should short-circuit the contacts (connect the wires that go from the battery to the input terminals of the button). You need to connect the multimeter probes to the output contacts of the button and set the device to resistance measurement mode. To measure the resistance value, you need to press the tool button. If the button is working properly, then the device readings will tend to zero. If it malfunctions, the device readings will tend to infinity (break)
The button can be replaced or repaired. If the part is collapsible, then you can disassemble it and clean the contacts. Very often, the cause of button malfunction is burnt contacts. If you clean them with sandpaper, the device will operate as before. If the button is not removable or its contacts are badly burned out, then you will need to buy a new part. Its price is not high, so everyone can afford to buy it to avoid repairs.
This is interesting! The button consists not only of contacts, but also of small springs, which can fly out at the slightest wrong movement. To prevent this from happening, you need to disassemble the button carefully and slowly.
Malfunctions of the reverse motor and speed controller
If the screwdriver shows no signs of life, then the fault may be hidden in the engine itself. Most often, the brushes through which voltage is supplied to the armature are worn out in the engine. If graphite brushes are worn away more than 40% of their length, they need to be replaced. The fact that it is time to replace the graphite brushes is indicated by sparking inside the tool body. Brushes cannot be repaired, so you need to buy parts of a similar type and size.
If it turns out that the brushes are in order, but the tool still does not work, then the reason lies in the electric motor itself. To check it, you need to measure the resistance of the armature winding. If the multimeter readings tend to zero or have a low value, then a winding break is appropriate. To restore the device's functionality, you will need to buy a new electric motor.
This is interesting! If the armature winding breaks, this part can be replaced or rewound. However, it is difficult to find an armature for Chinese power tools, and it is much easier to buy a new electric motor.
If there is no reverse, you need to check this mechanism. To do this, follow these steps:
- Take a multimeter and connect one probe to the input contact of the button, and the second to the contact of the electric motor
- Reverse handle switches
- The device records the readings, and if any value is displayed on the display, then the part is working properly. If the device remains silent, then you need to replace the part.
If the reverse option does not work, then you don’t even have to check the serviceability of the device with a multimeter. Disassemble the device and check the quality of the contact connections. If the wires do not come off, then the switch itself needs to be replaced.
If the speed controller is faulty, the speed controller (field-effect transistor) should be replaced. This part is connected to the start button, so replacing it is not difficult.
There is nothing complicated about repairing the electrical part; you just need to follow a clear sequence of actions to identify the cause of the malfunction and eliminate it.
How to replace a brush: work in a couple of minutes
But the drill may not work due to normal faults. For example, due to the brushes inside the motor. So brush repair is necessary here and the job is quite simple. You don't even need special knowledge or tools. To do this, we disassemble the device, remove the brush holders and replace broken parts. By the way, there are models whose body cannot be disassembled. You just need to remove the special plugs through the installation window, after which we will replace the brushes .
As you can see, there are various breakdowns, many of which will be under your control, while others will be performed only by service center specialists. And to reduce the risk of such damage, you need to take care of your tool, clean it after work, check the condition of the parts and brushes in order to replace them with new ones. However, if you see that you cannot handle it yourself, take the device to a repair shop.
Source
Reasons for breakdowns of different brands of screwdrivers - how to extend the life of the tool
It's not just the low-priced tools that break. All tools tend to break, so there is no escape from this. To extend the service life of a screwdriver, you need to understand what causes the device to quickly fail.
- Incorrect operation. The tool should only be used for its intended purpose. If a portable device is used daily for drilling concrete, it will not last even a few days
- Purpose - like other types of tools, screwdrivers are divided into household or amateur and professional. If professional ones are designed for a long time of operation, then household appliances can be used no more than 2 hours a day
- Compliance with storage conditions - instruments should not be stored in a room with high humidity. If the internal parts (mechanical and electrical) become damp, the device will quickly fail. Portable screwdrivers need to be stored not only in appropriate humidity conditions, but also at the correct temperature. This is necessary not for the tool itself, but for batteries, which are destroyed at low temperatures. It is recommended to store the device in heated garages and workshops for the winter.
- Eliminate the negative influence of weather conditions - this is not only rain or snow, but also sunlight. If the device overheats in the sun, then the next time it is turned on, it may burn out, so do not allow the instrument to remain in the scorching sun for a long time
To extend the life of batteries, which break down faster than screwdrivers, you need to not only store them correctly, but also charge them. The battery should not be stored for a long time in a discharged state, or left to charge for a long time. You regularly need to turn on the tool and let it work (1-2 times a week). If you don’t do this, you will soon need to buy a new battery or the tool itself. How long an instrument of Chinese, European or German quality will last depends on the quality of care and operation.
To repair the device in question, you will need a minimum set of tools. Repair work should be carried out on a table in good lighting, since the screwdriver has many small parts that can get lost. Take enough time to repair the device rather than disassemble it and throw it away. If you are repairing an electrical part, it is recommended to treat the rubbing parts with lubricants before assembly. After repair, the screwdriver will be able to serve for as long or even longer. Detailed video instructions - how to repair a screwdriver from “A to Z”.
To summarize, it should be noted that a screwdriver is the most reliable and necessary tool that should always be in good working order. Repairing it does not require much effort, and if the device is broken, then repairing it will only require time and spare parts, which are not difficult to buy.