A screwdriver is a versatile tool that can drill, cut, clean, grind and perform other tasks, depending on the attachment installed in the chuck. Like all tools, the device in question (regardless of its quality) breaks. In this case, only repairing the screwdriver or buying a new device will help. Repairing it yourself is a simple task that even a beginner can handle. If difficulties arise, the instructions on the website will always help you quickly fix the problem.
What does a screwdriver or tool design consist of?
When working with a screwdriver (popularly called a “shurik”), malfunctions arise that can be divided into repairable and non-repairable (requiring replacement). Non-repairable breakdowns, when a part cannot be repaired, include failure of the motor, button, gearbox, cartridge, etc., when they cannot be repaired, but can be replaced. Before repairing a screwdriver with your own hands, which any tool owner can handle, you need to understand its design features.
The main components of any cordless screwdriver include:
- Electric motor - driven by an autonomous battery (9V, 12V, 15V and 24V). Network devices operate from a 220V network, so they have a large power reserve and cost 2 times less than portable models
- A gearbox is a device that converts high engine speeds into lower speeds. Consists of a set of gears (usually made of plastic, but steel models are also available)
- Start button - the part responsible for supplying voltage to the motor shaft and moving the armature
- Battery or power cord. There are two types of batteries used in portable devices: nickel-cadmium and lithium-ion. If the device is networked, then its weight is much less, but at the same time, to use it, you need to connect the plug to the socket
- Force regulator - a device responsible for the amount of force applied to screws, holes made or polished surfaces
- Chucks are a mechanism in which attachments are secured to perform the corresponding actions. Screwdrivers usually use quick-release (keyless) chucks
- Reverse is another useful option that allows you to change the direction of rotation of the cartridge. This is convenient when installing and removing attachments into the device socket.
- The case is made of impact-resistant plastic, which is done not only to reduce the cost of the device, but also to increase safety when working with the tool.
This is interesting! Each unit has a corresponding purpose, however, the failure of these parts is affected not only by the frequency of use of the tool, but also by the correct use of the device. For example, a screwdriver cannot be used for drilling concrete, since it does not have an impact function. If you drill holes in the wall with the device, then such a device will not last long.
Inside design of the Einhell as 18-2 GA screwdriver
To get to the gearbox, you need to disconnect the battery and remove the upper part of the power tool body, after unscrewing the 9 mounting screws using a Phillips screwdriver.
After removing the top cover, you will see several mechanical and electrical units and parts interacting with each other, including:
- Permanent magnet electric motor;
- Three-stage planetary gearbox;
- Two-position speed switch;
- Spring lever driven by speed selector;
- A transistor that regulates the voltage supply to the engine and is responsible for the smooth speed of its armature;
- A start button having a wide-pulse regulator designed to transmit control voltage to the transistor;
- Engine rotation direction switch (reverse);
- A lever that moves the reverse switch;
- Terminals for connecting to the battery;
- Ratchet that limits the level of load on the cartridge;
- Chuck with self-clamping mechanism.
The purpose of all parts and components of the tool - what they are called
If a screwdriver breaks down, then before you repair it, you need to figure out which specific part has failed. To find out the malfunction yourself, you need to understand the purpose of each unit and its design parameters.
- The start button is where the tool starts working. This mechanism performs two options - it turns on the power circuit, that is, it supplies voltage to the electric motor, and also regulates the number of engine revolutions. The harder you press the button, the faster the chuck will rotate. An electronic PWM generator, which is installed on the board, is used as a speed controller. When you press the button, the contact moves along the board. A field-effect transistor is used as a contact, which plays the role of a rotation speed regulator
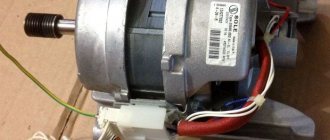
- Electric Motor - Portable tools use single-phase brushed-type DC motors. The advantages of these units include high reliability and ease of maintenance. An electric motor consists of magnets (playing the role of a stator), an armature and brushes. The use of magnets significantly reduces the cost of the unit
- Reverse - this option is implemented by changing the polarity at the terminals. To prevent the user from manually changing the polarity, the design of the tool uses changeover contacts in the form of a switch. This switch is located near the Start button.
- A gearbox is a set of gears that increase the torque of the cartridge or reduce the speed. Shuriks use two types of gearboxes - planetary and classic. Classic ones are similar to those installed on drills, only they are very rarely found in screwdrivers. More popular are planetary gearboxes, consisting of a ring (intermediate) and sun gear, as well as satellites. The sun gear is driven by the motor shaft. Its rotation sets the satellites in motion, transmitting torque to the ring gear. Depending on the number of speeds, planetary gearboxes can be two-stage or three-stage. The more speeds, the more expensive the tool will cost
- Force regulator - usually 16 force positions are used, but there are also models that have a larger number. The ability to screw a screw into wood depends on the amount of force. If you need to screw a screw into drywall or other soft materials, then a lot of force will not be required, so the regulator can be set to positions from 1 to 7
- The cartridge mechanism has a simple operating principle. The device consists of three cams that securely fix the installed attachments. The advantage of quick-clamping devices is the high speed of changing attachments
- The case is a plastic impact-resistant structure, inside of which all the components are located. To repair the device, you need to disassemble the housing. For this purpose, manufacturers produce housings made of two parts, connected with screws
- Battery - Manufacturers make two types of portable batteries, nickel-cadmium and lithium-ion (like those found in cell phones). Lithium-ion batteries are longer lasting and more reliable, but they cost 3-4 times more than nickel-cadmium batteries. Typically, a screwdriver comes with two nickel-cadmium batteries, which is due to their short service life
This is interesting! If you come across batteries that have a one-piece body design, this means that they are not intended for self-repair.
If a screwdriver breaks down, it is not difficult to repair it at home, if only you can find the breakdown. Frequent problems with screwdrivers include battery failure, replacing which can cause some difficulties. Let's look at mechanical and electrical faults, as well as the features of eliminating them on your own.
General information
Makita electric screwdriver design
A screwdriver from Makita is a fairly simple design that consists of several main parts:
- Mode switch.
- Gearbox.
- Electrical engine.
- Battery.
Additional devices may be added to certain models, but the main components will always remain the same. The battery is a completely disconnected part that will be recharged from time to time at a specialized station. It is quite rarely considered as a direct instrumental component. But it is the battery that often fails. The inside of a device like a Makita screwdriver is quite simple.
From the battery connection point, the wires will go to the speed switch, and also to the start button itself, from which contacts will go to the electric motor. Its front part is inserted inside the gearbox, which consists of a whole set of gears with different configurations. The composition of the set will depend only on the number of speeds or operating modes of the screwdriver. The modes will be switched using a specialized controller, which is located outside.
The gears in a gearbox with external teeth work in close connection directly with the housing, which has teeth on the inside. And if in certain parts the teeth are made of metal, then the body itself is made of plastic and will include plastic teeth. It is not surprising that after a while this design will begin to wear out and fail.
How to disassemble a Makita screwdriver
In order to disassemble the screwdriver, you must first disconnect the battery. After this, the tools in the case will unscrew all the screws that are capable of holding the pair of halves together. After this, the housing should be removed, and then all the external components will be revealed to the master - the electric motor, switch and gearbox. It should also be noted that in these models, specialized plates are often installed, which are responsible for switching between modes. With less than careful disassembly, the small plate may simply not be noticed. After disassembly, you can immediately begin repair work on the relevant part.
How to properly disassemble a screwdriver - instructions for beginners
Before repairing the device in question, it must be properly and carefully disassembled. Beginners do not always cope with this task, so it will be interesting to know how to disassemble correctly. The instructions for disassembling the screwdriver are as follows:
- Disassembly should be carried out on a table so as not to lose the component parts. Initially, you need to unscrew all the screws that secure the device body.
- Open the housing carefully so as not to damage it. To prevent damage to the plastic structure of the case, you can use a plastic spatula
- If the housing cannot be disassembled after unscrewing the fasteners, you need to carefully inspect its internal structure. There may be staples in the structure that need to be removed
- After disassembly, you need to arrange the parts in the order they were removed, so as not to get confused and put the device back together
If there are signs of oxides inside, this means that water has entered the device. There is a high probability that the cause of the device’s inoperability is high humidity, which resulted in failure of the screwdriver parts. After disassembling the instrument, you can proceed to its repair. A video description of the disassembly process is below.
How to disassemble
Disassembling the screwdriver is performed on a table or other flat surface to avoid loss of parts or fasteners.
Screwdriver
To disassemble the screwdriver, you first need to remove the battery and then unscrew all the screws. Then the case is carefully opened, trying not to damage the structure. If difficulties arise, you need to inspect the device again. There may be fasteners left somewhere or the parts are connected by staples that need to be removed.
After the case is opened, remove the parts one by one and lay them out on the table in the order in which they were removed. You can take several photographs so as not to make mistakes during the assembly process of the equipment.
Gearbox
A breakdown of this unit is indicated by strong vibration during operation, unusual noises or other signs. For repairs, you will need to disassemble the screwdriver gearbox. It includes ring gears, satellite gears, and carriers. All parts are removed from the housing one by one, then thoroughly cleaned and lubricated.
The procedure is carried out on a flat surface, removing all the parts, laying them out in the correct order so as not to experience problems during reassembly.
The disassembly itself looks like this: the cartridge is removed, the housing is disassembled, the gearbox is separated from the engine. Next, the plate is removed, all parts are removed from the housing, and the bolts connecting the halves of the gearbox are unscrewed. Use pliers to adjust the diameter of the spring to improve gear engagement. Next, the coupling is disassembled - the retaining ring, washers, and bulk bearing are removed. The shaft is removed.
Mechanical breakdowns - how to fix them
Faults in the mechanical part of the tool are easier to detect than in the electrical component. This is due to the fact that any mechanical defects are audible. The main signs of mechanical malfunctions of the devices in question include:
- The occurrence of extraneous sounds
- Vibration and chatter of the chuck
- The tool motor can be heard running, but the chuck does not rotate
To repair the device and eliminate mechanical faults, you will first need to disassemble the housing. Knowing the design of a screwdriver, it will not be difficult to eliminate any breakdowns that occur in the mechanical part. If extraneous sounds occur, which indicates the cause of wear on the bushings and bearings of the motor armature, then these elements need to be replaced. When the bearings and bushings wear out, they need to be replaced, but first you need to buy these parts. Difficulties may arise when purchasing, since it is almost impossible to find spare parts for outdated models of tools.
This is interesting! Before installing a new bearing, it should be well treated with lubricants, for example, Litol-24 or Solidol, or even better with special lubricants.
In addition to bearing failure, the gearbox on the screwdriver may break. A number of malfunctions of this device include:
- The gearbox shaft bends due to heavy loads
- The working surfaces of the gears wear out
- The pin on which the satellites are attached breaks
- The bearing or support sleeve of the gearbox is worn out
Most often, it is the gearbox that fails, or more precisely, its component parts—gears. The causes of gearbox failure are:
- Incorrect use of the tool
- Heavy loads for which the device is not designed
- Lack of lubrication
- Material from which the devices are made
If the screwdriver is “old school”, that is, its gearbox consists of steel gears (instead of plastic), then it is advisable to repair it rather than buy a new one. To do this, you need to disassemble the device, inspect it and find the cause of the malfunction. When repairing a gearbox, it is necessary to clean the mechanism and parts from obsolete lubricant and apply new lubricants. If there are damaged gears, they need to be replaced. Do not rush to dispose of faulty gears, as you will need to buy the exact same parts (use them as a template).
This is interesting! If the tool has plastic gears, it is not recommended to replace them with steel ones. The reason is that plastic gears break under heavy loads, which protects the engine from combustion. If the device has metal gears installed from the factory, this indicates that the engine has a large power reserve.
To avoid unnecessary questions when independently repairing the mechanical part of screwdrivers, there is a table below that shows the main signs of mechanical faults, as well as ways to eliminate them.
| Symptoms of tool malfunction | Troubleshooting methods |
| The occurrence of extraneous sounds and hum | If extraneous sounds begin to appear when using the tool, this indicates wear of the bearings. To eliminate the breakdown, you need to check the integrity of the motor armature bearing and gearbox. If the bearings are in good condition, you should also check the integrity of the bushings, as they also wear out. Most often, the bearing shaft support sleeve wears out. |
| Vibration | Curvature of the reduction shaft, which contributes to the occurrence of strong beating and vibration. To solve the problem, you need to disassemble the case, assess the damage and make the appropriate decision to replace the part. |
| Clamp chuck failure occurs | If runout of the cartridge is detected, then you need to check the quality of its fixation. The part is fastened with a bolt, which is located inside the part (to see the bolt, you should separate the jaws). To screw the cartridge, the bolt must be rotated not to the right, but to the left, since it has a reverse thread |
| Jamming | If the tool is jammed, as indicated by the operation of the motor, but the chuck does not rotate, then you need to disassemble the housing and check the integrity of the gearbox. Jamming of the tool indicates displacement of the satellites, a violation of the integrity of the gears, or a violation of the integrity of the bearing. To fix the breakdown, you need to disassemble the screwdriver and find the cause of the jamming |
| Cracking and spinning at switch position | Gearbox malfunction. To eliminate it, you need to disassemble the tool and inspect the integrity of the mechanism. |
Screwdriver and its design features
You should start repairing a screwdriver yourself by becoming familiar with its design. The main element of a screwdriver is an electric motor. Screwdrivers come in both corded and cordless types. The use of a corded screwdriver is used less frequently, due to such a disadvantage as the need to connect the tool to a 220V network. Battery-type tools are more popular, as they allow you to carry out not only repair work at home, but also outside it.
The main components of a cordless screwdriver are:
- Frame. Typically, all screwdrivers are made of durable plastic.
- Start button. It is designed in such a way that the number of revolutions of the cartridge depends on the force of pressing it.
- Electric motor. Battery-powered tools use single-phase commutator-type and DC motors. The motor consists of a rotor, a stator in the form of magnets, and a brush assembly.
- Gearbox.
- Force regulator.
- Reverse switch.
- Battery. As a rule, it is removable and is often supplied with the product in duplicate.
- Cartridge. As a rule, quick-release chucks are used.
Some models are additionally equipped with LED backlights, as well as battery charging indicators. Returning to the problems with the screwdriver, it should be noted that any of the above elements can cause the tool to malfunction. What is needed for repairs? The first step is to find the cause of the breakdown, and then make the appropriate decision to eliminate it. The tool can be divided into two parts: electrical and mechanical. Initially, you need to find out what the problem is with the screwdriver not working: mechanical or electrical. This won’t be difficult to do, so let’s look at the breakdowns in more detail.
Mechanical faults
Mechanical malfunctions of screwdrivers can be identified by such a sign as the audibility of the operation of the electric motor. When you press the start button, you can hear signs of the electric motor running, but the tool chuck does not rotate or characteristic sounds of a malfunction are heard when rotating.
The design of the screwdriver is quite simple, but a significant drawback is that all the elements are almost 2-3 times smaller than those of an electric drill. Possible mechanical failures of a screwdriver include the following malfunctions:
- Cartridge failure. Despite the fact that quick-release chucks are more versatile and easier to use, their significant drawback is their low service life. It is impossible to repair the keyless chuck, so if the tool refuses to hold the drill or bit, the chuck should be removed and replaced with a new one. This is one of the most common malfunctions of the tool, but it does not require disassembling the screwdriver.
- Gearbox failure. The screwdrivers are equipped with a planetary type gearbox. Typically, in order to save money, manufacturers make gearbox gears from low-quality plastic or metal. This affects not only the power of the tool, but also its service life. If the engine runs when you press the “Start” button, but the cartridge does not rotate, then the problem lies precisely in the planetary gearbox. To find out the cause of its malfunction, you need to disassemble the tool and then determine the breakdown. If one gear fails, the gearbox should be replaced.
- Bearing wear. The bearing is located in the planetary gearbox, so it is replaced along with the gears.
- The force regulator is broken. This device in screwdrivers is used not only to increase or decrease the traction force of the tool, but also to increase safety. If during work the working attachment becomes jammed, then instead of turning the tool, the regulator will turn. Thus, the master will not get a dislocated arm, and the electric motor will be protected from high loads, from which it can burn out.
It should be noted that the small size of the mechanical part of the instrument somewhat complicates the process of instrument repair, so be sure to be careful when carrying out repair work.
Electrical faults
Unlike drills, screwdrivers operate primarily on batteries. This means that different electric motors are used in the design of these tools. It is not difficult to determine the malfunction of the electrical part of the screwdriver. If the battery is charged, but when you press the “Start” button you cannot hear the sound of the electric motor, then the cause is an electrical failure. Let's look at the main types of electrical faults in screwdrivers.
Electrical faults - how to identify and fix them
A drill and a screwdriver have many similarities, but the difference lies in the torque. If a drill is intended for drilling holes in different materials, then the main purpose of a screwdriver is to screw in self-tapping screws. With a speed controller, this tool can be used for drilling and polishing surfaces. It can also be used for mixing solutions (only in small volumes). Cases of electrical malfunction, which are manifested by the following factors, are not uncommon:
- When you press the start button, the tool shows no signs of life
- When switching reverse - this option does not work
- Speed is not adjustable
To deal with such breakdowns, you first need to find out what reasons contribute to the occurrence of such malfunctions.
If the screwdriver does not want to turn on, check the charging unit
It doesn’t matter what brand of screwdriver fails - Bosch, Makita, Interskol, Metabo, Zubr, DeWalt and others. If the tool does not start, then first you need to check the battery charge and its serviceability. To do this, charge the battery (for 1-2 hours), and then install the battery back and check its performance. If there are no signs of life, then you need to arm yourself with a measuring device called a multimeter or tester, with which diagnostics will be performed.
This is interesting! If you pick up a multimeter, you probably know how to use it. If not, then you should read the instructions.
Using a multimeter, we will find out what is causing the breakdown - the battery or the charger. First, let's find out if the charger is working properly. To do this we do the following:
- Set the multimeter to DC voltage measurement mode at a nominal value of 20V. If the battery on the tool has a 24V rating, then the device needs to be set to 200V.
- Insert the charger plug into the socket
- Measure the output voltage at the charging block terminals
Its readings should be 2V greater than the rating of the battery being tested, for example, for a 12V battery, the charger readings should correspond to a value of 13.5-14V. If the rating is lower or there are no readings at all, it means the charging unit is faulty. It can be repaired if you have knowledge of electrical engineering. If you can’t fix the charger, you need to buy a new unit of the same brand.
Malfunction of the screwdriver battery and its correct repair
If the charging unit is working properly, then the fault lies in the battery itself. However, do not rush to disassemble the battery, since first you need to make sure that it is the reason for the tool’s inoperability. How can I check if it works? There are two ways to do this:
- Connect a tester to the battery terminals and measure the output voltage. When implementing this method, you must initially charge the battery by leaving it to charge for 2-4 hours. If the readings on the multimeter are below the device’s rating, then the reason for the screwdriver’s inoperability is hidden in a battery failure
- Place a second battery in the screwdriver and make sure that the tool starts from it (usually screwdrivers come with two nickel-cadmium batteries)
This is interesting! Based on the multimeter readings, it can be assumed that one or more battery banks have failed.
Manufacturers do not recommend repairing batteries yourself, much less disassembling these devices. That is why, if you are disassembling the device, then all actions are unsafe. Reviews and practice prove that it is not only possible to repair a screwdriver battery, but it is also very easy to do. The process of repairing screwdrivers with your own hands is as follows:
- Let's disassemble the battery. Many manufacturers make batteries from two plastic bases that are connected with screws. However, some manufacturers make the devices one-piece or non-separable. Video on disassembling the screwdriver battery below
- After removing the top cover we will see the corresponding number of barrels (cans). Their number depends on the battery voltage rating. Each barrel produces 1 Volt of voltage. To obtain a nominal value of 12V, 15V or other values, all barrels are connected in series
- We check the quality of connections (contacts). If there is a break between the barrels, we can assume that a fault has been found, but such breakdowns are rare. Most often one or more cans fail
- The presence of voltage on each bank is checked, which should not be lower than 0.9V-1V. If all the banks have a voltage of 1V, and one is 0.8V or lower, then the reason for the instrument’s inoperability is precisely in this barrel. Banks cannot be repaired, but they can be replaced to repair the battery
To replace cans, perform the following steps:
- Using a soldering iron, unsolder the barrel that has a low voltage rating
- Instead, solder a jar of similar size and parameters. When purchasing a new can, you need to take into account the denomination and filling material (nickel-cadmium or lithium-ion)
- Assemble the battery, charge it and check for proper operation
This is interesting! If you have difficulty finding one or more cans to repair the battery, you can take them from the second battery (if the tool is equipped with two batteries), which is already outdated and also does not work. Before you unsolder a jar with an obsolete battery, you need to initially charge it. After this, you should disassemble the battery and find a working barrel (which produces a voltage of at least 0.9V).
The process of repairing a screwdriver battery is not complicated, but when implementing it, do not forget that you are working with electric current, so you should follow safety precautions and carry out work only in protective equipment.
Finding the cause of the breakdown and eliminating it
The final breakdown of a tool is often accompanied by preliminary events, by paying attention to which you can prevent a serious malfunction: the appearance of extraneous sounds, sparking, burning odors, increased vibration, rapid battery discharge.
By disassembling the device, you can understand which unit is faulty. All device problems are divided into two types:
- electrical;
- mechanical.
Each type has its own primary characteristics, by which the damaged part can be easily determined. A special type of problem is related to the battery. The nature of the failure is due to the fact that the battery is quickly discharged, or the device does not want to start at all.
If purchasing a new battery is problematic, you can try to disassemble it and replace the faulty element.
The battery is disassembled by removing its latches from the grooves. Under the casing there are elements with a container. Their connection to each other is made by contact welding. You can use a multimeter to measure the voltage on each bank. The normal value of a charged cell is 1.2 volts. Faulty elements are removed - to do this, they are carefully bitten off with pliers at the point of contact, and similar ones are installed in their place. If there is no welding, you can use a soldering iron. Then the battery must be assembled and installed in a screwdriver for testing .
But the problem is not always related to the battery. For example, when repairing a Bosch screwdriver with your own hands, you often find damage to the charger circuit, not the battery. Repair of the charger consists of testing the radio elements. First of all, the mains fuse and rectifier bridge are checked.
Usually, when opening the charger case, external signs in the form of blackening of radio elements or a PCB board immediately show which element requires replacement. Most often, transistors located on radiators and the operational amplifier fail.
Electrical damage
Most often, malfunctions in the electrical part are associated not only with the inability to turn on the tool, but also with the lack of switching to reverse mode or the ability to adjust the speed.
If the battery and charging unit are working, but the screwdriver does not work
If it turns out that the charging unit and battery of the tool are working, then you should look a little deeper for the cause of the electrical malfunction. To do this, you need to disassemble the screwdriver. Further steps to identify breakdowns and eliminate them are as follows:
- Measure the presence of voltage coming from the battery to the terminals of the “Start” button. If there is voltage, then power is supplied to the button. If there is no voltage, it means the wire is damaged or the contact is broken. We follow the chain further to find the fault
- Check the start button. First, you need to remove the battery from the tool - this is necessary to check the serviceability of the button. After removing the battery, you should short-circuit the contacts (connect the wires that go from the battery to the input terminals of the button). You need to connect the multimeter probes to the output contacts of the button and set the device to resistance measurement mode. To measure the resistance value, you need to press the tool button. If the button is working properly, then the device readings will tend to zero. If it malfunctions, the device readings will tend to infinity (break)
The button can be replaced or repaired. If the part is collapsible, then you can disassemble it and clean the contacts. Very often, the cause of button malfunction is burnt contacts. If you clean them with sandpaper, the device will operate as before. If the button is not removable or its contacts are badly burned out, then you will need to buy a new part. Its price is not high, so everyone can afford to buy it to avoid repairs.
This is interesting! The button consists not only of contacts, but also of small springs, which can fly out at the slightest wrong movement. To prevent this from happening, you need to disassemble the button carefully and slowly.
Main causes of failure
Depending on how the breakdown manifests itself, its causes can be determined. There are 7 most common types of faults that cause an electrical mechanism to fail:
- Battery wear - the tool works poorly and requires more frequent charging. The solution is to buy a new battery and replace it yourself.
- Damage to the satellite or pin is a malfunction that can be eliminated by replacing components.
- If the screwdriver does not turn under load, this indicates improper operation of the device.
- Damage to the shaft or bearings is another reason for poor performance. During operation, the mechanism cracks and cannot cope with the load.
- Wear on the internal gears also impairs the functioning of the device.
- Lack of lubrication in the gearbox - this happens if the tool is rarely used.
- It may not work due to burnout of the motor winding. In such a situation, the motor needs to be replaced.
Determining the cause is not easy by visually inspecting the device; it is necessary to perform diagnostics according to the following instructions:
- disconnect the device from the network;
- remove the cartridge;
- remove the body part;
- remove the gearboxes and the fixing plate;
- disassemble the gearbox to gain access to the gears;
- inspect each component, assess the degree of wear or identify damage;
- replace broken parts;
- adjust the springs with pliers to improve control of the device;
- get to the bearings, check them, replace damaged ones;
- Check the condition of the motor, brushes and shaft.
Bearings and gears wear out quite quickly during intensive use, so they require periodic replacement. The battery, even in high-quality equipment, should also be replaced periodically.
Malfunctions of the reverse motor and speed controller
If the screwdriver shows no signs of life, then the fault may be hidden in the engine itself. Most often, the brushes through which voltage is supplied to the armature are worn out in the engine. If graphite brushes are worn away more than 40% of their length, they need to be replaced. The fact that it is time to replace the graphite brushes is indicated by sparking inside the tool body. Brushes cannot be repaired, so you need to buy parts of a similar type and size.
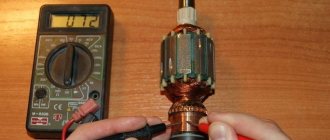
If it turns out that the brushes are in order, but the tool still does not work, then the reason lies in the electric motor itself. To check it, you need to measure the resistance of the armature winding. If the multimeter readings tend to zero or have a low value, then a winding break is appropriate. To restore the device's functionality, you will need to buy a new electric motor.
This is interesting! If the armature winding breaks, this part can be replaced or rewound. However, it is difficult to find an armature for Chinese power tools, and it is much easier to buy a new electric motor.
If there is no reverse, you need to check this mechanism. To do this, follow these steps:
- Take a multimeter and connect one probe to the input contact of the button, and the second to the contact of the electric motor
- Reverse handle switches
- The device records the readings, and if any value is displayed on the display, then the part is working properly. If the device remains silent, then you need to replace the part.
If the reverse option does not work, then you don’t even have to check the serviceability of the device with a multimeter. Disassemble the device and check the quality of the contact connections. If the wires do not come off, then the switch itself needs to be replaced.
If the speed controller is faulty, the speed controller (field-effect transistor) should be replaced. This part is connected to the start button, so replacing it is not difficult.
There is nothing complicated about repairing the electrical part; you just need to follow a clear sequence of actions to identify the cause of the malfunction and eliminate it.
Reasons for breakdowns of different brands of screwdrivers - how to extend the life of the tool
It's not just the low-priced tools that break. All tools tend to break, so there is no escape from this. To extend the service life of a screwdriver, you need to understand what causes the device to quickly fail.
- Incorrect operation. The tool should only be used for its intended purpose. If a portable device is used daily for drilling concrete, it will not last even a few days
- Purpose - like other types of tools, screwdrivers are divided into household or amateur and professional. If professional ones are designed for a long time of operation, then household appliances can be used no more than 2 hours a day
- Compliance with storage conditions - instruments should not be stored in a room with high humidity. If the internal parts (mechanical and electrical) become damp, the device will quickly fail. Portable screwdrivers need to be stored not only in appropriate humidity conditions, but also at the correct temperature. This is necessary not for the tool itself, but for batteries, which are destroyed at low temperatures. It is recommended to store the device in heated garages and workshops for the winter.
- Eliminate the negative influence of weather conditions - this is not only rain or snow, but also sunlight. If the device overheats in the sun, then the next time it is turned on, it may burn out, so do not allow the instrument to remain in the scorching sun for a long time
To extend the life of batteries, which break down faster than screwdrivers, you need to not only store them correctly, but also charge them. The battery should not be stored for a long time in a discharged state, or left to charge for a long time. You regularly need to turn on the tool and let it work (1-2 times a week). If you don’t do this, you will soon need to buy a new battery or the tool itself. How long an instrument of Chinese, European or German quality will last depends on the quality of care and operation.
To repair the device in question, you will need a minimum set of tools. Repair work should be carried out on a table in good lighting, since the screwdriver has many small parts that can get lost. Take enough time to repair the device rather than disassemble it and throw it away. If you are repairing an electrical part, it is recommended to treat the rubbing parts with lubricants before assembly. After repair, the screwdriver will be able to serve for as long or even longer. Detailed video instructions - how to repair a screwdriver from “A to Z”.
To summarize, it should be noted that a screwdriver is the most reliable and necessary tool that should always be in good working order. Repairing it does not require much effort, and if the device is broken, then repairing it will only require time and spare parts, which are not difficult to buy.
What and how to lubricate?
During assembly, each part is lubricated with synthetic (semi-synthetic) or mineral lubricating paste (grease). These substances differ in viscosity and durability. The smaller it is, the more often the parts have to be coated again. After the gear unit has been disassembled, it is recommended to coat each element with lubricant separately, gradually assembling the unit together. The lubricant is applied with a brush and distributed over the entire surface of each part.
Another way is to use specialized gear oil. Oils have a liquid consistency. They are used in the same way as lubricant, or sometimes they are poured into the gearbox without disassembling it, if a special hole is provided for this in the design of the screwdriver.
Thus, having understood the structure of the gear unit of an electric screwdriver, removing it from the tool, checking all the parts and, if necessary, changing the lubricant on them will not be difficult even for a novice craftsman. If you carry out this operation regularly 1-2 times a year, the risk of screwdriver failure will be minimal.