Connecting a printer
Older models of printing devices required a lot of attention to connect them to the computer.
It required connecting to a special port and waiting for the operating system to complete everything. Much has been simplified now.
There are two ways:
- installing it as a network one;
- or print from a smartphone or tablet.
We will look at two main types of connection:
- locally
- as network
First you need to install the driver.
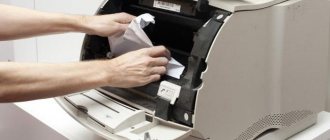
When installing locally, make sure the device is turned off, then connect it to your computer, and then turn on the power. Plug and Play standard makes the task easier - the operating system independently installs the necessary driver.
If this technology is not supported, you will have to install the driver manually.
In the first option, your actions:
- in accordance with the computer manufacturer's instructions, connect the device to the required port;
- Connect the printer power cord to a power outlet. The system finds the Plug and Play , and usually installs it without problems;
- when to appear New Equipment Search Wizard, check that you have selected the item Automatic installation.
Then click Next and follow the instructions;
If Plug and Play technology is not supported, then your actions are as follows:
- connect the device to the desired port;
- Insert the power cord of the printing device into the outlet and turn it on;
- In the Start
, open
the Printers and Faxes tab. Go to Printing tasks , click Add a printer and Next
.
The Add Printer Wizard will launch ; - choose Local printer, uncheck Installing a Plug and Play Printer and press Further
; - The majority of computers use parallel port LP 1 to send data. In this case, select it and click Next
; - follow the instructions that appear on the screen.
When the installation is complete, an icon will appear the Printers and Faxes
To use network type:
- running Installation Wizard, select Network printer;
- indicate yours from the list of connected ones;
- select your printer model and manufacturer;
- Set a custom name so that network users can access it.
Note: The printing device may be the default one. Then all documents will be automatically sent to this device.
The correct sequence of installing and setting up the printer for printing
The latest versions of Windows require scanning of new equipment connected to the computer and automatically setting up the printer to print. But sometimes after self-configuration the printer still does not print, and the Epson CX4300 MFP does not copy documents. Why doesn’t the computer’s automatic setting for printing work and why does the device stop working normally? Try setting up your Epson CX4300 for printing yourself.
- Using a USB cable, connect your Epson printer to your computer.
- Connect both devices to the network. On an Epson printer, press the power button, start the computer and wait until W
- If Windows recognizes the new hardware and begins automatic installation, wait until the process completes and try printing text or photos. But what if the peripheral device refuses to print? Don’t rush to contact technical support, but rather try setting up Windows for printing yourself first.
- An installation CD is included with your Epson printing device. Place it in your computer drive and wait for it to autorun.
If the disk is lost or simply becomes unreadable after a while, you should download the drivers from the Epson official website by selecting the desired printer or MFP model from the list, as well as the version and bit depth of Windows installed.
If you want to download a driver for Epson, but don’t know where or how, watch the video:
Drivers for printers from HP, Brother and other companies can be downloaded in the same way; you just need to go to the corresponding official website.
- In the “Installation Wizard” that opens, go through all the setup steps, following the system prompts.
- Once the process is complete, try sending the text or photo for printing, following the above procedure.
For installation assistance, watch the following video:
Sometimes you may encounter a problem printing with a Brother printer, on which text and photos were previously printed repeatedly, but after a crash or reinstallation of Windows, the printing device stopped working.
Driver installation
To install the driver, make sure the hardware is connected.
Then follow these steps:
- on the menu Start choose Settings
, Then
Printers
. You will see a settings window; - launch the Installation Wizard ;
- then select Local
; - then we select printing equipment.
If your device is in the drop-down list, then run the driver from the operating system during installation. This is not always good, as many functions will not be available. In this case, it is better to choose installation from disk.
- select the port. This is usually LPT, although some printers use a COM port;
- the next item is the name;
- Next, you will need to print a test page, and the installation will continue.
This completes the work with the driver.
Setting up the printer
To configure or change the default settings:
- move the mouse pointer to the lower right corner of the screen, then up and click Search
; - enter devices and printers , then click on it;
- equipment that you will use, right-click, then select Use as default .
Using a laptop, mobile device or tablet, you can make settings for each network. The operating system remembers all these settings.
You can also choose to default to different models on different networks:
- as in the previous case, click Search
; - similarly click Devices and Printers ;
- select the desired model and click Controlling the printer by default
; - select: Change printer ;
- in the Network selection , select the one for which settings are required;
- in the Select the default printer for this network tab, then click Add
; - When the devices are set for each network by default, click OK
.
Comment! If you want the settings not to change when moving from one location to another, follow steps 1-3, and select Always use the same default printer. Then click OK.
Basic Printer Settings
Before purchasing a printing device, you should familiarize yourself with the parameters that affect its performance:
- Today, two groups are most popular: laser and inkjet;
- Print speed is a characteristic determined by the number of pages printed in one minute. Color and black and white may differ in speed;
- monthly load – measured in thousands of pages. For office devices where you print a lot, this is a particularly important criterion;
- permission;
- The size of the memory buffer greatly affects the speed of operation;
- number and volume of trays feeding paper;
- types of materials, other than plain paper, suitable for output: labels, films, etc.;
- types of interfaces: USB 2.0, PictBridge or wireless: WiFi
,
Bluetooth
,
Ethernet
; - special attention is paid to ink. For example, for inkjet cartridges there are the following:
- containing dye;
- pigmented;
- quick-drying.
Everyone is good in their own way. But dye ink, for example, has the disadvantage of bleeding and short-lived color brightness. Pigment ink is more durable, however, it also has a disadvantage - it clogs the cartridges, which makes them unusable faster.
The most important thing is to refill each cartridge with the type of ink that suits it, otherwise problems with them cannot be avoided.
How to make a water-based inkjet printout suitable for use in decoupage?Author of the article and photo: Olga Sukhova - 2013
I have been doing decoupage for a long time - not a professional, but an experienced amateur. I always only used napkins. Everything is simple with them - find a beautiful one, cut it out, glue it and everything is fine. However, I have long been interested in the question of how to make a picture for decoupage myself. Those. just take the picture you like, print it out and use it in decoupage. Why so complicated, you say? There are a great many pictures, your eyes are filled with beauty. Take it and print it. That's what I did at first. I printed it on regular paper, cut it out, soaked it in water and... it was right in the water and it started to flow, I mean, the paint ran off of it. Everything ended up going down the drain.
My printer is a regular inkjet with water-based ink (CANON iP4700)
. This is precisely the problem. If you just print it out on plain office paper and then use it, the colors will run. Whether you put a picture in water or even just spread PVA glue on top, the paint floats. And it floats strong.
I decided to study the question of what to do, and whether there is still any possibility of making a picture suitable for decoupage using such a printer. I scoured a large number of sites on the topic of decoupage, forums and MK. I found a lot of advice, because... Everyone who has the same printer has this problem. But, having tried some of them, I still didn’t get any results.
The result came in a different way and completely unexpectedly! There may be a description of this method somewhere, but I didn’t come across it, although I studied a lot of information. Mostly they print either on a laser printer, or on an inkjet, but with pigment ink, or they fix water-based ink with two layers of acrylic varnish. All this is NOT SUITABLE for me and I don’t like it - I made a printout and secured it with hairspray, and then 2 layers of acrylic varnish, then thinned it using soaking and pellets. Complete nonsense. The paint still floats (not from above, but from below), although not so much, and the thin, almost transparent film created by varnish and a barely noticeable pattern after thinning is no good at all. The drawing is barely visible and almost nothing remains of the original one. I didn't like it at all.
So, we have an INJET printer with WATER inks
.
The task is to make a printout so that the colors do not bleed and the picture is suitable for decoupage, i.e. thin
.
1. Take the most ordinary PHOTO PAPER
. Not glossy. Simple, matte. I found a pack of 100 sheets for 60 rubles, size 10x15 cm, the cheapest and even without the name of the manufacturer. Quite thick.
It is important to place this paper in the printer correctly so that the printout ends up on the front side of the paper. One side is slightly smoother - this is the front side. It is impregnated with something, unlike the reverse side, and has a protective thin layer, although it is not visible.
2. Print it out
a previously found and prepared image on the printer. I won’t describe in detail how to prepare it for printing here.
(All pictures below are clickable - a large photo will open in a new window.)
3. Let the picture sit and dry
at least half an hour. I left it on longer, but then I discovered that there was no point, the paint dries quickly.
4. After this, take regular wide tape (they are much more convenient to work with) and glue it to the back of the printout
.
Glued, torn off. Glued, torn off.
In order for the tape to stick to the paper better, it is best to smooth it not with your fingernail (I initially did this), but, for example, with the end (top) of a RULER
(I did it with a wooden ruler). This is much more convenient, and the tape sticks evenly, and the nails are intact. When you smooth the tape with a ruler, the thicker layer of paper on the backside comes off - thus, fewer passes will need to be made and the printout will become thinner faster. Again, everything comes off smoother and there are no holes in the print. Take a look for yourself and evaluate the difference between simple gluing (see photo above) and gluing with ironing with a ruler (see photo below).
And one more useful ADVICE
:
It is more convenient to work from the edge of the table. You fix the tape on the edge of the table and then glue it onto the paper, which now also does not move and is more convenient for you to work with.
With your left hand you hold the paper, and with your right hand you slowly tear off the tape. The roll of tape itself hangs by itself and does not need to be held. Very comfortably!
We do this until the picture becomes visible through the thin layer of remaining paper. The main thing here (at the end of the work) is not to tear holes in the printout.
The wrong side of the print.
Front side of the printout.
It is best not to cut a picture from a sheet with scissors.
(I usually cut everything out and very carefully - with napkins), and
tear it out with your hands
.
Paper, no matter how thin it is, is not a napkin, which is still much thinner. When cut out, the paper will have clear edges and it will be difficult to disguise them during further work. If the edge is torn - fringed, then the picture will lie smoother and the transition will be less noticeable
. If you are making a large printout (for example, on a box), then there is no need to cut anything and tear it out accordingly, there you already cut your workpiece to the size of the box.
5. Once the printout has become thin, it can be used immediately
!
There is no need to water it with anything, spray it, smear it, or fix it
! We take it as it is and glue it with glue (I glue it with PVA) to the desired place of our work. And it's all.
To check, I then covered the top of the picture with PVA glue - I decided to check whether the ink would flow when applying the glue (and when printing on office paper, it does flow). DON'T LEAK!
Not a bit at all. The brush is clean, the paper around it is perfectly white!
Then I didn’t cover it with glue, I just glued it on and that’s it.
Then we finish our work - tint it if necessary, tint it, etc. And at the very end, as usual, we cover the work with ACRYLIC VARNISH
.
Everything is perfect! The paint from the varnish DOES NOT FLOW
, the picture is clean!
So, to make a printout on an INJET printer with AQUATE ink
, suitable for decoupage, you need
to print it on regular MATTE (or glossy) PHOTO PAPER
. That's all. After this, you can cover it with either glue or varnish - the ink DOES NOT FLOW.
This watering can was made using exactly these pictures, printed on a printer. You can see my other watering cans here:
Author of the article: Olga Sukhova The original article is here: https://www.business-lady.com
PS
After writing this MK, there were questions and doubts whether this method really works as I described and whether I am misleading beginners, because there is an opinion that it is generally impossible to make printouts on an inkjet printer - the paint flows in all cases? I will say this - don’t believe me, just check it for yourself, try to do the same yourself. This is the simplest way to be sure of anything. For my part, for the purity of the experiment, I specially made a VIDEO where I test a printout (photo paper + inkjet printer with water-based ink) to see if the paint will or will not flow if you put it IN WATER or spread it with PVA glue or VARNISH. See my experiments below...
Print text
Let's look at how to print text from a computer to a printer using print options.
The first thing you need to do is select the text or part of it and copy it from any document or web page.
Next, select it. Then we find the File
and click
Print
;
If you want to print part of the text, check the Selected fragment .
If you are printing a Word document (such as Word 2007), first check for readability, grammatical and punctuation errors.
In the File
Click
Preview (preferably), then Print
.
In the window that opens, you can select the necessary parameters:
- page numbers – indicate those that need to be printed (selected fragment, current page);
- number of copies - how many copies to print;
- enable – select: – all pages
- even
- odd;
- scale – you can specify how many pages to place on a sheet, and all pictures and diagrams are also scaled;
- by page size – specify the required page format;
- Effects tab – allows you to set background images;
- Paper/Quality tab – Set the print quality and paper size. This saves ink;
- Finishing tab - you can specify how many pages per sheet you want to get, as well as set the text orientation.
In general, there is nothing complicated.
Black and white
You probably know about two modes: color and black and white.
To install the second one you need:
- go to the File
, then
Print
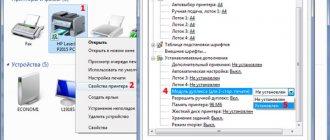
; - in the window Seal press Properties
; - a properties window will open;
- select Black and white printing ;
- Click OK
to confirm the changes.
So, the current document will be printed in black and white.
Color print
By going to the Color Management , you will see that you can view and change the default color printing values used.
- Click on Device Center , go to Color Settings , then, Color Management . Here you can select the default settings;
- if you want more advanced settings, click Professional settings ;
- Advanced Editing window will open . Go to the option that displays the desired print option. Then click on the required value, then OK
.
How to print photos from a computer
Storing photos on a computer is considered one of the safest and most convenient, along with transferring pictures to cloud storage. The ability to sort files by date or title makes it easy to find the images you need. But, you must admit, viewing photos on a computer monitor is not always convenient. And he is not able to fully convey the atmosphere and mood of the captured moment. Realizing this, many users have returned, so to speak, to the roots, namely printing photographs and compiling beautiful family photo albums. Learn how to quickly print photos from your computer to make your own original album.
- Standard image printing
This is the simplest method, which does not require any special knowledge to implement. It won't take much time either. All you need to do is select one or more images in the photos folder and click the right mouse button. In the menu that appears, click on “Print” and set the required values in the settings window. Here you can select the printer you are going to use, the size and orientation of the sheet, the number of copies, and the location of the image on the page. If you are happy with the settings, you can start printing.
- Paint
The program, although it has limited functionality, is considered one of the most universal for simple photo processing. With its help, you can add an inscription to the photo, rotate it in any direction, change the color, etc. Printing photos from a computer using Paint is no more difficult than with the first option. The principle of operation is somewhat different, but it is not difficult. Follow these steps:
- select the required image and right-click on it;
- in the window that appears, click “Open with” and “Paint”;
- then go to the tabs “File” - “Print” - “Page Setup” and change the image layout if necessary;
- return to the previous menu item and specify the active printer and number of copies;
- click on “Print”.
- Photoshop
Adobe Photoshop is one of the most popular photo editing tools. The service also allows you to prepare and print an image from your computer. Preparation includes retouching, color correction, changing perspective, size, etc. Sending a photo for printing is carried out in several stages.
- Right-click on the image, find “Open with” and select Adobe Photoshop;
- If necessary, process the photo;
- Press the combination Ctrl+P and set the settings at your discretion, for example, number of copies, printer, page orientation, etc.
- Click on “Print”.
- Mimigram application
You can also print photos using the Mimigram application. To do this, you will need to transfer pictures from your computer to your smartphone. Next, follow a few simple steps: select the creative solution you like and photo cards from your phone gallery that you transferred from your PC. If necessary, edit your pictures before printing, add interesting effects, stickers or writing. The next step is placing an order and receiving finished photos.
In the Mimigram application, you can not only print images from your computer or phone, but also apply them to mugs, magnets, T-shirts, etc. This opens up great opportunities for creativity and creating original gifts.