Most laptops already have a microphone. This is either a separate hardware device or a device built into the webcam. However, users often encounter situations where the system does not see the microphone due to its physical breakdown. In this case, you can use an external one. But they do this not only to fix hardware failures. Easily connect a wireless microphone to your laptop for karaoke. Or use a desktop model, which provides greater sensitivity and is conveniently located in front of the user. Connecting a microphone is done in different ways, depending on its model and the type of laptop port.
Interface 3.5 mm mini-jack
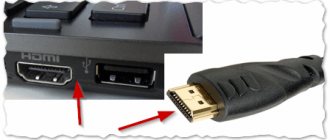
You can use a regular, wired microphone on a laptop only if there is a 3.5 minijack port. It's not difficult to find. Need to:
- inspect the ends of the laptop;
- find two port holes, indicated by green and red inserts;
- Make sure that the red port is intended specifically for a microphone by looking at the icon next to it.
On a note! This way you can connect a microphone to an Asus, Acer, HP laptop. These manufacturers install exactly a pair of 3.5 mm minijack ports on their devices for connecting speakers and a microphone.
Video material
If setup and connection still raise questions, you should contact a qualified specialist or take your device to the nearest service center. Otherwise, the process is simple and quite within your power. Enjoy singing at home, choosing the repertoire and in the quantity you want.
Combo port
Some laptops use a combo port to connect headphones and receiving devices. It's easy to plug in a headset with one cable from the headphones to the voice recording point. However, if you take a regular dynamic microphone, you won’t be able to connect it directly to your laptop.
To use an external audio recording device, you will have to buy a branded one. It may be from the same brand as the laptop, or it may have compatibility information. However, such a device is quite expensive. It is much more attractive for the average user to buy an adapter.
This adapter looks very simple. At one end there is a plug for the hybrid port, at the other there are two taps, marked in green and red for clarity. It is the latter that allows you to connect an external microphone to your laptop.
If your microphone uses a different type of plug
Today, connecting a microphone to a laptop can only be done using a 3.5 minijack interface. However, there are many models of audio recording devices on the market that may have a different plug. Meet:
- TS, monophonic sound, 2.5 mm;
- TRS, monaural, 3.5 mm;
- TRS, stereo, 3.5 mm;
- stereo and mono, 1/4 inch.
To connect an external microphone, it is recommended not to experiment with disassembling its connector and resoldering the contacts, but to buy an adapter . It's inexpensive. The product can be extremely compact, in a rigid case. Or it can offer a flexible cable outlet to the connection port, which is convenient for some users.
Using an external sound card
What happens if the audio recording device has a weak output signal? In this case, if you connect a microphone to a laptop, the voice will be very quiet, and it may not be possible to amplify it using software. To solve this problem, you will need a connected multimedia device.
An external sound card is a very small device the size of a regular flash drive. At one end there is a USB interface, at the other there are 3.5 minijack outputs, red and blue, needed for connecting a microphone. You just need to plug the sound card into the laptop port.
Important! Simple device drivers will be installed automatically. For more complex ones, you will need to download them from the Internet. Responsible manufacturers offer a disk with a set of software required for its operation, complete with a sound card.
Bluetooth connection
Recently, specialized microphones with a built-in speaker have begun to appear on the market. They connect to the computer via Bluetooth. On your computer, you just need to launch a karaoke file with an instrumental and text. The device itself will receive the sound of the voice, and receive a signal from the computer, and mix the voice with vocals inside its case. Since there is no additional need to transmit sound to the speaker, your vocals will not be delayed (which happens with more complex Bluetooth connections).
There is a primitive mixer located right on the body, so you can adjust the relative volume of music and voice directly during a performance, as well as apply effects (echo, distortion, etc.)
This is an ideal solution, for example, for picnics in nature, where it is inconvenient to take a bulky audio system.
How to connect a microphone to a laptop for karaoke via Bluetooth:
- Turn on the device
- Turn on Bluetooth on your laptop and pair them
- Select Bluetooth speaker as primary audio output device
In this case, there is no need to connect the microphone to the computer at all, since the sound output is done within the device itself.
The same goes for standalone Bluetooth speakers with wired or wireless microphones. They need to be connected not to a computer, but to an audio system.
We hope our tips will help you set up home karaoke, and your fun will be cloudless and wild.
Radio microphone
A radio microphone is an extremely popular device for karaoke. It consists of two functional modules. One of them, a decoder-transmitter, connects to a laptop. The second, the microphone itself, is equipped with a battery and a built-in transceiver module.
To connect a microphone to a laptop, you will need to follow the manufacturer's recommendations. Usually you need:
- connect the decoder-transmitter unit to the laptop using the USB port, 3.5 minijack, sometimes both at once;
- install microphone drivers;
- check the connection between the microphone and the data processing unit according to the manufacturer’s instructions;
- check the operation of the device.
Typically, a radio microphone has a fairly simple initialization technology. It is described in detail in its operating instructions.
Bluetooth
Bluetooth devices are gaining immense popularity among consumers. Although the communication range of such a wireless microphone is short, up to 10 meters without obstacles, it is enough for comfortable work with a laptop. To connect your device via Bluetooth, you will need to do the following.
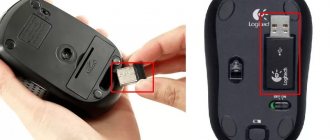
- Connect the receiver to the laptop. This could be a very small whistle, or it could be a module powered by USB and transmitting an audio signal via a 3.5 mm minijack.
- Install drivers for the new device and software offered by the manufacturer.
- Turn on the microphone and make sure it connects to the receiver. Usually, a small light bulb is installed for this purpose, the nature of the glow indicates the state of the communication channel.
The manufacturer offers detailed connection instructions for each Bluetooth microphone.
Important! There are models without a receiver. In this case, to use them, the laptop must have its own Bluetooth module. If the model is old and does not offer such luxury, to connect a wireless microphone you just need to buy and install one of the universal receivers.
How to start using an external device
The microphone on a laptop, even if it is faulty, may prevent it from working with a connected external device . It needs to be activated and set to be used on the system by default. This is done as follows.
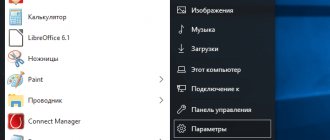
- The speaker icon is located in the tray, next to the clock. If it is hidden, in Windows 10 and Windows 7 you just need to press Win+B.
- You must right-click on the icon.
- From the menu that appears, select Recording Devices.
After these steps, a window will open in which all sound recording sources identified by the system are listed. You need to select the recently connected one by its model name.
If the device name is grayed out, it needs to be enabled. To do this, right-click on the name or icon next to it and select Enable. It is easy to understand that the device is working by the indicator located to the right of the name. When you start talking or just tapping on the microphone, you can see how the output level is displayed.
Advice! In order for the system to automatically use an external audio recording source, it should be set as the main one. To do this, right-click on the model name and select Use default communication device. After this, when you connect a wired microphone, the operating system will immediately begin working with it.
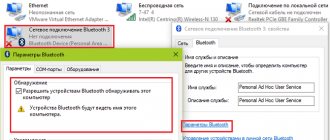
It is more difficult to start using wireless Bluetooth devices. If the radio microphone only requires manipulations with the receiver or manufacturer’s software, then the model’s Bluetooth must be paired before any settings are made. To do this you will need:
- find the Bluetooth icon in the form of a blue logo next to the clock;
- right-click on it and select Search for devices from the drop-down menu;
- find the name of the wireless model in the list of found ones;
- double-click on the name with the left button or select and click the Pair button.
You may be required to enter an authorization code during pairing. The required combination of numbers is always in the device's operating instructions. Once pairing has been established, the wireless model will automatically connect to the system.
Connecting the microphone
Where to connect a bluetooth microphone to a PC and how to use it? First you need to ensure the components are connected correctly. It is worth noting that there is no difference in connecting to a desktop computer and a laptop.
There are condenser and dynamic microphones:
- The second acoustic conditions of various spaces are less affected, which is a significant plus. They are also less susceptible to overload and do not require a “phantom” power source.
- Condensers produce a cleaner, more natural sound and operate with “phantom” power, which is approximately 48V. Such gadgets are used by professional studios for high-quality sound recording.
Important! Don't forget to connect speakers to fully enjoy your singing. You will find all the necessary information on connecting the device in our separate review “How to connect speakers to a computer without an amplifier?”
Windows XP
Next you need to figure out the software connection:
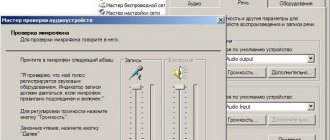
- Go to the lower right corner and double-click on the volume control icon.
- Open “Options”, then go to properties. Select the “Microphone” device from the list and confirm the action by pressing the “OK” key.
- We see in front of us a new column called “Microphone”. Uncheck the box next to “Off” if it is checked there.
Important! Use a subwoofer - an acoustic system to transform low-frequency sound waves. This device will help you make your music sound better. On our portal you will learn “How to connect a subwoofer to a computer?”
Windows 7 and 8
To configure the microphone in this operating system:
- Right-click on the volume icon to bring up a menu in which you need to open “Recording Devices”.
- We see a list in front of us, select a microphone from it.
- Double-clicking will open a window where you should set the default usage in the “Device Usage” section.
- Don't forget to click “OK”.
Important! The highest quality microphone will not provide you with the right sound without installing the necessary software.
What to do if the sound when recording or talking is very quiet
You can adjust the microphone sound volume using system tools in Windows 7, Windows 10. To do this, you need to go to the recording device settings window, as shown above. Here you just need to select the name of the model you are using with the left mouse button and click the Properties button. It is located in the lower right corner of the window.
In the device properties, sensitivity levels are adjusted on the tab of the same name. Having switched to it, you should use the slider to set the acceptable sound volume. To save the settings, just click OK and close the settings window.
Connecting a microphone to a laptop is sometimes very difficult. We are talking about old devices - their connector does not meet modern standards. Therefore, to use a very old microphone, you cannot do without qualified assistance. The device must be taken to a workshop or electronics specialist to re-solder the wires to a modern interface. Only after this can you connect the microphone to the laptop using one of the methods described above.
How to connect a karaoke microphone to a laptop
With the spread of the Internet, many users have appreciated its advantages in the field of communication with people who live far away, all over the country or even the world. E-mail, ICQ, Skype are comfortable means of communication. And if the first two mainly support text communication mode, then with the support of Internet telephony you can use voice or even video communication, but in order for your interlocutor to hear you, you need a microphone. If you have a karaoke microphone at your disposal, you can use it.
You will need
- – Jack to mini-jack adapter.
Instructions
1. Let's start with the fact that all modern laptops and netbooks have a built-in microphone; you just need to activate it in the system settings. If it is broken, or you are faced with tasks that require an external microphone, follow the further instructions. 2. All laptops have an input for headphones and a microphone; to save space, they are often combined in one jack, and switching is done mechanically, depending on the connected device. Look for a round hole on your laptop, next to which there is an icon for a microphone or headphones and a microphone through a line. This connector is an ordinary 3.5 mm mini-Jack socket and is located on the side or rear panels of the laptop case. 3. A typical karaoke microphone has a Jack output plug, but unlike the laptop input, its size is not 3.5 mm, but 6.3 mm. It is obviously larger, and without additional accessories it will not be possible to connect it. To combine devices, you will need a jack to mini-jack adapter. It is a plastic or metal cylinder, on one side of which there is a hole for a 6.3 mm Jack, and the other side ends with a 3.5 mm mini-Jack plug. Similar adapters are sold in radio parts stores, audio equipment stores and some computer stores. 4. After receiving the adapter, you can begin connecting the microphone. Insert the microphone plug into the adapter socket, and connect the resulting bundle to the laptop microphone jack. If your computer is running Windows 7, it will notify you after the connection that the device is connected. Windows XP does not display any notifications when connected. 5. After connecting the microphone and laptop, you need to make sure that the microphone input is strong. Enter the system mixer by double-clicking the volume icon next to the clock. In the microphone field, check to see if the “Off” checkbox is checked. If so, remove and install the volume control to the desired level. Also check the switch on the microphone itself, if necessary, move it to the “ON” position.
Despite the fact that today the Internet is increasingly associated with the sphere of fun, it remains a comfortable and powerful means of communication that allows you to connect people in various parts of the planet. Skype and similar programs not only completely safely replace long-distance telephone communications, but also allow video conferencing - all you need is access to the network. And in order to use these benefits of civilization, the computer needs to be trained to speak and see, that is, connect a microphone and a webcam to it.
You will need
- computer;
- microphone;
- sound card.
Instructions
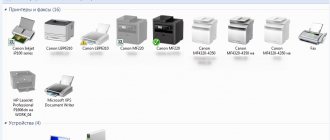
1. To connect, we need to make sure that the sound card installed on the computer and the corresponding microphone jack are working. The sound card can be either built into the motherboard or installed in a separate slot. We are looking for three multi-colored inputs for a jack connector on the back side of the system unit. 2. As usual, installing special drivers for the microphone is not required. After connecting the microphone to the corresponding connector on the sound card, go to the Windows Control Panel and go to the properties of the overall system volume mixer. 3. If we have Windows XP, select “Additional devices” and in the list that appears, check the box opposite the “Microphone” device. In Windows Vista, select “Recording Devices” to configure settings. If the sound card capabilities are allowed, an additional “Gain” option will appear in the settings, which can be used to compensate for, say, a large distance to the microphone. 4. With a positive installation and connection of the microphone, we will immediately hear our personal voice in the computer speakers. If desired, it can be recorded using special programs for working with sound. We successfully connected the microphone to the computer. Now it is possible to use the means of speech communication, Internet calls and other amenities that the global Network offers today. Video on the topic
Note! If the microphone is not prepared for connection to a computer and has a non-standard input for a computer, you will have to purchase a mixer.
The favorite pastime of many - karaoke - is easily impossible without a great microphone . It is he who, together with the speakers of the speakers, conveys all the beauty (if any) of the vocalist’s voice.
Instructions
1. Locate the audio inputs on your home receiver. Most receivers have inputs on the front and rear. Traditionally 1/4 inch or 1/8 inch stereo input (headphone jack). If available, use this socket. Instead, locate the most easily accessible RCA input. 2. Identify the plug on your microphone. Most microphones have a 1/8 inch plug, similar to what you would see on headphones. 3. Count the stripes on the plug. Plug with two black stripes - stereo (left and right channels). Three black bars indicate mono (one channel). 4. Determine adapter requirements. If the microphone has two stripes and is the same size as the karaoke receiver's jack, you don't need any adapters. Connect the microphone effortlessly to the audio inputs of your karaoke receiver. The “Tips” segment below contains a layout of common adapter combinations. 5. Connect the input channel to your receiver. Typically, the front headphone jack is labeled “Aux”. When you hear sound in the karaoke speakers, it means you have found the right channel. Video on the topic
Compared to old computers, new laptops, in addition to stronger technical capabilities, have one significant advantage - a built-in microphone . Previously, it was necessary to purchase it separately. It could get damaged, get lost, take up extra space, etc. All this is in the past. But it happens that the built-in microphone is not enabled by default. This problem can be easily dealt with.
Instructions
1. Check if your laptop has a built-in microphone . As mentioned before, modern laptops are available with built-in microphones , but this check will not be superfluous. Suddenly you have a special model. Review the documents for your laptop. Its equipment must be indicated there. Another option: if your laptop has a webcam, then it should definitely have a built-in microphone . You can also see its presence through Device Manager. 2. Go to the Start button menu. Select "Control Panel". In the window that appears, select the “Sound” section. A window will appear. In it, select the “Recording” tab to enable the built-in microphone . If it is present on your personal computer, it will appear in the list of devices. Click the Properties button. The window that appears should indicate whether the built-in microphone . 3. Check the sound transmission level of the microphone a. It is acceptable that he is energetic and works, but is configured for a very quiet broadcast. Increase the sensitivity of the device. Go to the “Control Panel”, find the “Sound” icon and double-click on it with the left mouse button. 4. Find the microphone in the list of devices. Right-click on it. A context menu will appear. Select Properties. Look for the options “Allow applications to use the device in exclusive mode” and “Give priority to applications in exclusive mode”. To connect the built-in microphone , set the highest sampling frequency and bit depth. Apply metamorphosis. 5. Test the microphone . If you can be heard perfectly, then you have configured everything correctly. If not, then try changing the settings in the “Improvements” tab, which you can also find in the microphone . If this does not help, then, most likely, the problem is a factory malfunction. Describe the problem and use the warranty repair service at the service center.
Connecting a mixer to a laptop is not a primitive task. It's one thing to connect a wire to two connectors, another thing is to prefer a suitable sound card, which you will definitely encounter if you continue to play music.
You will need
- – a set of wires for connecting the mixer to a laptop, on one side of which there should be a jack plug.
Instructions
1. Make sure that the necessary drivers for the sound card are installed on your laptop. If necessary, update them so that they work correctly, otherwise problems may arise with connecting the mixer. Find the audio output connectors on the laptop; they are usually marked with an icon depicting headphones. 2. Take the connection cable with a jack plug and connect one end to the audio output of the laptop sound card, and the other to the mixer. It’s cooler to use a cable option where the connection is made using 2 wires combined into one “jack” at the other end. 3. If you have a cable that has a jack plug on one side and tulips on the other, connect the first to the connector on the video card, and the second to the corresponding audio input ports on the mixer. Be careful to follow the color scheme for connecting the wires. You can also use special adapters that you can buy in radio stores in your city. 4. Buy a special external sound card for your laptop if you want to achieve better sound when using a mixing console. Check out their range on specialized websites and look at reviews from users who have already purchased one or another model. Note! Remember that you won't get great sound from standard sound cards, exclusively those built into the motherboard (many laptops only have such sound adapters). You can read information about professional sound cards using the following links: https://www.stereohead.ru/index.php?name=Pages&op=cat&id=10, https://www.computerra.ru/terralab/multimedia/357747/ , https://www.n-audio.com/news/new7.php. Helpful advice: Buy high-quality sound cards.
A telephone- microphone headset (TMG) looks like ordinary headphones, but has a side movable element, at the end of which a microphone is placed. It connects to the computer's sound card with two cables.
Instructions
1. Check whether the telephone and microphone headset is connected to the computer correctly. On the sound card, the microphone jack is pink and the headphone jack is green. The headset's microphone plug can be pink or red, and the headphone plug can be black, green or white. Occasionally, they do not differ in color at all, but have stylized microphone and headphone symbols. Finally, if they do not have any designations at all, they can be distinguished implicitly: on a microphone plug, the middle and general contacts are made as a single unit or are electrically connected to each other (the latter can be determined using an ohmmeter - the resistance should be close to zero). Do not plug the microphone plug into any of the card's output jacks - this will short circuit the right channel and risk damaging the amplifier. 2. With the headset firmly connected, turn on the computer, wait for the operating system to load, put on the headphones and say something into the microphone. If you hear a personal voice, the connection can be considered complete. 3. If the headphones work but the microphone does not, run a program that allows you to change the ratio between the tiers of signals coming from different sources. In Windows, it is called, depending on the version, “Volume” or “Volume Control” and is located in the “Typical” - “Fun” menu section. In Linux it is called “KMix”, “Mixer”, “Sound Mixer” or something similar, and is located in most distributions in the “Multimedia” menu section. 4. Find in the program an imaginary regulator that allows you to adjust the level of the signal coming from the microphone. If there is no such controller, enter the program setup mode (the method for entering this mode depends on the OS) and turn on the display of this controller. Next to it there is a checkbox, which in some versions of the program turns on the microphone, and in others turns it off. Turn on the microphone input, then use the slider to set the desired level of the signal from it. Don't make it too huge, otherwise distortions will occur. Later, check again if the microphone is working. 5. If you don't already have Audacity or a similar program on your computer that allows you to record audio files, install it. Record your personal voice, and then listen to the recording. The sound should be good, with approximately no distortion. Video on the topic
Video on the topic