Checking the sound of headphones is possible without the help of service center technicians. This is an accessory that is connected to a phone, laptop, or computer. It allows you to view media files and listen to music without causing discomfort to others. Headphones are easy to connect to devices, and before use it doesn’t hurt to check the sound, volume and other parameters. Free online tests and applications have been created for this purpose.
How to check headphones and speakers for sound quality
The performance and sound quality of headphones is determined using techniques designed to determine a specific parameter or universal applications. Popular:
1. Online services. To check, they contact the service, go to the website, run the test and begin analyzing the state of the headset.
2. Programs. Download the software for testing and install it. This option is suitable for highly specialized testing. The quality of the check does not depend on the operation of the site, browser or Internet speed. The programs determine the basic parameters of the device and characteristics.
It's easier to test headphones using a suitable track and video. The procedure will be needed if there are doubts about whether the emitters play at the same volume or not. Suitable video:
Using an online test, full-size, in-ear and other models, as well as speakers, are checked. When evaluating, you need to correctly connect and observe phasing when connecting the speakers. Maintaining polarity ensures consistent operation of the speakers. Polarity may not be taken into account in the case of monophonic playback, but in stereophonic playback the correct inclusion is important.
Microphone testing methods
There are the following main verification methods:
- using the Windows operating system;
- recording sound;
- via Skype;
- online.
Using standard Windows tools
For Windows 7, the check is performed like this.
- In the control panel you should find the “sound” tab, and in it “recording”.
- Find the connected equipment and make sure there is a checkmark in the green circle (the device is working). It also checks to see if there is a sound bar when talking into the microphone. If there is a reaction, then it works.
- Having selected the desired device, you should click its properties and in the first tab (general) make sure that there is a controller, and also that the input into which the device is connected is activated.
- Additionally, you need to open the “listen” tab and click on “listen from this device.”
- After the point above, the required device is indicated and it is checked whether there is sound after recording.
The audio scale should work when checking the microphone
On Windows 10:
- you should find the speaker symbol in the tray;
- The “recording devices” menu opens, and in it “sounds”;
- select the “recording” tab and check the functionality of the microphone based on the response of the scale;
- if the reaction is weak, then it needs to be strengthened - to do this, select the field with the device and click on the “properties” button;
- Next, select the “levels” tab and change the volume by dragging the slider.
Microphone sound levels in Windows 10
It is worth knowing that in this tab you can adjust the sound so that in the event of a call, the volume of a movie, music or other content will automatically decrease and will not interfere with the conversation.
Recording sound
Recording audio will also help you check the microphone on your headphones. In order to do this, you need to go to “Start”, select “Standard Programs”, “Record Sound” and in the window that opens click on “Start Recording”. After this, we make a recording and save the resulting file in any convenient place. By opening the file, you can listen to the sound and its quality both through headphones and speakers.
Via Skype
Another very convenient way to check your headset is to do it via Skype, no matter whether you use this application in real life or not. You can do an express version of the check, or you can spend a little more time . In the first case, just select any contact from your address book and click on the “Data on communication quality” item. In the window that opens, you need to select your microphone option and click the “Test” button; after a few moments of recording, the resulting audio will be played back.
In addition to the above option, you can dial a recording quality check service through a special call. To do this, select “Echo/Sound Test Service” and make a call. The recording lasts 8-10 seconds and plays back after a while. Naturally, in order to use this option, you need Internet access.
You can also adjust the volume in Skype. This is done through regulators, which are switched from automatic settings by default to manual mode (uncheck the “Automatic adjustment” box), after which you can set all the necessary parameters yourself. It’s better to do this right during a conversation with one of your friends.
Online check
For those who do not like built-in verification utilities, there is an alternative - online verification.
- The browser asks you to “check your microphone online.”
- Next, you should find the voice recording enable button.
- Sometimes the service asks for permission to process data; if this is the case, then it should be granted.
- The last stage of the test is to talk into the microphone and see the service rating about the quality of the connection.
Online microphone test service
These simple methods will help you check the operation of your working set of headphones and microphone in order to understand whether it is suitable for further use or not. As you can see, the check will not take much time, and you can easily handle it yourself.
Checking headphones left to right using a test video
The state of sound in headphones is reflected in a person's hearing, so attention is paid to quality. To check audio in models, use the following technique:
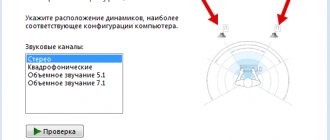
- Select the “Stereo” mode.
- Click on the speaker icons in the application. Check that the left and right channels correspond to their side.
- When pressed, the sound is displayed and sound is heard from the left side. This indicates that both channels are working correctly and that the connection is correct.
Special online diagnostic services for recording devices allow you to check if there is no specialized software for working with music. Videos for working with such devices will help with this.
Diagnostics will be possible with a reliable Internet connection. This prevents the sanity check from having minimal difficulty.
Checking the microphone through the settings of Windows 7 or Windows 10
The most accessible way to check the microphone on headphones is to check through the microphone settings in the Windows operating system. To do this, right-click on the speaker icon on the taskbar and in the menu that opens, go to the “Recording devices” section. The screenshot below shows how this is done in Windows 10.
After going to “Recording Devices”, the “Sound” window will appear in front of you, open on the “Recording” tab. This window will display all recording devices. In particular, the microphone from the headphones should be displayed here if it is connected to the computer. If there is no microphone, then most likely it is not connected, or the drivers for the sound card are not installed. If the microphone is present in the Sound window, then you can check its operation. To do this, just say something into the microphone and watch the bar on the right side of the window. This bar should start blinking green, indicating the current signal level from the microphone.
If the signal does not appear or it is very weak, then you can try to strengthen it. To do this, select the microphone with the mouse and go to “Properties”.
Here, on the “Levels” tab, you need to increase the microphone volume and its gain. After this, you need to save the settings and check the signal level again.
Checking stereo sound right and left using a test track
It's easier to check stereo using a music track. To do this, find music on the Internet. Professional studio recording is also suitable. Such a test is not exact, but it will allow you to understand whether the sound is satisfactory or the device is working.
When downloading audio, you should make sure that the player through which you will listen to the track is of high quality. After all, a bad signal source compresses and deforms the sound, producing poor results.
Those who prefer not to watch the video, but to test their headphones in another way, should turn to the test tracks. The most popular entries are:
- There's a knock on the door. First there is a knock in the right speaker, after which the sound moves to the left channel. Listening will quickly reveal which one is performing worse or not functioning at all.
- Frequencies 20 Hz – 10 kHz. Testing involves sending the signal evenly to both speakers. The absence of problems in the left and right speakers is understood by the identical sound on both sides.
If there is a delay in sound on the left or right, it is heard off-center, then it will be easy to determine whether the speaker is faulty. To fix the problem, you should contact specialists who also check by serial number or try to fix the problem yourself.
You can determine a possible defect if the reproducing knock and frequency. There are options with phrases in the audio file. It sounds when turned on and identifies the channel.
Simultaneous sound from both sides indicates a problem with the jack. Most often, breakdowns occur in areas where the signal wiring of the channels is soldered.
If you can’t test using a track, you can use a PC program. It is used to perform the procedure for positioning sounds in headphones.
To check for imbalance between channels and volume level, turn on the track in Mono mode, adjust the volume and check the audio recordings.
They also select the appropriate sound, start the song and listen to it. If the key shifts, the channel imbalance is obvious. Defective models should produce rich and realistic sound.
To identify problems with overtones, a monophonic sweep top is used. Mechanical difficulties in the low frequency region arise when the membrane is touched by something or when there are cracks in the membrane. This is accompanied by the appearance of resonance at specific levels. Rattling at low frequencies can be heard if a hair gets on the membrane.
Music tracks play low frequencies first, gradually moving towards high frequencies. The sound of one channel louder than another indicates a problem.
Test tracks allow you to independently evaluate the sound quality of the software player, check the characteristic distortions from the influence of the OS system mixer and other effects.
How to check?
To test the microphone on your headphones, all you need is a computer. Testing is carried out using Windows tools and online on special sites. These tools allow you not only to verify that the device is functioning in principle, but also to evaluate the volume, as well as listen to the recording to determine the sound quality.
The following tools are used for checking:
- Windows sound settings;
- control call on Skype;
- sound recording in PC functionality;
- online voice recorders and tests.
Any user can figure out how to check whether the microphone in headphones is working. There's nothing complicated about it.
How to check the balance and sound quality of headphones on your phone
You can check the quality of the sound in your headphones using applications. The most reliable and informative:
- Earphones Test +. The application tests headphones and speakers, assessing quality parameters. It is also used to determine compatibility with an Android device. This option is not suitable for Apple. The tool performs an efficient comparison of headset characteristics and behavior. It is used to evaluate a new model before purchasing and determine the compatibility of a smartphone with the hearing characteristics of a particular person. The application is downloaded for free. There are no ads and the controls are simple. The tester contains prepared tracks, so it is not a complex signal generator.
- Sweep. A variable frequency is used to produce the tone. It is designed to assess the presence of overtones. The program is used in combination with Earphones Test + or instead of it, since the former works on the basis of a discrete frequency increase, so there is a risk of missing the problematic frequency and performing the test inaccurately.
- Frequency generator HD Pro. Designed to select a specific frequency from values prepared in advance. Using the program, the presence of overtones at low frequencies is assessed.
- Check LR. This option is used to check channels on the left and right sides.
- Compat. Used to check phase and antiphase.
- Sound Analyzer App. To evaluate the characteristics, a demonstration with a change in the signal amplitude in 6 dB steps is suitable. The application is useful for those who want to gain knowledge of the influence of dB on subjective loudness.
The appropriate method for performing a sound test is selected taking into account the characteristics of the device. Most of them use music to bring out subtle nuances. This causes difficulties when a quick test is needed.
Using applications, they perform an online sound check and identify defects and point out the defect to the service center.
Checking the headphone microphone using special programs
The easiest way to test the functionality of your headset is to use the free Audacity program, a powerful audio editor that will be useful for other purposes. This application is similar to the built-in voice recorder, but in a more advanced version. How to check if the microphone on headphones works using it? Record a short audio file by speaking a few phrases into the headset, and then listen to it to check the sound recording.
The second free and useful program that can also be used for testing is the Skype IP telephony application. You can check the microphone in your headphones online using the following instructions:
- Install Skype on your computer or laptop.
- Refer to "Sound Settings".
- In the Microphone section, select the required device.
- Decide on a comfortable volume.
- ABOUT
- Make a follow-up call to a friend or acquaintance.
- If this is not possible, you can test using the Echo/Sound Test Service, which you will find in the main menu. The service will allow you to make a test call - follow the operator’s commands, and then listen to the recorded file to evaluate the sound.
How to test headphones and speakers for other sound parameters
Not only is the online procedure for testing headphones and microphones popular, but they also check other sound parameters on which the sound of a melody depends.
How to check if your microphone is working
On the bass
Bass testing is carried out in relation to all types of headphone designs: on-ear, wireless, in-ear, in-ear and others. Checking the bass sound will allow you to:
- determine normal volume;
- detect the presence without crackling or rattling;
- find out if there are loud unpleasant sounds or noise that can harm your hearing.
How to remove background noise in headphones
Old headphones are also tested using the test. If there are membrane defects, slight deformations or malfunctions, the user will hear a cracking or rattling sound. The quality of the audio track is confirmed by the absence of interference, purity and uniformity, increasing within 20 seconds.
Bass can be:
- Natural. This is typical for studio models.
- Balanced. Found in musical models.
- Overly powerful. This applies to bass models.
The music itself is important. For example, listening to dubstep will be more enjoyable on bass headphones.
Headphone Bass Check
The bass increase test is performed on a player, computer, laptop or smartphone:
- For equipment with Max OS, iOS, Android, install suitable applications.
- For Windows, programs with effective settings are used. Realtek HD Audio provides customization via the sound card. The equalizer ensures precise frequency settings.
Volume
The volume of sound provides the ability to broadcast signals to two ears. Thanks to this phenomenon, the right ear hears sounds intended for the left and vice versa. This occurs with jbl speakers. But the headphones clearly separate the sound. Manufacturers are trying to solve the surround sound problem by using audio drivers that simulate the location of the source in virtual space. Surround spatial sound will allow you to feel the effect of presence.
5.1 surround sound test
Installable programs and online services are developed for testing. There are two surround sound options: 5.1, 7.1. The first comes with 6 audio channels, while the second comes with 8.
For sound delay
Sometimes the sound lag in the headphones is determined. This parameter is important for wireless Bluetooth headphones. They also check when processing audio at an accelerated pace. Desync is detected using video, which allows you to determine whether the sound will lag or not.
Sound balance
Tracks with a range of frequencies and knocks on the door help figure out the balance. You can download them in flac or wav format.
To correctly reproduce stereo panoramas, the speakers must reproduce frequencies with the same sound spectrum. The tests create a frequency of 20 Hz-10 eHz and send them at the same level to the speakers. During the test, the signal should sound in the center, without deviations.
Sound volume
Playing headphones with sufficient volume allows you to comfortably listen to music and carry on a conversation. If the device operates quietly, it is worth familiarizing yourself with the resistance of wired models. Devices without a separate amplifier operate with a resistance of 64 Ohms. For larger parameters, a more powerful source is required.
The amount of resistance varies with frequency and is represented as a curved line or impedance. The indicator determines the type of emitter or emitters used in the product.
Frequency range
A test for frequency response or amplitude-frequency response and the range of reproduced frequencies will show the sound quality, since the human ear does not perceive frequencies beyond 20Hz-2000Hz.
Tracks are used for verification. A male voice speaks at an achievable frequency. When low-frequency sound appears, this is considered the lower threshold of the frequency range. The upper range is also determined.
Beyond the specified value, the sound is quieter. A sharp frequency cut, when headphones do not reproduce above the limit, is encountered with wireless or USB models connected to the input of a computer or smartphone. Although the speaker is capable of reproducing high frequencies, the built-in DAC or digital format is limited by frequency.
Checking the sound of headphones “left-right” - left and right channels
If you hear the sound off-center, but off to the left or right, then you can easily figure out which speaker is faulty. Read about how to fix the problem here.
Test the right and left headphones online (knock on the right, knock on the left):
2nd test for 2 speakers. The sound is directed equally to both speakers:
If the tests do not suit you, there is an interesting program for PC. With its help, you can test the positioning of sounds in headphones.
How to check bluetooth headphones for functionality
Testing wireless Bluetooth models is not difficult. There are no differences from wireless models. Among the nuances are:
- Dependence of sound quality on the availability of codecs. AptX, AptX HD, LDAC. They are enabled in the settings of your smartphone or player.
- Dependence on the novelty of bluetooth. Old versions before the fourth update do not have time to transmit information coming simultaneously from audio tracks. There are no problems with information transfer when using options 4.0+.
- Carrying out a test using a cable. It shows good effect when compared with wireless headphones.
Before checking, you should immediately adjust the sound “over the air”, since listening to the headphones will be done via Bluetooth. The method is also suitable for testing new generation HOCO headphones, Logitech G430, and Sony gaming headsets.
The network offers compositions for testing gadgets. Their work is based on audio files, the use of which requires knowledge of the specific features of tonality. Most users find it difficult to cope with the task. But there are also simple options, in the form of test ringtones and applications. Headset testing via Windows is available. Standard Win tools provide accurate results.
Due to the pleasant and melodic sound, the eardrums will not be overloaded and the person will preserve their hearing. They do not visit service centers to check and do not hand over the accessory to specialists for an indefinite period. You can take the test at home on-line without any financial costs. The user will personally verify the quality of playback and save money.
Voice chat test
- Start a voice chat service that allows you to make test calls, such as Skype. Log in with your username and password, if applicable.
- The menu will be slightly different depending on which service you're using, but is usually called something like Sound Settings and can be found under Tools. Make sure your headset is turned on. Save your settings.
- Activate a test call or similar feature. Typically you do this by selecting a dummy contact labeled Test Call or something similar from your contact list. Then initiate the call. When you speak into the microphone, you will be able to hear your voice.
If you are using a USB headset and cannot hear sound, try turning it off and exiting the audio application you are using. Wait a few seconds, then reconnect your headphones and run the utility again. Your problem may be caused by a temporary program glitch.