A microwave transformer is an important link in the chain that generates microwave radiation. This is a converter of the mains voltage to the value supplied to the magnetron input. A high-voltage converter often causes a microwave oven to break down.
Checking the transformer for operability is a mandatory item in the list of technical diagnostic measures to determine the causes of the malfunction. Since we are talking about high voltages, independent intervention is only possible if all safety measures are observed.
Where can I get high voltage?
Food in microwave ovens is heated by the operation of ultra-high-frequency waves. Microwaves are generated by a special emitter - a magnetron. To operate within the specified characteristics, it needs a high voltage - 2,000 V. This is almost an order of magnitude higher than what a household electrical network provides (220 V).
Where do kilovolts come from? They are created at the output of the secondary winding of the high-voltage converter.
Important! A microwave oven, even disconnected from the power supply, can cause an electric shock (U up to 5,000 V).
Types of high voltage converters
Elements of the converter installed in the microwave oven:
- magnetic circuit;
- frame;
- primary winding;
- two secondary windings.
U = 220 V is supplied to the primary winding. The incandescent filament is powered from the secondary windings. The first of the two secondary windings is made of heavy gauge wire. U at the output is approximately 3 V. At the output of the second winding - variable high U = 4 kV.
Microwave ovens of different brands use converting devices from different manufacturers. The converters do not look the same and have different characteristics. They differ:
- power;
- output voltage of secondary windings;
- the number of turns in the coils and the cross-section of the wire;
- dimensions;
- method of fastening.
The secondary coil, like one of the emitter terminals, is connected to the housing.
Spot welding from a microwave transformer
Hello to all DIY lovers.
Every do-it-yourselfer who deals with electronics is familiar with the situation when it is necessary to solder wires to 18650-type batteries; it is not recommended to do this with regular soldering, since you can overheat the battery, which in extreme cases can damage it, and since the second option is spot welding , then in this article I will tell you how to make your own homemade spot welding with the least investment, the main donor of which will be the microwave. Before reading this article, I suggest you watch the video, which shows the entire process of making a homemade product and tests under various conditions.
In order to do spot welding with your own hands, you will need:
* A transformer from a microwave * Single-core copper wire, the thicker the better * Wire for a welding machine 1 meter * A pair of crimping tips with a hole * Two bolts with an M10 nut * A hacksaw metal * Drill, metal drill * Microwave button * Power cord from 220V network
That's all you need to assemble our homemade product.
Step one.
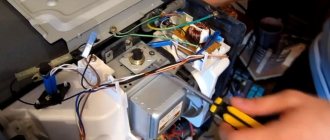
First you need to find a microwave oven, from which you will need a transformer and a button; you will also need a power cord, which conveniently has two insulated terminals.
Let's disassemble the transformer. For this homemade product, you need to leave the primary winding, but the secondary needs to be removed.
When the winding is drilled out, we proceed to its complete removal; we knock out the remaining parts of the windings through a metal spacer; in the end, they can already be pulled out by hand.
After we have gutted the secondary winding of the transformer, we remove the metal shunts that were under the winding.
Step three.
When the terminals are installed on the wire, you can thread it into the transformer, we make one or two turns, some wind one and a half, it all depends on how much space there is for this.
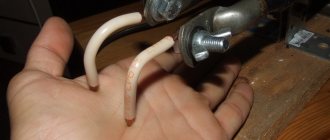
Now we make electrodes from copper, strip the single-core wire and twist it into a circle to clamp it with a bolt, we do the same actions with the second electrode.
Step four.
Next, we proceed to the supply wire, connect one of its contacts to the output of the primary winding of the transformer, and to the second we connect the wire from the button, which will interrupt the power.
Step five.
Finally, we install a plastic spacer between the output contacts to prevent a short circuit and wrap everything with electrical tape.
Become the author of the site, publish your own articles, descriptions of homemade products and pay for the text. Read more here.
Electrical circuit diagram
In addition to the converter, the electrical circuit of the microwave oven contains:
- diode;
- high voltage capacitor;
- magnetron;
- fuse;
- electric motor - one or two (for rotating the tray, if provided for in the design, and for the fan);
- Control block.
In expensive microwave ovens, instead of a converter, a pulse unit is used, which has a more complex structure, but weighs less.
What types of malfunctions occur?
You need to check the transformer in two cases: when the stove is not working well and when it is not working at all. You can suspect a malfunction of this particular element based on the following signs:
- The microwave oven makes an unusually loud noise;
- food placed in the chamber is not heated or only slightly heated;
- When working, it smells like burnt insulation and the equipment smokes.
If at least one of the listed symptoms appears, it is better not to turn on the device until the problem is resolved. Turning on a faulty stove can worsen the breakdown.
One of the most common causes of electrical equipment failure is power surges. If there is a suspicion that the device is faulty due to changes in the network, urgent repairs are necessary. However, it is possible that during repair work a manufacturing defect will be discovered.
Elementary causes of malfunction
There are a number of reasons for a microwave oven not to function properly:
- Low voltage supply in the network. Even a small difference of 20 volts can affect the operation of the microwave. To avoid voltage surges, you can use a voltage stabilizer.
- Overvoltage at a specific outlet. Separating consuming elements or devices into different sockets will help solve the problem.
- The device door is faulty. As a result of partial closing, the microwave oven heats up weakly or does not turn on at all. By replacing the latch or door, the device will work again.
- An incorrectly set operating mode can also prevent the microwave oven from working.
Basic External Parts of a Microwave Oven
Please remember that repairing a microwave oven yourself is prohibited under warranty! Especially if you don’t know what voltage is in the microwave. Insufficient knowledge in electronics and electrical engineering can lead to combustion and melting of parts. Because this high-tech equipment loves gentle treatment and compliance with the manufacturer's instructions. An interesting video will help you understand the nuances of the repair in more detail.
Good day to all! And so I will begin. I once saw on the Internet spot welding from a microwave transformer and decided to make it myself. I disassembled the microwave and took out the transformer with the microwave surge protector. Next, I sawed the transformer along the weld seams for the convenience of dismantling the old secondary winding and winding the new one!
I left the primary winding as original, and wound the secondary winding with KG-35 squares of copper wire, the winding took 1 meter, but in order for the leads to be longer, I advise you to take 2 meters of wire. I wound 3 turns without 1/4 turn.
Yes, there were also shunts made of the same transformer iron between the windings of the transformer, they are needed to limit the current of the stove magnetron so that it does not go to waste, I removed them for welding!
I welded the transformer back together. I welded it by squeezing it in a vice and first pinching all the corners and sides, and then welded it one seam at a time, letting the transformer cool so that its wiring wouldn’t burn! Then from the same microwave I made a housing for the future device. Then the assembly began: the power cord was left over from the microwave, then a surge protector, a 25A circuit breaker - it’s possible for 16A, but I only had 25A. I bought tips 35/10 - 35 is for a square wire, and 10 is a hole for a 10 bolt. I tinned the ends of the wires and tinned the tips, tinned them in a crucible with solder, and before that, etched them in phosphoric acid. Next, I soldered the tips to the conductors and completed the assembly of the device.
Causes of malfunctions
The converter fails most often due to:
- Wire break. The wire of one of the windings may break.
- Short circuit in the windings. This can happen in one coil or both.
- A break or short circuit in the magnetron coil.
The magnetic core of the converter is assembled from steel plates. If the plates peel off, the machine will make noise. It is necessary to find out the power of the transformer and replace it. Such global breakdowns can be easily identified by eye, but they do not happen often. The overwhelming majority of problems are still caused by coils.
The operation of the microwave oven is accompanied by noise
Loud noises when the microwave oven is turned on are most likely due to the following reasons:
- Magnetron failure. This happens as a result of long-term operation and power surges.
- Ventilation problem.
- High voltage transformer failure. A huge voltage surge in the microwave transformer and charring of the winding indicates a short circuit in one of the windings. This is why noise occurs in its operation.
Check procedure
To check the serviceability of the high-voltage converter, you need to arm yourself with a multimeter; you will also need:
- screwdrivers with different tips;
- pliers;
- ohmmeter
Sequencing:
- turn off the device - remove the plug from the socket;
- unscrew the screws and remove the casing;
- discharge the capacitor;
- remove the terminals from the transformer;
- check the coils with a tester - if there are no deviations, put them back;
- if damage is detected - the wire has broken or a short circuit has occurred, replace the device;
- assemble the oven and check its operation.
If the device still does not work after taking measures, you should continue troubleshooting or check the device under voltage.
A transformer with traces of melted insulation and a burning smell does not need further inspection: it is broken and cannot be repaired.
Important! To check the transformer, you have to disassemble the microwave oven - this can only be done when it is disconnected from the power supply.
A high-voltage capacitor easily retains a huge electrical charge, so it must be discharged before measurements. How to achieve this? Simply close its contacts to each other - this can be done, for example, with pliers.
Causes of transformer failure
The device operates at the limit of its capabilities in order to produce maximum power. During operation, it heats up quite quickly, passing high voltage through itself. Despite the high reliability and quality of manufacture of this part, over time the transformer has to be replaced.
Under the influence of high temperatures, the winding gradually burns out and melts. This can be noticed when a burning smell appears when the device is operating. And also a quick failure is accompanied by a buzzing sound.
You can buy a new transformer for a microwave oven from our company ZIP-M Retail. But it is not recommended to repair it yourself. The device is live and improper installation can lead to undesirable consequences.
Diagnostic options
Let's look at common options for finding the causes of a breakdown.
Secure Checkout
The safest test is carried out by a tester and involves examining the coils for damage. Procedure:
- The multimeter is adjusted to the required limits and with its help the resistance of all windings is determined - the primary and two secondary ones. The study is carried out on a removed transformer.
- If the tester displays one, it means a break has occurred.
- When the circuit is closed, a value in the range of 2–4.5 Ohms will appear on the primary coil (the tester is set to 200 Ohms). On the filament - 3.5–8 Ohms, on the high-voltage secondary (2,000 Ohms) - 140–350 Ohms.
If the resistance value is outside the specified ranges, an inter-turn short circuit has probably occurred.
When taking measurements, it is necessary to take into account the multimeter’s own error. It can be determined by short-circuiting the probes within the set limit. The resulting value is the error.
You can perform a secure check yourself or invite a specialist from the service. To ring the windings, the user only needs to know the basics of electrical engineering and have the skills to work with a tester.
Test under voltage
If measurements have been taken, the measurements obtained are normal, but the stove still does not work, it is necessary to examine a number of characteristics. Measuring the output voltage on the secondary windings is a rather dangerous business. Procedure:
- 220 V is supplied to the microwave.
- The tester measures U at the outputs of both secondary windings. High voltage - 2 kV, filament - 3 V.
This method requires equipment that can measure AC voltages greater than 2 kV.
Reverse check
This option is less problematic. 220 V is supplied to the secondary winding, about 24 V is removed from the primary winding. The coefficient is 9.1. If 12 V is applied to the primary winding, the secondary will be about 109 V.
If the transformer heats up when idling, an interturn short circuit has probably occurred. If the device heats up under load, and when it is turned off, it stops heating, you should continue to look for the problem.
Methods for diagnosing device performance
After independently resolving all faults, taking into account all safety rules and regulations, the microwave oven must be reassembled in the reverse order, as indicated in the diagram above, and plugged into a standard household electrical network. You should use new parts that will work properly after replacement.
Secure Verification Method
To describe one of the safest methods, you will need a multimeter.
Multimeter
With its help, we check whether the windings on the transformer are intact. To carry out a safe diagnostic method, we perform the following steps:
- We set the required resistance indicators on the measuring device, both secondary and primary.
- We do the same with the transformer, which has already been disconnected and dismantled.
- The multimeter display will show one if there is a breakdown in these places.
- When the circuit is closed, the indicators provided by the filament winding will be in the range of 3.5 - 8 Ohms, the primary winding will show from 2 to 4.5, the secondary winding of the high voltage level will increase to within the range of 140 to 350 Ohms.
- If the device shows parameters below or above the specified limits, then there are problems in the short circuit between the turns.
Be sure to take into account the error parameters of the measuring device when taking measurements. Close the probes of the device to the limit in which you are using it. This action will indicate the true error parameters.
Even if you have the necessary instruments and devices for independent diagnostics, but you have absolutely no experience in matters related to current, you should turn to professionals and not experiment, because this can cause many injuries.
Which microwave ovens have problems?
Most often, problems with the converter occur in microwave ovens of the Samsung, Daewoo brands.
Considering the eminence of the brands, it is difficult to assume that they all neglect the quality of the electrical circuit components used. Most likely, this trend is associated with the popularity of these brands. They are bought more often, which is why the breakdown statistics are higher. But when calculating the number of breakdowns per number of units sold, it becomes obvious that they break down no more often than other well-known brands.
Transformer
The microwave oven contains a transformer, which is very useful for creating a welding device. This important part consists of two ordinary coils of copper wire, which is wound around a core. There are primary and secondary windings. Winding coils have different numbers of wire turns. This is necessary so that when connected to the primary winding there is voltage, and a current appears inside the second winding due to induction, which has a lower voltage. The current strength should increase.
Precautionary measures
When carrying out measurements under voltage, electric shock, even death, can occur. Two rules will help you avoid danger:
- It is strictly forbidden to touch the internal parts of the microwave oven while it is operating. To carry out measurements, you need to put crocodile probes on the tester’s terminals and connect them to sections of the circuit.
- If you need to touch high-voltage parts with your hands, you should not only disconnect the stove from the power supply: you can prevent electric shock by shorting the magnetron leads to the housing. Thanks to this precaution you will protect yourself from capacitor discharge. There is a resistor in the microwave electrical circuit to discharge the capacitor, but it does not eliminate the danger 100%. The resistor may burn out or they completely forgot to install it, and such a mistake could cost the life of a do-it-yourselfer.
Repairing any electrical equipment involves the risk of electric shock. When testing a transformer in a microwave, you need to be extra careful due to the high voltage and capacitor. Use safe measurement methods and follow safety regulations.