Windows operating systems
08.07.20192199
Using Word, you can create a document of any complexity. Beginners are often interested in how to print text from a computer to a printer. In fact, this is much easier to do than learning to type quickly.
What can you print on your home printer?
You can’t even imagine how many possibilities open up to you when you have a color printer in your home, and even a multifunctional one. With this device you can easily convert electronic pictures, photos and text into printed form. The main thing here is to correctly set the parameters for printing - both for the object itself and for the printer as a whole. In addition to such basic printouts that even a beginner can handle, your device can implement several more incredible functions.
- Interesting activities for children, such as color pictures with tasks or mazes. Of course, this takes a lot of ink, but you can tinker with the settings and arrange for black and white printing. This is especially suitable for those who know how to work in a graphics editor.
- Stickers for baby by month. They are usually made in subtle shades, so they won’t waste much colored paint. At the same time, you must choose the right paper suitable for your printer model to ensure clarity and durability of the image.
- Portraits and interesting toys for children. Typically, such templates can be found on websites dedicated to educational crafts. You can download and send for printing animals, insects and any items necessary to get to know the world around you.
- Paper dolls with clothes for girls. Remember how we, parents, played with such dolls as children and independently built a house for them and dressed them? Now all these treasures can be found directly on the Internet and printed as templates.
- Various ideas for crafts, again with children or for a competition. Print out and keep in front of you the instructions that you will use to carry out Hand-Made.
In other words, a printer, even a black and white one, will be able to satisfy your and your child’s desires, and will also help pass the time usefully. You shouldn’t run to the store for “developers” when you can make them at home.
Interesting toys, useful tasks and puzzles that you can choose yourself can be easily printed at home.
GOOD TO KNOW!
If your printer has high-quality inks and is easy to refill, then you can print more serious things, from restoring old photographs to printing on fabric.
Working with a document and editing text
When you launch Microsoft Word, you will see a work area in front of you that looks like a blank sheet of paper. It is in this place that typing and editing will take place.
As a rule, novice users, seeing a blank sheet of paper and many different buttons in front of them, do not understand what they need to do. They are even more confused by the keyboard because they don't know which buttons to press.
However, in reality there is nothing complicated here. It’s enough just to understand it well, and it won’t be difficult for you to learn how to type text on a computer. If necessary, you can find a special video where the process of typing text is shown online in all details.
All you have to do is repeat and remember everything. This will make it easier for you to work not only in the Microsoft Office Word editor, but also in others that use a similar principle.
At first you will type text slowly and often with errors, but don’t stop, keep practicing. Over time, you will be able to consolidate the acquired skill and bring it to perfection.
Saving text
So, you have created a new document. Now you can save it immediately. This is done using the button located in the upper left corner. By clicking on it, you will call up a menu in which you need to find the “Save” item, click on it, and then select the format you need, for example, a Word document.
You will then see a window with several options to choose from:
- where to save the file (for a quick search it is better to select the Desktop);
- what to name the file (come up with a name for the new document);
- file format (no need to change anything here).
When you make a selection in each of the fields, you can click on the “Save” button. Your document will then appear on your computer's desktop.
Now you can perform a variety of operations with them: send them to a flash drive or send them by email. You can also resume work or remove it from your computer altogether.
I would like to give some useful advice: when printing a large document, save it often. This way you will not lose the text you have already typed in case of unforeseen situations.
Printing a document on a printer
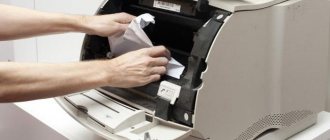
Sometimes after typing, you need to print a document. To do this, you will naturally need a printer. If you already have one , then you must make sure that it is connected to the computer and configured correctly.
If this is done, then next you need to do a few simple steps. Before you send a document to print, make sure the printer is turned on and has enough paper. After this we do the following:
- Find the document you need to print and open it.
- Click on the button in the upper left corner that opens the menu, select “Print” from it, and then click “Print” again.
- A window with many settings will appear in front of you, but don’t be alarmed, there is nothing complicated about them.
- At this stage, you will have the opportunity to select a printer, if several are connected to the computer, the number of copies of the document, sheet format and other parameters.
- If you do not need to change special settings, you can leave everything as default and immediately click OK.
Immediately after this, the printing process will begin, and in just a minute you will have your document in text format in your hands. In the same way, you can print all other files, adhering to the algorithm described above.
Copying a text file to a flash drive
If you have learned to type text on a computer, then transferring it to a flash drive will not be difficult for you:
- First of all, make sure that the flash drive is inserted into the USB connector.
- Inspect the desktop - there should be a “My Computer” icon, which you need to double-click on.
- When the window opens, find “Removable Disk” and also double-click on it.
- Now navigate to the folder where you saved the created text file. In our case, this is the “Desktop”. Right-click on the document, and then select “Copy” from the menu that opens.
- Now again go to “Removable Disk”, right-click anywhere and select “Insert”.
- After this, the copying process will begin, and soon the document will appear on the flash drive.
Many people may think that learning how to use a computer is very simple. However, this is not the case for everyone. There are still people who do not know the most basic things. Without knowing how to type on a computer, it is very difficult not only to obtain the necessary information from the Internet, but also to communicate with other people. Therefore, those who have a problem with this need to urgently address it.
In fact, learning to type text on a computer is not that difficult. Difficulties arise only at the first stage , when a person sees a lot of new things in front of him and is lost, not knowing what to do. But it will be easier for you to master this science if you learn to type text not alone, but with a more experienced user. Then he will be able to tell you if you have any difficulties and help you learn typing faster.
Rules for setting up a printer to print from a desktop computer
To do something useful with your existing printer, it is important to connect the device correctly and configure it to perform its functions correctly. To do this, follow the instructions below.
Often, Windows 10 automatically configures and makes the printer ready for use.
There are several ways to connect the printer to a computer: using a USB cable, via a wireless connection via Wi-Fi or Bluetooth, or via a dial-up Internet connection. Today we will look at one of the most popular methods, which is usually implemented at home.
- First of all, start the PC and be sure to wait until it finally boots (you can check this using the response to any operation, which should occur quite quickly after loading).
- Then plug the printer's power cord into a power outlet, and the USB cable into the corresponding output of the computer system unit.
- A device search notification will appear on the screen, and after the computer has searched for the necessary drivers, you will receive a “Device is ready to use” notification.
If such a message does not appear on the screen, then you will have to install the printer manually. To do this, insert the disk that came with the printer into the drive, or download the driver for your device model from the Internet.
Many printing devices require additional software installation in addition to drivers.
Printer drivers are responsible for the correct operation of the printer, as well as for high-quality printing, so pay special attention to this installation.
Next, you will see a software installation wizard that will install the application in just a few steps with confirmation. Almost every printer model offers to print a test page after installation to make sure that the installation was completed correctly.
Own book
Speaking about double-sided printing, it turns out that it is quite possible to print your own book without resorting to the services of printing workshops. Moreover, this can be done both through the printer settings and in the Word document itself.
The only warning is that it is not recommended to make such a brochure more than 80 pages, otherwise it will be inconvenient to staple it together.
Printing in the form of a book through the settings on a laser printer occurs as follows.
- After selecting the commands “File” - “Print”, you should go to the printer settings. All modern devices have a function that helps you print multiple pages per sheet. Here you will need to select sequentially “Mode” - “Left to Right”. So the device will print pages 1 and 2 sequentially on one sheet.
- To correctly set the printing of the entire book, it is important that the total number of pages of the reproduced document is a multiple of four. Otherwise, you will need to determine which spreads can be left empty or where breaks can be made.
- We determine and enter the sequence of pages for both pages of the sheet - we do this separated by commas. After this you can send it to print.
- We lift the pages that have come out of the device and, without changing their position, put them back into the tray on the printer. Sheets must not be turned over! After this, all that remains is to print the second range of pages, that is, repeat all the same steps described earlier.
- Regarding the set range of pages, you should do this: on one side there will be numbers: 1.4, and on the second - 2.3. This is repeated with all pages of the document.
You can configure the file to be printed as a book directly in the print settings from your computer. However, in this case there is a danger of skewing fonts and other settings. For those who are determined to try, this algorithm is proposed.
- Through “File” - “Print”, select 2 in the “Number of pages per sheet” parameter.
- Set numbers 1 and 4.
- Print the page on the printer, turn it over and repeat this entire procedure again for numbers 2 and 3.
For versions of MS Office 2007 and newer, you need to act in a slightly different sequence: “Page Layout” - “Options” - “Margins” - “Multiple Pages” - “Brochure”.
You can also assemble the text into a “book” in Word itself. For design you will need so many editor tools.
- The first step is to determine the correct page orientation. This can be done in the “Page Layout” tab. Now in “Page Setup” in the orientation, select “Portrait” (with the height of the sheet greater than its width).
- Next is “Setting up fields”. Without leaving the “Page Setup”, you need to click the “Margins” button, then “Mirror Margins”. This will help make sure that in odd-numbered documents the left margin is wider, and in even-numbered documents the opposite is true.
- Through “Margins” - “Custom margins” you can leave space for binding. In the dialog box that opens, select “Margins” - “Binding” and enter the required value. Don't forget to save.
- To select your own book format, you need to go through “Page Options” - “Size”. Select the required value from the drop-down list.
- For your own style, select “Home” - “Style”. In the appropriate tabs you can experiment with font and paragraph.
- Before sending text for printing, you should familiarize yourself with the text printing parameters in the dialog box of the printer itself. Pages can be displayed either automatically or after manual user configuration.
How to type and print text on a computer with a printer installed
Almost every home computer has a text editor installed - a program designed to format text in various ways. This is often the Word office application, and of course the version may vary among different users. Let's see the whole process from A to Z in our photo instructions.
| Illustration | Description of action |
| We type the required text in the Word editor in normal mode and format it so that it is in perfect condition: after printing, it will not be possible to invisibly correct errors on paper - you will have to print a new version of the document. | |
| Once again, we carefully check everything and go to the “File” tab. | |
| In the list of this section, select the “Print” item, check that the printing device is connected, and then click the “Print” button if you do not need to make any additional print settings. |
GOOD TO KNOW!
Right in the Word text file, you can make print settings for multiple copies, as well as print multiple individual pages. This is done by the office application and the operation is not affected in any way by the printer model.
How to print a PDF file
The text document can also be presented in the common PDF format. To open it, you must have Adobe's free reader installed on your computer. If there is none, then you can print by dragging the PDF file directly into the browser. Next are the already familiar commands “File” - “Print”. All that remains is to select the printer and, if necessary, make settings for the page range.
To display the printing parameters that are relevant to the user, just click “Properties” and select the print quality, its color, and configure the layout.
There are other features of printing through Adobe Reader.
- Covers can be printed through the “Cover” window.
- In the “Quality” tab there is an economy mode that helps reduce toner consumption. And to save paper, you can select the “Double-sided” option using the “Layout” - “Print Type” commands. All you have to do is click “Print”.
What is text preview before printing and why is it needed?
The built-in preview option, which is found in all text and image editors, is a very useful tool that will help you see how a document will look in printed form. If you notice any error at this stage, it can be corrected directly electronically.
Only those pages that are selected for printing are included in the preview.
The preview is a whole page or a list of them, which we can see in the “File” section before printing.
Setting the basic parameters
If you do not know how to print texts on a printer, then you should also remember what mandatory parameters should be specified when printing ordinary documents.
1. Number of copies, if you need more than one copy of a document or sheet.
2. The pages you plan to print.
3. What kind of printing do you need - single-sided or double-sided.
4. Page orientation – portrait or landscape.
5. Sheet size – A4, A5, other.
6. Size and parameters of fields.
7. Number of pages per sheet.
By default, the text on the page is printed in one copy on one side. Orientation – portrait, A4 format. There is one sheet per page, and the document itself is printed from the first to the last page.
Methods for printing text from a computer: solving problems in different ways
You can print text documents not only using applications that allow you to format text. Our experts have selected several more methods that you can perform on a personal computer.
Quick access to printing via keyboard shortcut
Not everyone uses keyboard shortcuts when printing or editing text. We present to you a more simplified version of calling a dialog box to redirect the selected text to print.
Please note that when printing text from the Internet, you capture on the sheet not only the necessary information, but also blocks with advertising.
To do this, enter any application for working with text, and then simultaneously press CTRL + P. A window will appear in front of you with a preview and some printing settings, regardless of whether you found the text on the Internet or used the edited material in Microsoft Word.
Organize printing through the quick access panel
After finishing working with text in Word, there is often a need to print the text without additional settings. To carry out such an operation, follow our algorithm.
| Illustration | Description of action |
| Let's find a checkbox in our open file at the top of the application, call the drop-down list in which we select “Other commands”. | |
| In the window that appears, select the “Quick Print” function, click the “Add” button, then confirm your actions by clicking the “OK” button. |
After these steps, a quick print icon will appear in the top panel. If you click on it, your document will automatically be printed without the possibility of previewing, so it is recommended to carefully check the document for errors before clicking the button.
How to print using the context menu
You can quickly print the finished text using the context menu. To call it, you need to find the required file to convert to paper form, then right-click on it.
Printing by any of the methods is only available when the printer is turned on: make sure it is turned on in advance.
A context menu for this document will appear in front of you, in which you can click on the “Print” item. Activating the printer and printing the document will occur in the same way as in the previous method - without the possibility of configuration.
Printing information on a printer from a computer or laptop
Modern users store documents and photographs electronically on their computers and laptops, but sometimes there is a need to print information. Nowadays there are many photo studios or retail departments everywhere that will provide you with such a service. But when the need to print documents or images arises constantly, it is better to get your own printer. The variety of types and models is endless, but they all perform the main action - they display information from the computer onto paper.
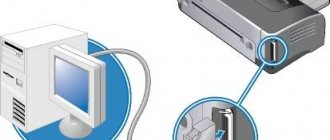
Before you print to a printer from a computer, you need to make sure that the device is detected by the system. When you connect the printer for the first time, drivers are installed to synchronize the device with your computer or laptop. It is also necessary to configure the parameters for correct operation.
Connecting a printer
Regardless of the model of the connected printer and its set of functions, the connection principle will be the same for wired devices.
- Turn on your computer or laptop.
- Connect the wires from the printer to the appropriate connectors.
It is important that the device is turned off when connecting to the computer, otherwise incorrect operation may occur in the future. Connecting the printer to your computer - Connect the printer to a power outlet.
- Press the power button directly on the device itself.
Installing drivers
When you connect new equipment to a PC or laptop, the system begins scanning and searching for the necessary drivers. Windows will likely find the right software for your printer, but it's still best to install drivers specific to your specific model. They come on a disk along with the device, and can also be found and downloaded on the manufacturer’s website. Let's look at installing drivers from disk:
- When you turn on the disk, as a rule, the Installation Wizard should start.
- If the launch does not happen, you can call it manually, to do this, go to the My Computer folder and find the name of the drive there, click on it and in the pop-up menu click Open, run the boot file with the extension
- The Installation Wizard will launch, which will carry out the standard procedure for installing drivers; only minimal participation is required here.
HP Printer Installation Wizard - If you experience interrupted downloads and files cannot be installed completely, there may be a driver conflict, check to see if you have any other printer software on your computer.
- Provided that the installation was completed correctly, an icon with the name of the connected device will appear in the Devices and Printers folder. This means that the printer is now detected by the system and the relationship between the devices has been created.
Setting up the printer for printing
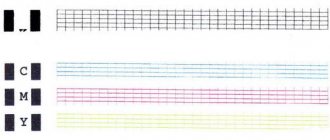
Immediately before printing, the necessary parameters are indicated that can be set in the program that opens the document. But the printer properties include functions such as improving print quality, which will increase the clarity of text or images if the ink is no longer fresh, shades of gray, color, selecting an operating mode, checking the printing nozzles, and cleaning.
Configuring Epson Printer Print Settings
The Microsoft Office package contains programs that require a printing function. The most popular editor for working with text is Microsoft Office, which has a wide range of tools. Let's look at his example of how to print to a printer from a computer. You can start printing from the File button, from the printer icon at the top of the toolbar, or by pressing the hot keys Ctrl+P (in this way, printing will start without additional settings).
When you go to the print settings menu, you can set the necessary parameters. Determine which pages to print, if necessary, change the position of the text in relation to the paper size, etc. You can preview the print on the screen.
How to print on both sides of a sheet
Not every printer supports automatic double-sided printing, but some models offer this service. If your device has this capability, then simply check the box next to the Duplex option before printing.
Duplex printing in MS Word 2010
If the printer does not print on both sides, you have to turn the sheets over by hand. Here it is important not to make a mistake and position the paper correctly so as not to apply the text on top of the side where it already exists.
If you need to print a large number of pages on both sides, turning each sheet will be problematic. Then use the print settings, where you specify to print the odd pages first, then turn the stack of sheets over and print the even ones. It is better to first check by printing a couple of pages whether you are inserting the paper correctly, because it will be sad to see how the printer began not to print on both sides, but to overlay text on top of the previous one. On the monitor screen you will see instructions on which paper position will be correct.
Printing the image
In any graphics editor, it is possible to print photographs or pictures. You need to follow the same principle as when printing text. Customization involves editing the size, the ability to multiply the image to the desired quantity, or printing several different pictures on one sheet.
In the same way, you can print Microsoft Excel tables and website text. The browser's File menu also assumes the presence of a printing service.
As you can see, there is nothing complicated about working with the printer. The most important thing is to configure everything correctly for correct operation and timely service the device.
NastroyVse.ru
Special cases of printing: printing pictures and pages from the Internet to the printer
It is often possible not to convert information into a purely text format, but simply print it in the form in which you have it on your PC. Typically, such cases include printing pages from the Internet or using Internet browsers. Let's look at several popular ways to print information.
How to print a document on a printer on both sides
To perform duplex printing on your printer, you can either use Word to make the settings, or you can use the settings in the printer itself. They are set differently in each device model. As an example, we recommend that you watch the introductory video that our experts selected for you.
How to print pictures on a home printer: step-by-step instructions
Pictures or photos are printed on the printer without any special settings. To perform this operation, do the following.
- Open the selected image with two mouse clicks.
- Then, in the viewer tool or graphic editor that opens, click on the “Print” icon (usually located at the top of the window).
- A window for setting up printing photos and images has opened in front of you.
- Make the necessary changes in the wizard, set specific parameters.
- If necessary, select a printer and click on the "Print" button again.
GOOD TO KNOW!
Photo printing must be done with the right choice of photo paper, because how bright and natural the photo will be depends not only on the correct settings, but also on the quality of the media.
How to print an entire page from a website without editing
Outputting information to a printer without additional formatting is one of the simplest options. To print a page from the Internet, you need to right-click directly on the selected information, then select “Print” from the drop-down list.
You, of course, can make it easier: call up the print menu using the keyboard shortcut CTRL+P.
For Internet pages, it is better to use ink sparingly, which means setting the settings to black and white printing.
A settings window opens in front of you, which clearly displays the number of output pages, the printing device used and other parameters that can be edited if necessary.
GOOD TO KNOW!
If you use virtual printer settings in Google Chrome or Yandex, the time for printing output is halved. However, you should understand that the settings will differ depending on the type of browser.
PRINTER SETUP
Like any device on a computer, the printer should also be configured. If you can’t do this on your own, then follow my instructions:
- Again, through “Start” we enter “Devices and Printers”;
- There you will see the device you plan to use. By right-clicking on it, select “Set as default” in the window that appears.
If you have a laptop or tablet, the settings you create for them will also be saved. Thus, using several computers, the settings for each will be individual.
In addition, it is possible to configure different models on different networks. To do this, you will need to find the model you need in “Devices...” and point to it “Manage default printer”.
Next, you will need to apply “Change Printer”, and in the network settings, specify the one you need. When selecting a printer, you must specify “Default for this network.” Next, you need to agree with everything.
Why the printer does not print: searching for problems with the device
Do you need to urgently print a document from your computer, but the printer does not respond and refuses you or displays information on paper incorrectly? Perhaps the device has run out of paint, or it is completely disconnected from the desktop PC. Let's figure out what the problem is.
- If the device does not print after successful print settings on the PC, and does not give any signals at all, it is most likely due to incorrect settings. Check the reliability of all wired connections, check the software, replace or update drivers.
- Lack of ink in cartridges. You can understand this if a message is displayed on the printer or computer screen from the printing program, which clearly indicates that the ink cartridges are low. Refill or replace the cartridges and do a test print to ensure that excess ink remains on the draft.
- There is a problem with the print head or it is dirty. If all the sheets are printed with streaks or the text is not visible at all, and you clearly know that you recently changed the ink in the device, this is usually the reason. You need to go to print settings and clean the print head.
Print directly from the Internet
Sometimes there is no time to copy and save interesting information from the Internet into a separate file, and the user decides to print it directly from the browser. Sometimes this solution is the most optimal, given that MS Word may display all the text incorrectly, so the overall content of the result will still have to be edited. However, online printing also has its pitfalls. It's worth getting to know them better.
Any standard web page will contain not only text - it will also contain extraneous materials (advertising, links, pictures). If you only need to get printed text, then you need to select it with the left mouse button, holding it down until the very end of the document.
Next, still holding the computer mouse, you should simultaneously press the combination of the already familiar “Ctrl” and “P” keys. This combination will open a special window: in it the user will set print settings. The commands may vary for each browser. We provide detailed algorithms for the top 5 most popular ones.
Google Chrome
You can print from Google Chrome from your computer after setting up these commands.
- In the menu that appears on the right you can see the preview area. On the left side there are all settings that remove unnecessary information. Another useful bonus is a figure that will show the required number of sheets that will be needed for such a printout.
- There are options for choosing the number of copies, layout and color (or monochrome in black and white).
- To properly remove all unnecessary elements, just check the box next to the “Simplify the page” item. This action will also reduce the number of pages.
- The “Advanced Settings” section will help improve print quality - you must specify a resolution of 600 dpi.
Opera
Opera's settings are similar to Google's - the rules for working in the dialog box are the same. Additionally, it is recommended to use the following options:
- simplify pages;
- select a quality of at least 600.
Yandex
Printing via the Yandex browser is also similar to the two already discussed above. Only in the window that pops up is it worth highlighting the item to simplify the layout - this will remove unnecessary elements. You can then send the content to the printer.
Mozilla Firefox
Need to print from the Mozilla Firefox browser? Then in the print dialog box you should pay attention to the following settings.
- The most relevant tab is about selecting a fragment.
- After specifying the printing range, all you have to do is click “OK” for the necessary information to be printed.
Internet Explorer
Printing from the Internet with Internet Explorer is similar to Mozilla in many ways. You can configure it like this.
- If you need to print only the selected fragment, you must mark the “Selection” setting. Or opposite “All” if you intend to print the contents.
- There is a quick launch button here. Bypassing all settings, it will immediately begin printing everything presented on the screen.
Internet Explorer is not recommended for printing because it may print text along with advertisements, even if the advertisements were not intentionally highlighted.