Work with text
Typically, the user types text in MS Word or the built-in notepad from a computer (laptop). It is recommended to implement your plans in two simple ways.
- Sequentially go through the tabs “File” - “Print” - “Settings”.
- Use “hot keys” (press Ctrl and P at the same time), which will allow you to do without the top menu settings.
Before sending it directly, it is recommended to pay attention to the preview, the function of the same name is displayed along with the text on the right. The following settings may be useful:
- indicate the required number of copies;
- selecting a separate section of text or pages for printing;
- type (single-sided or double-sided printing);
- orientation (portrait or landscape);
- required format (usually A3, A4, A5 are standard);
- field sizes and other parameters.
If all this is not done, then by default a document of A4 format with portrait orientation will be printed in the amount of one copy.
detailed instructions
- To solve the problem of how to print photos from a computer to a printer, find the desired image and double-click on it with the left mouse button to open it using the appropriate program.
- Launch the print command by clicking on the corresponding icon located on the software toolbar designed for opening photographs and pictures.
- In the window that opens, specify all the necessary parameters that will allow you to print photos really the way you need them, otherwise the result may disappoint you. And first, select the device with which you are going to solve the problem of how to print an image using a printer.
- Also select the print quality to suit your purpose. If it is not an important parameter, then in order to save paint it is better to set its value to average.
- Decide on the paper size, number of copies needed, and printing style.
- Finally, save your changes and run the print command on your printing device.
If you are going to print several photos on one page from your computer to a printer, then follow these few steps to do this:
- Click on the required photos while holding the Ctrl button.
- Open the context menu of any of the selected images by right-clicking on it. Find the item called “Print” and click on it.
- In the print image window that opens, you should specify the number of copies and the specific size.
- Be sure to use the function of previewing the resulting images so that the problem of how to print a picture on a printer from a computer is solved truly successfully, and you do not have to reprint, wasting ink and paper.
- If the result that you saw on the screen after resorting to preview satisfied you, then you can safely click on the button to start the printing process.
In general, as you have probably seen, answering the question of how to print photos using a regular printer is very easy and simple. The main thing is that you initially know what results you want to get, because the print settings you make will depend on them. In addition, never be lazy to use such a convenient function as preview.
How to print a PDF file
The text document can also be presented in the common PDF format. To open it, you must have Adobe's free reader installed on your computer. If there is none, then you can print by dragging the PDF file directly into the browser. Next are the already familiar commands “File” - “Print”. All that remains is to select the printer and, if necessary, make settings for the page range.
To display the printing parameters that are relevant to the user, just click “Properties” and select the print quality, its color, and configure the layout.
There are other features of printing through Adobe Reader.
- Covers can be printed through the “Cover” window.
- In the “Quality” tab there is an economy mode that helps reduce toner consumption. And to save paper, you can select the “Double-sided” option using the “Layout” - “Print Type” commands. All you have to do is click “Print”.
How to print a photo or picture
Images are output from the computer according to a slightly different principle. First of all, this concerns the purchase of special photo paper. It can be glossy or matte - the main thing is that the quality will differ from the result obtained on plain paper.
Once you select an image, you can start printing it.
- Right-click on the image and select “Print”. Following this action, the Print Wizard will open.
- The further sequence is: “Next” - “Print settings” - “Media” - “Photo paper” (here we set “Best quality”) - “Next”.
- It is worth paying attention to the menu on the right: it indicates the size of the photo that will be printed. The menu must include visual examples.
- If after this the user is satisfied with everything in the preview, then all that remains is to click “Next” one last time to print the photo or picture.
Ad-free printing
Article without ads in Google Chrome
To ensure that an article printed directly from the Internet does not contain any extraneous information and is formatted, it is necessary to remove advertising from the site . This is simply done by installing plugins:
- AdBlock;
- AdBlockPlus.
You will find step-by-step instructions for installing any of these free plugins in the article Extensions can be enabled or disabled for a specific portal. Yes, using the plugin
and the Ctrl+P key combination, you will prepare any article for printing within one minute. https://www.youtube.com/watch?v=kRdBbImdt8k
- Printing on both sides of the sheet.
Have fun typing.
Poster printing
To print a large format image, such as a poster, placard, patterns, wall map or playing field for a game, you can use the A4 format and do this on a standard printer. There is no need to install any additional software or hardware for this operation. The software installed on a regular computer/printer within Windows OS is sufficient.
Preparing for printing
When printing in large format (even divided into sections), more stringent requirements are imposed on the image. The resolution (quality) must be such that the pixels are not visible when zoomed in multiple times. The larger the printout size, the higher the source quality required.
To connect image fragments into a large picture easily and quickly, printing must be done without white margins. Not all printing devices support this option. Some printers will require you to cut off the margins. The final image will be smaller or smaller in size, but will consist of a larger number of fragments. Information about the borderless printing feature and instructions for using it can be found in the user guide for your specific printer model.
There are printers that automatically mark printing and cutting boundaries. This function is called “Crop Line in the Margins”. It will allow you to print sectors of a large image, both for trimming and for overlapping pasting.
How to print a poster on a printer
To print large format sectors, you need to set certain settings on the printer. You need to act as follows.
- In an open graphic document, click the “print” button (or give the command from the keyboard Ctrl+P).
- In the print window, go to the “properties” section and go to the “page” item.
- Next, you need to find the “page layout” menu, where in the list assign “poster printing”.
- Using the “set” button, determine which method of dividing the image into fragments is better: 3 by 3 or 4 by 4.
This algorithm allows you to print a large format image without additional software on those printing devices that provide this capability. If your printer does not have the above options, you will need to use additional software to print large formats.
Print a poster using Paint
This program is included in the standard Windows package; you do not need to purchase or install it. It allows you to make posters with an element-by-element breakdown using normal printer settings.
- Open the image through the “open with...” and “Paint” menus.
- In the main menu, click the “file” button, select “print” in the pop-up menu, then “page settings”.
- As a result, a window will appear in which you need to select the location of the picture: horizontal or vertical (landscape/portrait). Next, you need to check the box next to “fit”, where you manually set the number of pages horizontally and vertically. So, if you need to print a picture on 4 A4 sheets, you need to indicate 2 by 2.
- It is advisable to preview the document prepared for printing to make sure that the division of the poster into fragments was done correctly. Next, you just need to print the document.
Paint allows you to quickly and easily print a large poster without additional preparation or tedious cutting. This is easier than looking for the necessary settings for the printing device (it’s not a fact that they exist at all).
Printing a poster using Excel
An unusual but effective solution is to print the poster using an Excel spreadsheet, which is also included in the standard Windows software package.
- To do this, you need to create a new blank Excel document. In it, select the “insert” main menu item, where in the pop-up menu go to the “drawing” item. Next, you need to find the image to print on your computer.
- Go to the “View” menu, in which you need to select the “page layout” action. Next, you need to stretch the original image, drawing its boundaries onto markers. You can change the image size in any direction. To see everything that is happening on your screen, you can zoom out (the zoom bar is located in the lower right corner of the main Excel window).
- Once the image has taken up the required number of sheets, it can be printed.
Attention: when submitting a file for printing, in the print settings you will need to select the horizontal or vertical orientation of the sheet and the values of the print boundaries (margin sizes).
It's best to preview before printing. It will show whether the image was divided into fragments correctly.
Other ways to print a poster
To print posters, you can use services that can be found on the Internet. Among them, it is worth taking a closer look at Posteriza, Rasterbator and Poster Printer. Each application or program has its advantages, in particular, in Poster Printer you can edit an image by adding a background, an inscription or a beautiful frame. Depending on what exactly needs to be done: only printing or additional options are needed, an online service is selected.
Print the entire page or just part of it
Remember once and for all that no matter what browser you use, be it Mozilla Firefox, Opera, Google Chrome, Internet Explorer, etc., you can always print a page by pressing just two buttons: CTRL + P.
For example, in the same Mozilla this window will open where you can select the printer, the printing range, including the number of pages or even a selected fragment, as well as the number of copies.
But, in my opinion, this function is implemented in Google Chrome much more interesting. There are additional settings here that you can use to add, for example, headers and backgrounds (some elements that, for certain reasons, will not be shown by default on the printed sheet or sheets).
To print only certain text from a page, which can be supplemented with a picture or without it, you first need to select the desired fragment. Look how I did it in the picture (the highlighted right part will not be reflected, since this, apparently, is a browser feature; in Mozilla, for example, there is no such problem).
Press CTRL+P, then go to additional settings and select “Only selected”.
Here's what will be printed:
As you can see, everything is easy and simple.
I would like to immediately answer another question that users often ask - how to print a page without advertising? Indeed, if the site has advertising blocks, they will be printed along with the main text. There are two ways out: if you print a fragment of text, you don’t have to select the advertising block. The second option is to install an add-on in the form of Adblock, which I already talked about before. In this case, all advertising will be blocked.
For more complex cases, if for some reason you cannot print a page directly from the browser, you can use the Microsoft Office Word application.
To do this, create a document in a place convenient for you and open it. Next, we go back to the browser, where we select the desired fragment. Perhaps it will be just a small piece of text, or perhaps the entire page is not the point. The main thing is to highlight everything you need. Copy the text (remember that all selected elements are copied, including pictures) and paste into an open Word document. Here's what I got:
Next, print at your discretion by pressing the same CTRL+P keys. If the pictures bother you, delete them. To do this, right-click on the picture and select “Cut” from the menu.
By the way, if you need to print only text, I would recommend printing it not in Word, but in a regular notepad, where you cannot save pictures and other files.
Print directly from the Internet
Sometimes there is no time to copy and save interesting information from the Internet into a separate file, and the user decides to print it directly from the browser. Sometimes this solution is the most optimal, given that MS Word may display all the text incorrectly, so the overall content of the result will still have to be edited. However, online printing also has its pitfalls. It's worth getting to know them better.
Any standard web page will contain not only text - it will also contain extraneous materials (advertising, links, pictures). If you only need to get printed text, then you need to select it with the left mouse button, holding it down until the very end of the document.
Next, still holding the computer mouse, you should simultaneously press the combination of the already familiar “Ctrl” and “P” keys. This combination will open a special window: in it the user will set print settings. The commands may vary for each browser. We provide detailed algorithms for the top 5 most popular ones.
Google Chrome
You can print from Google Chrome from your computer after setting up these commands.
- In the menu that appears on the right you can see the preview area. On the left side there are all settings that remove unnecessary information. Another useful bonus is a figure that will show the required number of sheets that will be needed for such a printout.
- There are options for choosing the number of copies, layout and color (or monochrome in black and white).
- To properly remove all unnecessary elements, just check the box next to the “Simplify the page” item. This action will also reduce the number of pages.
- The “Advanced Settings” section will help improve print quality - you must specify a resolution of 600 dpi.
Opera
Opera's settings are similar to Google's - the rules for working in the dialog box are the same. Additionally, it is recommended to use the following options:
- simplify pages;
- select a quality of at least 600.
Yandex
Printing via the Yandex browser is also similar to the two already discussed above. Only in the window that pops up is it worth highlighting the item to simplify the layout - this will remove unnecessary elements. You can then send the content to the printer.
Mozilla Firefox
Need to print from the Mozilla Firefox browser? Then in the print dialog box you should pay attention to the following settings.
- The most relevant tab is about selecting a fragment.
- After specifying the printing range, all you have to do is click “OK” for the necessary information to be printed.
Internet Explorer
Printing from the Internet with Internet Explorer is similar to Mozilla in many ways. You can configure it like this.
- If you need to print only the selected fragment, you must mark the “Selection” setting. Or opposite “All” if you intend to print the contents.
- There is a quick launch button here. Bypassing all settings, it will immediately begin printing everything presented on the screen.
Internet Explorer is not recommended for printing because it may print text along with advertisements, even if the advertisements were not intentionally highlighted.
Printing a page from the Internet
There are many conscientious website developers and designers who have taken care of their users and have already prepared web pages for printing. This is indicated by a separate dedicated button on the website, when clicked, a printable version is immediately displayed on the printer. But what if there is no such button, but you need to save the information?
Most browsers can handle this task, and in several ways. One of the simplest is to call the print command using the CTRL+P key combination (you must first open the page you want to save). In the window that appears, you need to specify the desired settings and click the “Print” or “Save” button. To print a page from the Internet cleanly as you need (meaning without junk, advertising, etc.), you can install plugins in your browser. For example, such as AdBlock, AdBlock Plus or uBlock Origin. Of course, this method is not always acceptable, since the page after formatting may look somewhat crooked, and ad blockers do not always cope with the task. The end result may be a result that was not at all expected.
The second way to print a page from the Internet is slightly different from the first. First, we also press the combination of the same two keys CTRL + P, but this time we save the selected page in PDF format and then print it out. Why save in this format? Yes, because by opening the received document in any PDF editor, you can easily edit it - remove all unnecessary things, move text and pictures as desired, add your own information, etc. Then boldly print it, no longer worrying about the final result.
Next we will talk about when you need to print only text from a page.
How to print from a smartphone
Working with browsers indirectly affects the problem of printing from a phone. More precisely, there is no problem with this - today a large number of services have appeared that will help you send the necessary information to the printer directly online.
If the printer does not have Bluetooth or Wi- Fi technology, registration with Google Cloud Print is required . This service technology will allow you to carry out your plans from anywhere on the planet with an Internet connection. The service allows you to work with almost all printing devices currently produced, but this connection works best with Cloud Ready devices. But even the simplest printer can be fully connected to this “cloud” printer:
- launch Google Chrome browser;
- select the advanced option in the settings menu;
- at the bottom you need to find “add a printer”;
- then you should log in with your Google account;
- All that remains is to “add a printer” once again, after which the user will confirm registration.
It is important to understand: for this to happen, the equipment must be connected to a device with an Internet connection.
You need to do the following on your phone.
- Download Cloud Print to your smartphone. Connect to it through your account.
- Select a file.
- Select your printer again in the new screen.
- Conduct settings.
- Click on “paper plane” - the information will be printed.
Cloud printing
The method is not the fastest, but it also works. Cloud services are designed for remote storage of any type of files. The most popular services are Google Cloud Print and DropBox. Both options are described below.
Google Cloud Print
To set up and print, you need to have the Google Chrome browser installed on your computer and the application on your phone.
The application is free and can be downloaded through the PlayMarket and AppStore online stores. Supported by both OS - Android and iOS. The main advantage of this type of printing is that there is no need to be located near the printing device. This is not a Wi-Fi connection, which is limited by distance. The connection in this case is made through a Google account, which means the connection is made via the Internet. Therefore, printing is possible even if you are on vacation and someone at home needs to print a document from your phone.
Printing is possible subject to important conditions - the computer and phone must be working and connected to the Internet. Both your PC and your mobile phone must be logged into the same Google account at the same time. It's very easy to register an account if you don't already have one.
First, log into your Google account by clicking on the corresponding icon.
Authorization by default enables the synchronization feature. That is, by installing the browser and logging into your account on another computer or phone, automatic synchronization will occur - all browser data (history, passwords, browser settings, bookmarks, etc.) will immediately be available on the new device. There will be no need to make settings again, enter passwords, etc.
Next you need to add the printer to the browser. In the upper right corner of the browser, click on the vertical ellipsis. Go to settings.
At the bottom of the page, click on Additional.
Find the Print settings section. Go to Google Cloud Print.
Next, go to Manage devices that support virtual printing.
On the next page, click on Add Printers.
If the printer is connected to the computer, the system will detect and add the device.
Sometimes it is not necessary to connect your printing device to your computer. The printer can support virtual printing from cloud services. Check the documentation for this feature, or go to the following link: https://www.google.com/cloudprint/learn/printers/. It provides a complete list of printers that support cloud printing.
The next step is to download the Cloud Print application and install it on your smartphone. We launch it, log in using the same Google credentials, and allow access.
Depending on the phone model, a new Cloud Print item may be added to the Share or Sharing options. To start printing, click on it, select your printer and confirm.
If there is no such item, then most likely, to print, you need to use the Virtual Printer item.
New phones are starting to support virtual printing by default. To check, in the settings, go to the printing section (you can use the search in the settings), and find there the item responsible for adding a virtual printer.
DropBox
DropBox differs from Google services in its printing principle. The main difference is that you cannot add printing equipment to DropBox. You will have to print from a computer. And the service only serves to provide access to files stored on the phone.
- Download the DropBox application and desktop program on your phone and computer (laptop), respectively.
- Create an account.
- Login on mobile and PC.
- Upload the necessary documents from your phone to the cloud.
- Now all files are available in the program and on your computer.
- Print as usual. Open the document and use the File-Print menu to start the process.
Yandex Disk
The technology is similar to DropBox. Install the application on your phone. Also install on your computer. Then share the required file from your mobile phone to Yandex Disk (you need to select the location in which folder the file will fit). Open the desktop software on your computer, log in to your Yandex account, and then you will see the files in the previously specified folder. Then you can do whatever you want with the files - print, edit, send by mail, etc.
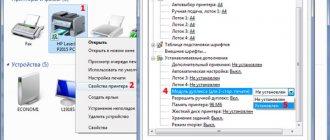
How to do double-sided printing
Some modern devices are equipped with the function of printing on both sides of the sheet. To launch it, you need to do the following.
- In the upper right part of the document, click on the Office icon, and we will be taken to the required section. Select “Print”, which will open the already familiar window (you can also run the combination ctrl + p).
- Select “Properties”, which opens a window that distinguishes between different models. If there is double-sided printing (or called “Printing on both sides of the sheet”, “Printing with the back”), then it will be enough to activate it.
- If there is no such checkmark, the “Double-sided printing” function is checked in the dialog box. After printing the pages located on one side of the sheet, a mention will appear in the Word document about the need to turn the result over and return it to the feed tray.
There is another manual way to print on both sides, which involves sending all the odd-numbered pages of the document first, and then the odd-numbered pages. But in this case, a large percentage of errors cannot be ruled out (especially with a large number of sheets). Of course, you can select only even or odd pages - this option is present in the “Enable” tab, which appears in the lower left corner of the same print dialog box.
You can see if your device has the ability to do double-sided printing in the commands “File” - “Print” - “Options”. In MFPs, the equipment will automatically support this feature. Among such models we can note, for example, the Canon Pixma mg3140, which is easy to use and provides printing, scanning and photocopying capabilities in one device.
In order for such printing to occur without human intervention, the unit can use duplex - this is a method in which paper, after printing on one side, will go back through the printer without turning over.
How to print digital photos on a printer
To reproduce digital images into beautiful photos, you have three great options. The first two methods involve using the Image Import Wizard in Windows Vista and Windows 7. This is a powerful and simple tool for transferring images from your camera to your computer. The Image Import Wizard works with most cameras and makes it easy to select and print your favorite photos. The third method is based on PictBridge technology - printing directly from the camera, without a PC.
Print photos from PC in Windows:
- To transfer images from the camera to a computer, turn off the camera, connect it to the computer via a USB cable, and turn on the camera. If you are working with Windows Vista or Windows 7 PC, then the connected camera should start using startup.
- To start copying images to your computer, select Import Images and Videos.
- If the AutoPlay window does not appear at the end of step 1, open Windows Live Photo Gallery, click the Import button and select the camera in the list of devices.
- Windows will now check the camera for photos and videos that can be transferred to the computer. When the system finishes checking, a window will open with a list of images and video files that were found.
- If you want to organize a large number of photos into groups and folders, leave the Browse, Organize and Groups to Import option. If you'd rather do this later, select Import All New Items and add tags to help you find those photos. You can specify a folder by clicking the More Options button at the bottom of the window.
- Click Next and Windows Live Photo Gallery will open the images you just copied to your computer. To select the photos you want to print, press and hold the Ctrl key and click on the image. Then press Ctrl - P to adjust the print settings.
- The Print window menu contains options for the printer, paper size, number of copies, and print layout. To configure any of these settings, click the Options button in the lower right corner. Next, click the “Print” button to start printing your images.
If you don't want to use Windows Live Photo Gallery, you can use the bundled software on the disc that came with your camera. You can also try using all-in-one editors such as Adobe Photoshop Elements. Follow the step-by-step instructions to print photos from your computer, memory card, or directly from your camera.
And to print high-quality photos at a low price, install a continuous ink supply system on your printer. When using CISS with photo ink, the cost of printing photos is reduced by almost 30 times!
Own book
Speaking about double-sided printing, it turns out that it is quite possible to print your own book without resorting to the services of printing workshops. Moreover, this can be done both through the printer settings and in the Word document itself.
The only warning is that it is not recommended to make such a brochure more than 80 pages, otherwise it will be inconvenient to staple it together.
Printing in the form of a book through the settings on a laser printer occurs as follows.
- After selecting the commands “File” - “Print”, you should go to the printer settings. All modern devices have a function that helps you print multiple pages per sheet. Here you will need to select sequentially “Mode” - “Left to Right”. So the device will print pages 1 and 2 sequentially on one sheet.
- To correctly set the printing of the entire book, it is important that the total number of pages of the reproduced document is a multiple of four. Otherwise, you will need to determine which spreads can be left empty or where breaks can be made.
- We determine and enter the sequence of pages for both pages of the sheet - we do this separated by commas. After this you can send it to print.
- We lift the pages that have come out of the device and, without changing their position, put them back into the tray on the printer. Sheets must not be turned over! After this, all that remains is to print the second range of pages, that is, repeat all the same steps described earlier.
- Regarding the set range of pages, you should do this: on one side there will be numbers: 1.4, and on the second - 2.3. This is repeated with all pages of the document.
You can configure the file to be printed as a book directly in the print settings from your computer. However, in this case there is a danger of skewing fonts and other settings. For those who are determined to try, this algorithm is proposed.
- Through “File” - “Print”, select 2 in the “Number of pages per sheet” parameter.
- Set numbers 1 and 4.
- Print the page on the printer, turn it over and repeat this entire procedure again for numbers 2 and 3.
For versions of MS Office 2007 and newer, you need to act in a slightly different sequence: “Page Layout” - “Options” - “Margins” - “Multiple Pages” - “Brochure”.
You can also assemble the text into a “book” in Word itself. For design you will need so many editor tools.
- The first step is to determine the correct page orientation. This can be done in the “Page Layout” tab. Now in “Page Setup” in the orientation, select “Portrait” (with the height of the sheet greater than its width).
- Next is “Setting up fields”. Without leaving the “Page Setup”, you need to click the “Margins” button, then “Mirror Margins”. This will help make sure that in odd-numbered documents the left margin is wider, and in even-numbered documents the opposite is true.
- Through “Margins” - “Custom margins” you can leave space for binding. In the dialog box that opens, select “Margins” - “Binding” and enter the required value. Don't forget to save.
- To select your own book format, you need to go through “Page Options” - “Size”. Select the required value from the drop-down list.
- For your own style, select “Home” - “Style”. In the appropriate tabs you can experiment with font and paragraph.
- Before sending text for printing, you should familiarize yourself with the text printing parameters in the dialog box of the printer itself. Pages can be displayed either automatically or after manual user configuration.
Text selection
Mozilla Firefox Dialog Box
First of all, please note that on the site page, in addition to the article you are interested in, there may be a lot of other information: comments, polls, offers to read additional material on the topic. To immediately eliminate printing of extra pages, left-click on the article or that part of it that you need on paper. Now we use the key combination Ctrl + P: hold Ctrl, press P, release. Moreover, it is not necessary to switch to the English keyboard layout; it works both in Latin and Cyrillic.
The “Selection” line in the Mozilla Firefox browser dialog box becomes active only if you have specified a print area. Place the checkbox in this position, click OK, and the document is printed on the printer. It works the same way
. Unfortunately, there is currently no preview function, and the number of sheets that will be printed is anyone's guess. The Internet Explorer browser also has
. You should not click it, because without an additional request to confirm the task, printing of the entire site page will begin, even if you have already selected the desired piece of text.