A mixer is an electronic device for audio processing that improves the quality and format of an audio file due to the presence of audio processing functionality . The mixing console allows you to mix channels, receive signals from various sources and provide the ability to listen to the final results of file processing in various versions. The need to use such devices during the operation of recording studios or in DJ installations is obvious. As for using a mixer at home for personal rather than professional purposes, very few people can boast of having serious audio systems with a mixing console in their apartments. If your purposes for using the device have been determined, all that remains is to figure out the process of connecting the equipment.
The process of connecting to a laptop
Connecting a mixing console to a laptop or any other desktop computer is a rather painstaking procedure, requiring consideration of many different factors and consisting of several stages.
First of all, you need to examine the plug of the device through which the connection to the network will occur. Modern devices are usually equipped with European standard plugs, therefore, you will need an adapter to work.
Selecting cables and wires for connection is perhaps the most time-consuming and crucial moment in the entire procedure.
Unfortunately, the system cannot be configured via a USB connection, which is so convenient and universal.
You have to use more complex connection options. To connect to a computer, you will need a cable with two “jack” connectors and one “mini-jack” for connecting a sound card. Don’t be mistaken with the length of the cord: it’s better to buy a cord with a reserve rather than later come up with options for extending it or continue to use the sound system in an inconvenient location.
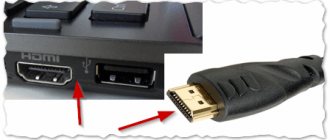
Cable - adapter from jack to mini-jack
The next step is to connect to the microphone. To connect it, you need to use a special connector located on the side wall (sometimes on the back) of the laptop and an XLR cable. Sometimes it happens that the system does not see the device. In this case, we do the following:
- go to the Windows “Control Panel”;
- select “Hardware and Sound”;
- click on “Realtek Manager”;
- in the driver settings we set the standard device;
- We check the functionality of the microphone and mixing console.
How to connect a mixer to a laptop, computer, speakers, amplifier and other devices
Purchasing a mixing console naturally poses the following task: connecting the mixer to a laptop or computer. This procedure is quite complex and consists of several stages.
In addition, to perform this you will additionally need a cable of various types and, possibly, adapters. However, each user can solve this issue independently if he follows a certain sequence of actions.
Algorithms for connecting the mixer not only to a PC, but also to other devices in full detail - in the material below.
A mixer is a device whose initial task is to receive various audio signals (line and microphone) and their subsequent mixing . In addition, mixers can amplify signals and process them, with the ability to listen to the result, as well as perform other tasks.
Important! Mixing consoles are the backbone of any home or professional recording studio. It is almost impossible to do without them, unlike many other studio devices, which can be replaced using special software installed on a laptop or PC.
Modern mixing consoles come in both analog and digital. In the first case, the sound is not converted into a digital code, that is, the user works with exactly the signal that he hears. In the second case, the audio stream is converted into digital, after which it can be modified, processed, or performed other actions with it.
Analogue remote controls are presented in the low and medium price segment and are very popular. These devices adequately cope with the assigned tasks both at amateur musicians’ performances and in a professional studio.
This type of equipment is not difficult to use, is suitable for beginners, has a simple structure, is easy to repair, and is also durable.
Its disadvantages include bulkiness, lack of automation, high energy consumption and the need for regular maintenance.
Soundcraft EFX8 analog mixing console
Whereas digital mixers are quite lightweight and come in a compact body. These products are perfect for musicians to work in various places and provide good sound. Setting up processes for such devices is fully automated. In addition, they are flexible in switching. The disadvantages of these remote controls include high cost, complex controls, and difficult repairs.
Midas mr12 digital mixing console
On a note! The best mixers are made by well-known companies such as Behringer, Yamaha and Soundcraft. The Karat mixing console was very popular in Soviet times.
Selection of adapters and cables
Any mixing console is mains powered, so the first thing you need to look at is the type of plug. For modern devices it is of a European type, so the user may need an adapter if he has an old type socket.
To connect the remote control to a laptop, you will need a cable equipped with two “Jack” plugs on one side and one “mini Jack” plug on the opposite side . In this case, it is necessary to immediately determine the length of the wire, taking into account the possibility of working in various conditions, so that in the future you do not have to additionally purchase a longer cable.
The user will also need a cable to connect a microphone - XLR-mini Jack.
Advice! If you have an XLR-Jack wire available, you can use it, but you will need to additionally purchase a Jack-mini Jack adapter.
Connection to PC and laptop
To connect the mixer to a laptop or computer, you need to position both devices so that it is convenient to work with them and connect them with a cable.
The “Jack” plugs should be inserted into the linear outputs on the mixing console (labeled Line/Mono), mini Jack – to the input on the side of the laptop or on the front (rear) panel of the computer system unit (pink connector).
Some people connect the remote control to a PC using a mini Jack - 2 RCA cable with Jack adapters, but the sound with this connection is not of sufficient quality.
The microphone is connected to the mixer using an XLR-Jack cable. And you can set up audio transmission from the mixer to your PC using an audio signal processing program, for example, BPM Studio or FL Studio.
Advice! You need to know that the built-in audio cards of a laptop reproduce low quality sound. If you plan to use the mixing console for professional purposes, then it is better to additionally purchase an external sound card and connect the console to it.
Connecting to an amplifier and speakers
If you plan to connect the mixer to speakers and an amplifier, you must turn off the power to the equipment before connecting all devices with cables so as not to damage it. The further algorithm of actions looks like this.
- Connect a cable with a mini Jack plug to the output for connecting external audio devices on a PC or laptop (green connector, next to it there may be a picture of headphones), and connect the second plug to the mixer in the port marked “In”.
- Connect the next cable to the “Out” connector on the mixing console and to the “In” input of the amplifier.
- If the speakers are passive, they are connected directly to the amplifier. Active speakers are connected to the Stereo Out L and R connectors, where L is left and R is right.
Important! It must be remembered that the impedance of the speakers and amplifier must be identical.
Connecting to a sound card
If the audio card built into the PC (laptop) is weak, and an external one was purchased for professional work with sound recording equipment, then the sound card should be connected to the mixing console and the computer. Typically, an external audio card is connected to a PC or laptop via USB. Next you need to install the drivers.
https://www.youtube.com/watch?v=DU8eoV4jUoU
Connecting a sound card to a mixer
Advice! You can find new drivers on the disk included with the card or download the latest version from the manufacturer’s official website.
The mixing console is connected to the Line Out L and R connectors on the audio card using a 2 RCA – 2 Jack cable. If there is a need to use a sound card to record audio from a mixer, the RCA plugs need to be connected to the In L and R connectors, and 2 Jack plugs to the Stereo Out inputs .
There is a second option that allows you to write sounds from the remote control - use a 2RCA - 2 RCA cable. It is connected to the Line In inputs of the audio card and to the Rec Out outputs of the mixer.
Now, by connecting a Felyby or another brand microphone to the mixing console, the user can not only record sound from the mixer (voice and soundtrack), but also process it or add some effect, for example, vocal echo.
Connecting to other devices
The mixing console can be connected to other devices for different purposes, including a stereo system, alternative speakers, telephone, receiver or TV. For example, you can connect a music center to a mixer to digitize old cassettes using an external audio card, as well as to output sound.
In the latter case, the remote control will be connected to the center as alternative speakers in order to reproduce sound in this way. To do this, you will need a Jack 3.5 mm - 2 RCA cable with adapters to Jack. On a music center, the plug is connected to the line input, on a mixer - to the Main OUT outputs.
Whereas in the first case, the music center is connected as a signal source.
In some situations, users need to connect the mixer to a phone or tablet and use it as an audio source, such as a soundtrack.
If your mixing console has an AUX jack, you will need a Jack 3.5 mm to Jack 3.5 mm cable. If there is no such connector, then you need a wire with 3.5 mm Jack and 2 RCA plugs, as well as 2 adapters to Jack.
They connect the headphone output on the phone and the Line In L and R connectors on the mixing console.
If necessary, the user can connect a mixing console to the receiver. For this purpose, you will need a 2 RCA – 2 Jack cable. After the devices are connected by wire in a de-energized state, you need to turn them on and on the receiver select as the signal source the connector to which the mixing console is connected.
Sometimes the user may need to connect the mixer to the TV so that the latter acts as an audio source. To do this, you can use the headphone jack or 2 RCA outputs on the TV receiver, and the AUX connector on the mixing console or, if it does not exist, the Line In L and R inputs.
Settings
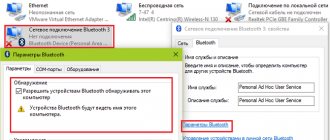
There are situations when a laptop or PC does not detect a microphone when connected. In this case, you will need to perform the following steps:
- on Windows 10: open “Control Panel”, find “Realtek HD Manager”, and for other versions of the OS: “Control Panel” - “Hardware and Sound” - “Realtek HD Manager”;
- open the “Microphone” tab;
- Click “Set default device”.
After these manipulations, the microphone and mixer will work.
Possible problems and ways to solve them
In some cases, the user may encounter that after connecting the mixing console to a laptop or other devices, there is no sound. In such a situation, you need to make sure that the cable with which the connection is established is not damaged, and that the adapters, if used, are working properly.
Advice! You can check the integrity and functionality of a cable with adapters by connecting the wire to another equipment or replacing the adapter and cable.
You also need to make sure that the equipment is connected correctly. There are a lot of connectors on the mixer, so an inexperienced user can easily confuse the inputs and outputs.
The next problem that often appears when connecting various equipment to a mixing console is low sound quality, crackling, noise and other interference. This side effect is explained by the use of low-quality cables and adapters. To resolve the issue, it is necessary to replace them with good products.
Another possible problem is usually related to the drivers for the built-in or external sound card. If they are not installed or updated to the latest version, there may be no sound. To update them, it is recommended to go to the official page of the hardware manufacturer and download them from there.
Important! Downloading software updates from other sites or unverified sources can be dangerous.
So, connecting a mixing console to a computer (portable or stationary), amplifier, sound card or other devices is quite simple if you know the correct procedure and understand which connectors to use. When setting up the connection, you need to use only high-quality adapters and cables, otherwise it will be difficult to get decent sound.
The best laptops according to buyers
MACKIE Mix12FX 12-channel compact mixer with effects processor on Yandex Market
Soundcraft EPM8 mixing console, 8 mono + 2 stereo inputs, GB-30 microphone preamps on Yandex Market
Soundcraft Signature 10 analog 10-channel mixer on Yandex Market
Soundcraft EFX8 mixing console with effects processor on Yandex Market
Numark Mixtrack Pro 3 on Yandex Market
Source: https://hitech-online.ru/audio-video-foto/mikshernyj-pult/kak-podklyuchit.html
:
How to connect unlimited Internet to MTS
How to connect a computer or laptop to a TV.
How to connect a laptop to a TV and end up with a large monitor
Connecting two laptops or a computer via a local network. Or how else to connect via Wi FI system.
How to connect a laptop to a TV
Source: https://mykomputers.ru/noutbuki/96980
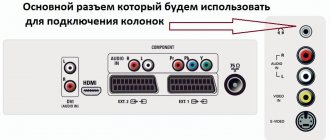
Connecting speakers and amplifier
Connecting the system to the speakers and amplifier, which are most often included in the equipment package, is quite easy, but care and attention are needed in this case as well.
The procedure is as follows.
- On the computer's motherboard, you need to find a line output with a green marking - a place to attach a stereo cable connector, direct the second connector to the IN socket of the mixer.
- Connect “Out” on the remote to “In” on the amplifier.
- Next, add speakers to the system. As a rule, they are connected to the remote control via the “Out R” and “Out L” connectors.
Pay attention to resistance! This indicator should be identical for the speakers and amplifier - a discrepancy will immediately affect the volume and sound quality.
Connecting a sound card
The correct choice of sound card will ensure full use of the functionality of mixing systems, this is especially true when it is necessary to solve professional problems. If the card built into the device has a high degree of audio playback quality, then it is quite reasonable to continue using it in combination with a mixer, but if the quality is not enough, you will need to take care of purchasing an external USB sound card.
Any external sound card has several inputs and outputs for manipulation between the mixer and the computer.
Connecting the mixer to the sound card
You can connect all elements of the system as follows:
- connect the card and the laptop with wires (“mini-jack” to the “out-put” socket on the card);
- download and install drivers for the card;
- Next you need to connect a microphone, headphones and other auxiliary devices through a connection to the mixer;
- We complete the system by combining a mixer and a laptop.
The option for optimally combining all elements of the system in each specific case may be different - it depends both on the tasks assigned and on the specifics of the selected devices.
Entry-level mixing console? Or a mobile karaoke center!
Hello everyone, it's been a while since I wrote a review. I didn’t order anything particularly interesting, and many things here on Muska have been reviewed without me, and more professionally than I can do. Once upon a time, several years ago, a friend asked me to put together a karaoke set for him, and then, unfortunately, such a device as in this review was not on sale, but there were quite expensive, semi-professional mixing consoles, which for such a simple there were too many tasks and it was too expensive - something like $200 just for the mixing console. At that time, I was also inspired by the idea of buying myself a similar mixer, but the big and fat toad turned out to be stronger than my desire. But now the Chinese have nevertheless released a device, taking into account all these wishes and for a very modest amount, namely: 1 - with the ability to connect a pair of microphones 2 - add a reverberation effect to the sound from the microphones 3 - add sound accompaniment to this and all this happiness, costing a little less than $30. What kind of device is this, for those interested, read on. But I’ll make a reservation in advance, for fans of electronic gutters - there will be no disassembly in this review, because this is not 18p. In general, many will again wonder why there is a whole, separate and incomprehensible box, when you bought the cheapest microphone, inserted it into the computer - and then sing? I’ll answer - it’s just an ordinary computer, with a regular built-in sound card, unfortunately it cannot process voice from a microphone, so to speak, on the fly, i.e. in LIVE mode. The sound can be played, but the voice from the microphone cannot. And without applying the effect of echo or reverberation, the voice, frankly speaking, is not very good, although professional singers may be able to sing normally without these embellishments. Let me say briefly - the echo effect hides the falseness in the voice, so for karaoke, in my opinion, this is simply a necessary function. Again, not all sound cards allow you to connect two microphones at once, for example, to sing a duet. And it’s commonplace that a computer may not always be at hand. Well, let's now return to the mixer under review - let's call it that, after all, there are 4 inputs that can be combined into one output in every possible way. I’ll make a reservation that this was the most, no, it’s not the SAAAAAAAAAAAAAAAAAAAAAAAAY delivery of goods from China in the entire history of my orders. The goods took 129 days to reach me. But despite this, the seller tried to the last to prove that everything was OK - the goods were on their way. WAIT. And after 129 days... - Tadam!!! - the goods have arrived. Arriving at the post office, I picked up a fairly large package.
Well, let's unpack it:
Some boring parameters of this device
Yes, the box is clearly dented. But really, what else could I expect when this box visited God knows how many post offices and took more than 4 months to reach me. I wonder if the unit itself is intact???
Yes, fortunately everything is fine with the mixer itself. Let's look at it in more detail. At the end, in the front of the mixer, there is a micro USB connector, through this connector the mixer is powered, or it can be connected to a computer like an external sound card. And next to it there is only one button, which is designed to switch the mixer’s operating mode - either as a separate device, or as an external sound card for a PC.
Well, here's the front view:
At first, such a number of adjustments drives one into a stupor, but I have already encountered even more complex mixers, so this one did not cause any particular difficulties when connecting. Moreover, everything here is intuitive, even without reading the manual, which is also included in the kit
Also included is a fairly modest-sized power supply, but despite its very modest dimensions, it claims as much as 2 amperes, well, at 5 volts, of course.
First switching on: Well, let's make the first switching on. Let's connect the mixer itself to the socket, connect the microphone to the first channel with a jack 6.3 connector. Speaking of inputs, on the first two channels, maybe I’m just behind the times and the Chinese have been making such connectors for a long time, but this performance pleasantly surprised me. The fact is that the connector here is universal - you can connect it like a microphone with an XLR connector, but you can also connect a 6.3 jack plug to this connector without any problems. Usually these connectors were located separately, but here it’s all in one. This mixer also has the ability to connect condenser microphones, i.e. microphones that need external power, the mixer has a separate +48V button for this. Well, let’s connect the acoustics themselves to the headphone output. There is a separate output connector, consisting of two 6.3 Jack connectors, but I didn’t have such a cable on hand, so we’ll connect the speakers to the output intended for headphones. Well, at the same time, I will attach a tape measure in the photo so that you can imagine the real dimensions of this remote control
I don’t know, maybe this is how it should be, maybe this is the result of a very strong amplification of the input signal, but somehow I haven’t noticed this before on other mixers. Next, let's try to play with the adjustments - add high frequencies, then low frequencies
Now let's try to change the sound received from the microphone, add the same echo effect - or reverberation
Well, now let’s connect our phone via Bluetooth. Yes, yes, I forgot to mention, this mixer can also work via Bluetooth, which makes it a completely autonomous device - you don’t need to take anything with you at all. Just a phone, a couple of microphones and speakers. And voila - you have a full-fledged karaoke. Also from this mixer you can flip through the tracks being played, as well as pause.
Well, now all this is together - i.e. music from phone and sound from microphone
Now let's try the mixer as a music player from a flash drive, yes, there is such an opportunity - i.e. In principle, you don’t even need a phone if, say, you’re meeting with friends outdoors. It turns out that you only need acoustics, microphones and... and in principle, nothing else is needed. Well, just find where you can power it all from. This is how the mixer works from flash drives.
By the way, the remote control has an interesting feature. As soon as you insert a flash drive, the remote control will immediately start playing music from this flash drive. And if you take out the flash drive right during playback, and then put it back in place, the mixer will continue to play exactly from the same place at which the flash drive was taken out. But there is one BUT - THIS MIXER ONLY PLAYS MP3 FORMAT!!! I tried to copy music files in the following formats to a flash drive: FLAC, OGG, WAV - but the player built into the mixer saw only MP3. But MP3 of any bitrate - I tried to include up to 320 kbps. Well, in principle, no one promised to play other formats.
Well, let’s connect our mixing console like a sound card, for example, to a laptop running the Windows 7 operating system. When connected, the device was installed without any additional drivers, and was identified in the system as JieLi BR21, and the device is displayed as in the list of devices for playback , and in the list of sound recording devices. In essence, the mixer turns into a quite good external sound card.
Well, let's sum it up. What did I want to get from this purchase? Mobile karaoke station. In principle, this mixing console is apparently intended for this. He is not suitable for the role of a professional mixer, because... There is quite a decent amount of parasitic noise; there are only two input channels for microphones. Those. a little different - the mixer has four inputs, but two inputs can be used separately, and the other two 3rd and 4th - then there is only a choice: you can either connect two more microphones or two sources of monophonic signals, or connect one external stereo device, or these two channels are used to play music from a flash drive or Bluetooth devices. But for karaoke, you don’t need anything else, and the functionality that is in this remote control, in my opinion, will be quite enough for fun drinking sessions or chants.
PS In the comments a question was asked about the possibility of using this mixer on Android devices. I answer - I connected it to my TV box on Android 9 - the set-top box was identified as AUDIO_USB_BR21 and without any problems recorded sounds from the microphone on the TV box. An example of how a mixer works for Android. They also asked about the possibility of recording with this mixer in MP3 format and asked to show an example of the original mp3 and already recorded . To be honest, I didn’t even know it myself, but the mixer really can record sound onto a flash drive in mp3 with a quality of 128 kbit/s, I’ll add examples of the original file and the recorded one. here is the original file and this is already recorded
Setting up sound card drivers
You won't be able to record sound without installing and configuring drivers. Most often, all the necessary software is installed when Windows initially boots, but if the card was replaced subsequently, you will need to download the drivers again.
- There are several major sound card manufacturers, each of which has its own official website. Regarding video, by the way, there is only one resource, which greatly simplifies the search procedure. Let in our case it be a card from one of the most popular companies Realtek.
- To select the correct driver, you need to know the exact name of the installed card. The AIDA64 utility can help with this. You need to download the download file and install the program, then open the aidaexe file. In the window that opens, click “Computer”, then “Summary information”. As a result, the screen displays information about everything that is installed in the laptop - from the name of the motherboard to the brand of the sound card we are interested in.
- We go to the website Realtek.com. It does not have Russian-language support, but if you need it, you can use it to work with the Google Chrome website - the built-in translator will translate everything for you.
- Select “Downloads”, then “High Definition Audio Codecs”, check the box “I accept to the above” and click “Next”. We select the type of operating system, as well as the resource from which we will download (there are several of them).
- Download the driver and run it, strictly following the instructions. Reboot the computer and enjoy the sound.
Connecting a mixer with different equipment
The mixing console can be connected not only to computer equipment, but also to other devices - a music center, smartphone, receiver or TV. This is done for different purposes. For example, to digitize film cassettes, the mixer is connected to a tape recorder, and through the remote control you can output sound to more powerful speakers on the TV if its native ones are too quiet.
To connect the mixing console and a music player or TV, you will need to use a cord with a jack connector on one end and two tulips on the other. If digitization of cassettes is required, then the center uses the output, and the second device, accordingly, uses the input. If the mixer is an intermediary between the TV and the player, then the output is used on the TV, the linear input is used on the remote control, and then from the remote control through the output the cable goes to the input at the center.
Sometimes a mixing console is used to output loud sound from a smartphone or tablet. In this case, you can use an AUX cable if the remote control has a 3.5 output. If not, you will have to take a cord with 3.5 on one end and two tulips on the other. On the remote control you need to insert the plugs into the LineIn L/R connectors.
To connect the mixer to the receiver, you need to use a 2 RCA - 2 Jack cable. Outputs and inputs are selected according to the principle of “who is the source of the signal and who receives it.” Both devices are connected, and after turning on the receiver, the signal source selects the connector to which the mixer is connected.
Possible problems
Sometimes connecting the mixer to other devices does not work. The first thing you should check is the correct connection and functionality of the cords and adapters. The mixer has a huge number of inputs and outputs, so it's worth making sure you're using the right connectors. To check the functionality of the cords, just connect other equipment with these cables and check if there is sound.
The mixer has a lot of connectors
If the connection produces results, but the sound is of very poor quality - quiet or there is noise, crackling, interference and other unpleasant phenomena, then the reason may lie in the low quality of the accessories used for the connection. The obvious solution would be to replace them with better options.
Sometimes the reason for no sound is due to old software on the built-in sound card. In such a situation, the software should be updated through the official website of the equipment manufacturer or computer/laptop. As a rule, they have all the necessary drivers for all models of the company.
Possible problems and ways to solve them
In some cases, the user may encounter that after connecting the mixing console to a laptop or other devices, there is no sound. In such a situation, you need to make sure that the cable with which the connection is established is not damaged, and that the adapters, if used, are working properly.
Advice! You can check the integrity and functionality of a cable with adapters by connecting the wire to another equipment or replacing the adapter and cable.
You also need to make sure that the equipment is connected correctly. There are a lot of connectors on the mixer, so an inexperienced user can easily confuse the inputs and outputs.
The next problem that often appears when connecting various equipment to a mixing console is low sound quality, crackling, noise and other interference. This side effect is explained by the use of low-quality cables and adapters. To resolve the issue, it is necessary to replace them with good products.
Another possible problem is usually related to the drivers for the built-in or external sound card. If they are not installed or updated to the latest version, there may be no sound. To update them, it is recommended to go to the official page of the hardware manufacturer and download them from there.
Important! Downloading software updates from other sites or unverified sources can be dangerous.
So, connecting a mixing console to a computer (portable or stationary), amplifier, sound card or other devices is quite simple if you know the correct procedure and understand which connectors to use. When setting up the connection, you need to use only high-quality adapters and cables, otherwise it will be difficult to get decent sound.